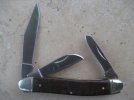
Well I ordered the kit, and it got here today, so I went ahead and threw it together. I didn't keep track but I'd say it took me about ten to fifteen minutes. I didn't polish it, stain or finish the wood, or do any serious precision work, I just assembled the knife to see how it does, how I like it, and how I like the pattern in general. I'm already a fan of the toothpick/laguiole/navaja general shape, so I had a feeling I would like it, but at the same time the feel of this knife in particular is surprisingly good!
It came in a nice little box with all the parts looking pretty close to finished, just put it together and you're done. From the looks of this I would have expected a price of more like $25 and not $9.99! The wood scales look pretty similar and were nice enough to me that I decided to just leave them alone and let age and natural oils/sweat do the job of "finishing" them. It also came with an instruction booklet that didn't tell me anything I didn't already know, but also would be very helpful to someone who didn't know how slipjoints fit together.

Quick shot of the tang and back spring, it almost looks like a backlock. This is what makes it such a solid and sharp lockup; I am impressed with how smooth and strong it is for a knife I just put together myself.

Four inch blade, about four and seven eighths long closed. I just held the pieces together for this and the following picture.

The "filework" on the backspring is more like engraving, but to me it looks good for the price, and I like it.

Note- the covers were held on with tiny brass screws that were screwed in from the liner side, then peened flat to look like pins. Is this normal in slipjoint covers? Also it was very soft brass, as every screw stripped out its head as I tightened it, so don't "screw" up!
I went by the book on the assembly, which meant putting in the center pin (is that the proper term?) and the pivot pin first, then putting in the butt-end pin last in the vice. I forgot to photograph my vice setup, but all I had to do was put a scrap of leather in the jaws, clamp it down, and wiggle the pin in while tapping. It worked pretty well for me, no jig needed. (though I did do a bit of a "jig" afterwards when I found out how easy it was!)

Pins trimmed and peened, covers sanded and somewhat smoothed, its a neat little knife! It really does not feel like a four inch bladed knife at all to me, I would have sworn it was smaller if I hadn't measured it. Even in its unfinished-looking state it is a thin, elegant feeling knife that is very nice. I love it!


Comparison for size next to a RR Coke Bottle.

In summary, these knives are well worth the money just like every other Rough Rider knife out there. I did notice however that there was no brand indication anywhere on the knife or packaging. The tang etch says "MI 159 China." It isn't quite as sharp as most Rough Riders from the factory, as it wouldn't shave arm hair, but I'm willing to bet that it wouldn't take more than a pass or two on a strop to get it there. The blade is almost perfectly centered and there is no rub. It snaps open very solidly and stays open with enough force that I'll never worry about pushing it closed with my thumb on the spine. I had a lot of fun putting this together and the experience makes me like the knife even more. If you've been wanting to try out putting together your own traditional pattern knife just for the fun of it, I highly recommend this kit! :thumbup: :thumbup:
Now I need to get one of those stockman kits...


