San mai forging question

Joined
May 1, 2019
Messages
719
Does anyone know of any good tutorials or discussions on forging san mai where the core is not visible in the spine of the knife?
I know Ilya Alekseyev from That Works did one, but i haven't seen others

I don't like the exposed core on the spine aesthetically, and also making the tang out of softer material seems good. I could probably work it out, but i would like to do some reading first
 
HSC has the answer. Warikomi has four pieces of steel in the san-mai. The high carbon center layer consists of edge piece that goes between half and three-quarters of the core and the spine piece is the same as the cladding. Once forge welded only the edge will show. The other plus is a softer spine that can take blows.
 
Warikomi is also known as the taco method. Take flat steel, make it into a channel, insert the core steel and forge weld it all together. Not very easy! I like Stacey's approach to use 3 pieces of cladding (sides and spine) and the core steel. This will allow you to use less core steel, and control more the thickness of the softer spine area, too.
 
High carbon steel was very valuable and scarce at one time. It took days to weeks to make only a few pounds of it. Raw materials were scarce and often required long journeys to gather them. Add to that the issue that a sword takes a lot of steel.
Warikomi was a way for Japanese swordsmiths to make sword blades with their very expensive tamahagane that had hardened edges and the body less costly softer low carbon steel. This also made a sword that resisted catastrophic failure.

One tip about using warikomi:
When using it, you have to forge a curve into the blade to allow the edge to curve up to the spine when ground. If you grind a blade from a straight billet the hard edge will stop before the tip. I scribe a light mark on the billet where the top of the edge-core is and then forge the curve until I can draw then desired profile and not have any edge issues.

BTW, for those who want to forge a knife from warikomi but don't want to make it from scratch, Dictum sells it at a very reasonable price. IIRC, Workshop Heaven also sells it.
 
You could try to scarf or lap weld the core steel to the softer cladding steel, forge it into a sheet of the desired thickness & then proceed with cladding the sides as usual. This would save you some core steel aswell, as it would only reach about half way up the blade, or even less if you like. When you polish the spine, there should be no seam since its all the same material. Just an idea.
 
Ah, thank you both! I'll do some more reading on that

I'll have to find some time to fiddle around with it, i got some cheap 1080 a while back i can use for cores. Sadly shipping from the US is often unreasonable
 
You can use plain welding steel for the cladding and spine piece.

For those who can't visualize warikomi here is an example of a basic billet:
Two pieces of low carbon steel .125X1.5"X12". (san-mai sides)
One piece of the same low carbon steel .1875"X.50"X12" (spine core)
One piece of high carbon steel .1875"X1.0"X12"(edge core)

Place on one side piece the edge core and spine core. Place the other side piece on top. You now have a warikomi sandwich.
Clamp together tightly assuring the core pieces are tight together. Weld up the ends and every inch or so along the edges. Forge weld the billet solid. Make sure to hammer or press from the sides a bit, too. Once solid, clean it up a bit and forge it out into the knife you want.

Tips on forging warikomi:
Before forging the blade to shape you need to take care of the steel on the point end of the billet. Three ways are:
1) Cut the end that will be the point of the knife at a 45° angle. Forge this point up until it is more-or-less straight with the spine. Grind the spine line straight and proceed with forging out the billet. This is pretty simple to do.

2) Forge the end of the billet up in a curve until the edge core will be properly exposed at the tip. This is best done using the horn/bick. The bar will look like a lower case "j" when it is right. Cut/grind the "j" to make the spine straight and then forge out the billet. This is the method I use. It is fast and simple and doesn't appreciably thin the end of the billet.

3) Forge the tip in first, starting with thinning the edge, deliberately causing a banana curve until the core metal will be fully exposed at the tip when profiled. Grind off the excess banana and continue to forge your knife. (basically, just another way to do suggestion #2)

Note- a frequent quick grind and a dip in FC when working warikomi will help you keep track of the core alignment and how much hard steel is at the tip. If using suminagashi warikomi this is really important.
 
Last edited:
I'm not a maker, but I'm enjoying the discussion. Is this simple diagram helpful?

11398-cladtypes.jpg

It seems like Stacy's method includes two more pieces of soft steel than is shown above (couldn't find a diagram that matched exactly).
 
That is the simplified Z-knives warikomi drawings for explanation purposes and not fully accurate. Ni-mai as shown is usually done with three pieces - one cladding for the omote over two for the edge and spine. The issue if you did warikomi or ni-mai exactly like the drawing is the spine would have a very thin layer of soft steel that you could easily grind right through.

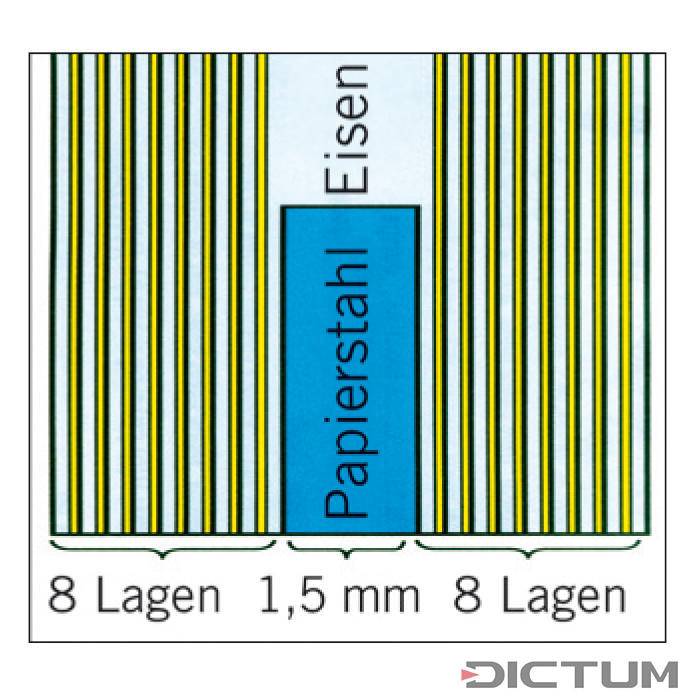
The best method is to use two core pieces on warikomi and ni-mai. The below diagram shows suminagashi warikomi with multiple layers of iron and medium carbon steel on the sides, but the core is what we are talking about. The dark blue is high carbon steel and the light blue is iron. If the sides were single pieces of the same low carbon steel as the top core it would be what I am saying. If you don't read German, the edge steel in this diagram is "paper steel" (high carbon Hitachi white or blue paper steel) and the spine core is iron. The term "iron" is used to refer to low carbon steel by Japanese smiths.
Dictum and others carry this steel very reasonably. I use it often on high end kitchen knives.

719618_01_G_WE_8_Japanischer_Mehrlagenstahl_Schneidkeil_Blauer_Papierstahl_WZ_jpg.jpg
 
2) Forge the end of the billet up in a curve until the edge core will be properly exposed at the tip. This is best done using the horn/bick. The bar will look like a lower case "j" when it is right. Cut/grind the "j" to make the spine straight and then forge out the billet. This is the method I use. It is fast and simple and doesn't appreciably thin the end of the billet.
yeah that makes sense. any problem with the opposite order; cut an angle into the billet then forge the point back to get the point where you want?
 
That was option #1. It works but is more difficult that the simple "j" bend. The issue with forging the tip up is that you may compress the core a bit and it will be shallower than along the rest of the edge. Probably not an issue for an experienced smith but could be problematic for someone with less experience moving steel.
 
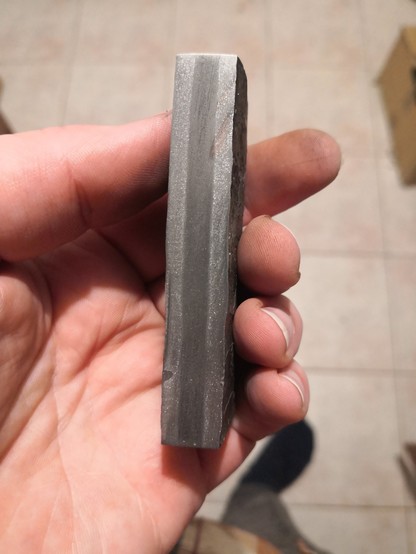
Hopefully this isn't too old, i finally had a go at this the other day. The first attempt with a wrapped cladding failed, but the second one i MIG welded the outsides first and seemed to have some success. I think my problem is I'm not getting it hot enough, which is mostly practice. I would rather learn to do this without a modern welder
I did find the laminate billet didn't move as easily as i would expect. The core was 26c3 which isn't bad to forge so i assume it's due to the overall construction

The tang was part of the laminate and it survived being drawn out to that shape, so the welds aren't terrible
58da6f3fdc5a9b74.jpg
 
Here is how to learn forge welding for things like san-mai and basic damascus:
Take some 1/4" thick mild steel (cheap welding steel from the hardware store) and a bar of 1084 range steel and practice. Cut the carbon steel into 1"X4" and the cladding into 1"X3" pieces. strips. Stack three together and tack weld the corners. The longer core will be the handle for forging.
Make about ten of these starter billets.
Take one billet and heat it to what you think is right. Then weld it up with a hammer.
Grind the edges to see how it welded. Draw it out to about 6" or 7" long. Re-grind the edges.
Take the next billet and do the same with hotter heating. Observe the color as it appears to you when you think it is ready to forge.
Test the billets until you get the color and forging down.
The good thing is the drawn-out billets will all make a good blade if the welds were good.
For damascus practice, make 7-layer stacks. If the billets draw out well, use them for the cladding on 1084 and make suminagashi.


TIPS:
Make sure the billets have fully soaked all the way through before welding.

When you think the billet is ready to weld- heat up a piece of coat-hanger wire, stick it in some flux, and push it against the billet. If the billet is at welding temp the wire will stick.

Use a reasonable size hammer. 2#/1Kg is good for a small billet, 3#/1.5Kg max.

Start with lighter blows and increase force as the billet welds.

If it starts to cool to red, put it back in the forge to re-heat. Hammering a too cool billet will un-weld what you just did.
 
Ah thank you, i'll try that. I did find some 1080-ish i didn't know i had while reorganising things yesterday.
I think my billet was also a bit on the thin side (~7mm) which makes it hard to keep heat in it. Doing it thicker would make it easier to keep it hot
 
Had another go today with the 1080, seems to have worked better
I should actually finish the mono-steel blades i've been working on, so might be a while before i get back to these
e1f15a9b277332c5.jpg
12cbbda28a3d13d7.jpg
 
So, more questions! i'm sure i'll run out eventually :P

How does the nickle foil affect the welding, does it make it easier?
Would using fusion TIG be a good alternative to mig when sealing billets? i find mig a bit uncontrolled and messy, and i want and excuse to buy a tig torch
 
Back
Top