Sanding the plunge line, How to do it.

Joined
Feb 24, 2000
Messages
1,867
I have gotten a lot of good ideas and how to do it tips from this forum, so I thought I would try to give something back to it.
I don't recall reading a explination of how to hand sand the plunge line.
I prefer a satin finished blade over a mirror polish, so here is after 30 plus years of knifmaking how I do it.
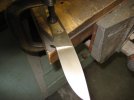
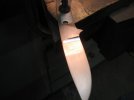
This blade is ATS-34 and has been finished to 320 grit and heat treated by Paul Bos.
Here is what I do when I get the blade back.
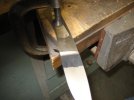
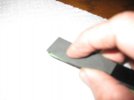
First I put a piece of electritians tape around the blade back of the plunge line. See picture.
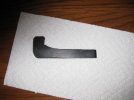
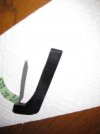
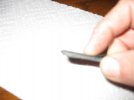
Then I take a 1/8" piece of micarta that I have a chisel grind on one end, wrap a piece of sand paper around the end and with a pushing, rocking motion clean up the plunge line.
The reason I use the electritians tape is to keep from wallowing out the area covered by the electrians tape.
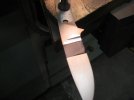
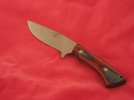
After the plunge line is cleaned up, I remove the tape and use sanding blocks to finish the blade.
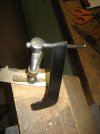
The sanding blocks are made from 2/4" lumber. I use a 10" contact wheel, so I trace the 10" wheel on a 2/4" and cut the shape out. I then cover the 2x4 with a piece of leather.
I use a paper cutter to cut sandpaper strips to fit the sanding block.
I know most use some type of fluid when they hand sand, but I don't. I like to see what I am sanding and for me the liquid gets in the way.
 

Attachments

  • 009.jpg
    009.jpg
    45.6 KB · Views: 334
  • 010.jpg
    010.jpg
    49.5 KB · Views: 339
  • 011.jpg
    011.jpg
    31.8 KB · Views: 330
  • 013.jpg
    013.jpg
    28.7 KB · Views: 332
  • 014.jpg
    014.jpg
    24.5 KB · Views: 329
This is a picture of a finished knife.
 

Attachments

  • Knives 2-12-11 008.jpg
    Knives 2-12-11 008.jpg
    31.7 KB · Views: 166
Thank you for sharing your technique. I'm working on my first knife and having a dandy of a time getting my plung lines cleaned up. I'll be following your steps.
Cheers, John
 
I use a similar method with a sanding block but ill let the sand paper over hang about an 1/8 of an inch off the front of the block that way when you stroke to the plunge the sand paper hits the in the plunge line every time when you push into it lift the back end of you block so that the front is digging harder when you get close to the plunge. That the way I do it but Im starting another folder in the morning when I hand sand it ill try your method Mr Lewis. Thanks for the advice
 
Glad to be of help. If you have any questions after trying this method I'll be glad to try to help.
 
I took a 1/8" thick piece of micarta. I Cut it in a 1" strip and left some extra at one end for a sort of handle. Then I shaped the front end in a chisel type grind. The sandpaper is wrapped around the micarta and using a rocking, pushing motion the plunge area is cleaned up. Once that is done, I remove the tape and finish the rest of the blade with a large sanding block.
If it would help, I can take more pictures of the micarta sanding block. Let me know if you would like to see them.
 
I hope these pictures help. It's really nothing fancy. The dimensions are 1/8" thick, 4 3/4" long and 3/4 to 1" wide.
 

Attachments

  • 001.jpg
    001.jpg
    45.8 KB · Views: 119
  • 004.jpg
    004.jpg
    20.3 KB · Views: 111
  • 005.jpg
    005.jpg
    19.5 KB · Views: 118
  • 006.jpg
    006.jpg
    22.1 KB · Views: 114
Thanks for sharing, Tom. Those pics answers a lot of my questions around your technique.
 
Hey Tom how does the edge of the micarta hold up? I have something similar but I squared off the tip on the chisel grind so it doens't come to a point but rather a very small flat spot because I wasn't sure how well a sharp edge would hold up.
 
The edge has held up very well. I have used it on hundreds of knives and it shows very little wear. I would recomend trying different types of chisel grinds some sharp, some with a small flat edge and see which works best for you.
 
Tom, I'll share a tip with you that sped up my sanding. If you're already doing this for the majority of your sanding or are happy with how you've been doing it, then you can disregard, but it might help some others who are starting out.

One thing that will slow down sanding or give inconsistent results is flex in the blade you're sanding. If you're putting a given amount of force into the blade, and part of that force is resulting in the blade flexing, then that is force that is not being put to use in actually sanding the blade. So it really helps to have the blade fully supported. Nick showed something he uses in his sanding, and here is a picture of the little 5-minute jig I threw together several years back:

IMG_6491.jpg


It's just a piece of low carbon steel that has been covered with a little leather to support the blade toward the end of the tip. Now, in order to actually get the blade supported through its distal taper, here's what I did:

IMG_6484.jpg


You can see in the next picture, that the blade tapers away from the support:

IMG_6487.jpg


So, I advance the set screws up, pushing into the leather, until they make contact with the blade:

IMG_6488.jpg


That gives full support through the length of the blade and provides a very solid sanding setup so that all your energy going into sanding the blade. I usually cover the leather with a fresh strip of painters tape so as to avoid marring the blade too bad when sanding one side, then I apply painters tape to the finished side of the blade before flipping it over and sanding the second side.

For sanding, I use a piece of angle with paper wrapped around it to provide a bit of ergonomics for sanding. I use one with and one without leather depending on what I'm doing, and I also use a piece of micarta to work into the plunge similarly to how you described. I do start with a cutting fluid (I use honing oil to keep the grit in play) when sanding at lower grits (I start around 400 usually), but as I approach my desired final grit, I switch to dry sanding only.

--nathan
 
Last edited:
Back
Top