Saw cut bone

Sean Yaw

Gold Member
Joined
Feb 26, 2019
Messages
416
Does anyone have any techniques for making saw cut bone like in the photo below? One would imagine that a saw may be a good starting place, but I'd still appreciate any tips. I have some undyed smooth bone from Culpeppers I was going to use for this effort.
cfe587fc8d0653eed8c0f0a1d276c942.jpeg
 
I would crazy glue to board.
Skim cut, just barely on table saw.

*Haven't done it, but that's how I'd do it.

I'll be watching closely, as I want to find/use some bone on knives soon
 
I'd do it by hand. Mound pieces of hacksawblade together in a handle with spacers between them and cut with that
 
Checkering file will do it best.

A circular saw or disc sander will make curved lines, not parallel straight lines. They won't be at the right angle, either.
 
Checkering file will do it best.

A circular saw or disc sander will make curved lines, not parallel straight lines. They won't be at the right angle, either.
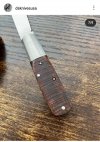
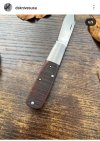
Stacy are you saying the technique I shared is wrong? It seems like maybe you are but I could be wrong. I'm all eyes and ears to see an example of your technique. I love to learn new tricks and would add that there generally is no wrong way. Only different ways. That said, I'll share an example of my recommended technique which was passed on to me from someone well respected in the slip joint crowd. Knife was made by Don Southard, I shared the disk technique with him. Looks like it worked out pretty good to me.

Screenshot_20230424_141918_Instagram.jpg

Screenshot_20230424_141925_Instagram.jpg
 
I've never done saw cut bone myself, so I have no input on the right way to do it. But I do have an observation on the resulting goal: every knife I own with sawcut bone has the lines in a gentle curve. When I look at the GECs pictured in the first post, the lines appear to curve slightly, when I look at the Don Southard knife that Jason posted, it appears to curve. I even checked some Delrin handles with fake sawcut, and the lines curve. So I don't know the right way to get to this effect, and while I think doing these as completely parallel with a checkering file might look fine to most people, I also think it would probably look a little odd to anyone familiar with traditionally-made knives.
 
I think it's a matter of taste and that "saw cut bone" is usually a look achieved by some means other than cutting the bone with a saw. Bone saws are a lot like a hacksaw and wouldn't leave parallel lines of even depth like in the OP. A low grit disc will create slightly curved scratches, and one can orient the scale as desired. They won't tend to be as uniform as the OP. I think you just try various things until you get a look you like. My guess is that 30-40 lpi checkering file would look a lot the the OP if that's what you're going for.
 
Stacy are you saying the technique I shared is wrong? It seems like maybe you are but I could be wrong. I'm all eyes and ears to see an example of your technique. I love to learn new tricks and would add that there generally is no wrong way. Only different ways. That said, I'll share an example of my recommended technique which was passed on to me from someone well respected in the slip joint crowd. Knife was made by Don Southard, I shared the disk technique with him. Looks like it worked out pretty good to me.

View attachment 2163717

View attachment 2163718
There is no wrong or right way. Your bone looks nothing like what the OP posted, though.
 
There is no wrong or right way. Your bone looks nothing like what the OP posted, though.
Agreed, I actually mentioned the point of no wrong way in my last post and again not my bone just an example of the method I mentioned and obviously a maker can craftly position the lines at different angles for the end result. I genuinely would like to see an example of sawcut bone that has been done with a checkering file. Surely if someone is recommending it they would have an example to illustrate the technique.
 
The original vintage sawcut bone was cut on a table saw type setup with a fairly small diameter blade (old school blades, not the modern chisel point variety). Variations in the sharpened edges are what gave you that nice uneven grooved appearance. I think (not positive) that the GEC bone is done on an indexable milling setup, similar to what the shops use to cut the nail file grooves in their blades.

Eric
i believe you are correct .. when you cut something with a circular blade you get marks like those in the first picture..
i have cut lots of wood ,micarta , ivory, horn and other materials from larger stock ..
and most of the time i have to sand these types of lines out of the materials to get a clean/smooth finish..
yes a bandsaw does put up/down lines into it.. a circular blade, semi round marks.. as the blade cuts/rubs while cutting the material..
 
It goes without saying perhaps but the larger diameter the saw blade / disk / what have you the less curvature of the sawcut marks.
 
Just to add to the info:

A 10" table saw has an edge speed of around 150,000 inches per minute, or 2,500 inches per second.
The marks on a saw blade cut are left by a wide or bent tooth. They are spaced by the speed of the wood moving past the blade. Slow down and it becomes almost smooth. Vary the speed of the work and you get variable spacing. It would be rather hard to get repeatable and even line spacing on bone slabs by hand cutting on a circular saw or bandsaw.

Factories have specific tooling for these tasks. It can be a special grinding wheel like what is used to cut serrated edges, a multi-blade saw block that cuts parallel lines, or a CNC jig on a milling machine that cuts the lines over and over again. In the modern world, it can be a laser.

Looking at the enlarged photos, it appears a moving wheel with a cutter of some sort made the cuts (similar to a milling surface planer). A fixed reasonable diameter and a carbide cutter with the scales or finished knife mounted on a sled that moves at a fixed speed would cut the lines with a slight curve and in seconds.
 
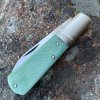
I tried 36 grit paper on a 12" disc, band saw, and checkering file. I really liked the look of the 12" disc, but wanted deeper marks. It also looked better on darker bone than lighter stuff. In the end, I went with the checkering file and the result was good enough. I don't think it will be the only way I try it in the future, but good enough for me for a first shot.
0CFB902E-C6BC-4172-96C9-314F41B59679_1_105_c.jpeg
 
Last edited:
I tried 36 grit paper on a 12" disc, band saw, and checkering file. I really liked the look of the 12" disc, but wanted deeper marks. It also looked better on darker bone than lighter stuff. In the end, I went with the checkering file and the result was good enough. I don't think it will be the only way I try it in the future, but good enough for me for a first shot.
View attachment 2171754
Beautiful knife.
 
Back
Top