Sharpening A Kitchen Knife, Beginner-Style

Joined
Dec 6, 2020
Messages
1,092
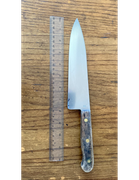
Thought I would get back to a little sharpening today. Next up for me was this un-branded kitchen knife. I bought it many years ago in a super market, and it surely has been abused and neglected. The blade is just under 8-in. long and is only marked "U.S.A." on one side. It has a full-tang with a very mild saber grind on the bottom third of the blade. I don't know if it is a stainless steel or not. It started the day with a roll and two small chips in the edge. I worked it on a DMT Course plate and then a DMT Extra Fine plate. Now, it will cut paper. It's an amateur sharpening job, but it's a start.


In a short while, I'm going to chop some raw green beans with it. Do you think the edge should be polished further for chopping? Maybe strop it on black, and then green, compound?

Thanks for looking. :)
 
Green beans are kinda like tomatoes when cutting or slicing them. The skin is pretty cut-resistant, as with other things like cucumbers or pickles. So, the keenness of the apex is primarily important to start the cut through the skin. And the geometry behind the edge is at least secondarily so, because thin steel behind the apex lends itself more easily to a keener apex. In a nutshell, a very clean & fully apexed edge with some thin geometry behind it will solve a lot of issues in the kitchen. Every kitchen knife I've ever sharpened ALWAYS got better after I'd thinned out the geometry behind the edge, even on the cheapest of the cheap knives. Once you do that, it's easier to get the apex hair-popping and slicing effortlessly.

The actual finish of the edge, whether it's polished or somewhat toothy, isn't necessarily as important and becomes almost moot with very acute, thin edges (like < 25° inclusive and lower). BUT, with tough-skinned fruits & veggies, it's probably easier to go with a little more toothy bite. Taking polishing too far, especially on strops, carries more risk for rounding off the apex, which is counter-productive with tough skins on fruits & veggies.

How do I "thin out the geometry behind the edge"?

Speak slowly. I'm a beginner. :)
 
Speak slowly. I'm a beginner.
Do not take this the wrong way, but thinning blades comes with experience, not something a beginner should even be thinking of. Just keep practicing, take your time and read as much information as your mind can bear. Trust me, you will get better but just start slowly and learn as you go.
 
How do I "thin out the geometry behind the edge"?

Speak slowly. I'm a beginner. :)
Just lay the blade lower to the stone - the objective being to sharpen at a lower angle, i.e., a thinner geometry, to narrow the shoulders of the existing edge bevels - it literally thins the steel behind the edge. This is something that can be done gradually over a few sharpening sessions, just by going a little bit lower in angle each time.
 
Just lay the blade lower to the stone - the objective being to sharpen at a lower angle, i.e., a thinner geometry, to narrow the shoulders of the existing edge bevels - it literally thins the steel behind the edge. This is something that can be done gradually over a few sharpening sessions, just by going a little bit lower in angle each time.

That's normally what I would do because I hate taking more steel off of a knife than I have to. But for a kitchen knife like the OP's, I would go ahead and take it down like I want it and not worry about it.
 
Obsessed with Edges Obsessed with Edges cudgee cudgee 000Robert 000Robert : I will think on what you have said and proceed with consideration. There is something about this knife that tells me it was never intended to have a lot of nuance. It's really just an unadorned slab of edged metal with some wood handles. To say that it has any "geometry" at all would be a kind of flattery. For contrast, the Zwilling Henckels knife that I sharpened earlier has much more finesse. Nevertheless, you have added to my knowledge and given me more to think about.

Of course, another alternative would be to forget about vegetables and learn to eat paper because this thing can really slice through copy paper. :)
 
Hit up thrift shops. Most sell kitchen knives for like a buck or two. Buy a few use then as practice knives and sharpen them up. Dull them on a brick or concrete. Resharpen. If you really screw something up it was only a buck or two.

O and stick to the basics. Also if it’s sharp it’s sharp. My Grandfather used a basic old two sided oil stone and a leather strop for years and his knives would always be sharp.
 
R Ryansknives : Agreed. When I get done practicing on the crappy knives in my kitchen drawers, I intend to hit the thrift shops and the Goodwill.

Obsessed with Edges Obsessed with Edges : Following up on what you said above, you've made me appreciate how knives work and which knives are for which jobs. I haven't got the skill yet to thin out the geometry on this knife, and, as I was trying to say above, it might be better to start with a more correct knife for the job rather than try to turn this one into something that it is not. Hope that makes sense.
:thumbsup: :thumbsup: :thumbsup:
 
R Ryansknives : Agreed. When I get done practicing on the crappy knives in my kitchen drawers, I intend to hit the thrift shops and the Goodwill.

Obsessed with Edges Obsessed with Edges : Following up on what you said above, you've made me appreciate how knives work and which knives are for which jobs. I haven't got the skill yet to thin out the geometry on this knife, and, as I was trying to say above, it might be better to start with a more correct knife for the job rather than try to turn this one into something that it is not. Hope that makes sense.
Those inexpensive knives are the ones with which to do all the experimenting you can dream up. Not much to lose in modifying it. I tend to look at them as a project badly in need of better execution, no matter what the original design intent might've been, from the manufacturer. So, even if you're not feeling ready for it yet, stash it away for another day, when the itch strikes you to tackle it.
 
Still messing around with this knife. Sharpening and resharpening, using ceramic hones, stropping. I'm not getting anywhere. Very frustrating.

What's the secret?
 
Still messing around with this knife. Sharpening and resharpening, using ceramic hones, stropping. I'm not getting anywhere. Very frustrating.

What's the secret?
The secret is maintaining the angle along the entire length of the blade...sharpening until you get to the edge, (and form a burr or stop at the exact apex), do the same thing on the other side...remove the burr, (if one was created), and then go about your business.

To accomplish that you can do it freehand, or with the aid of a device, but regardless, you'll have to have the patience to learn the skill required.

If I were you, since you say you're getting nowhere, I'd sharpen with a coarse stone or plate or hone, (choose your term), and work one side until I know for a fact I have raised a small burr on the other side. Flip it over, do the same until the burr moves back to the first side you were sharpening. (Do not bother with fine hones at this time. A coarse bevel and edge will be just fine.)

Very lightly remove the burr with strokes at the same or slightly higher angle than you sharpened at.

If you have a Sharpmaker, this would be a good time to put the brown rods in it to get a small micro-bevel evenly on both sides. (Assuming that the Sharpmaker setting is equal or greater than the angle you sharpened at. If not, it will not hit the edge.)

Leave off the stropping until you get the fundamentals down with your stones / hones / plates. You may do more damage than good.
 
Blues Blues : Good advice. Thanks.

I don't want to be the workman who blames his tools (unless you'll let me :D ), but these 2 x 6 diamond plates are not making my life easy. And the Spyderco Double Stuff is even harder to use. But maybe it's better this way. Maybe if I can learn to work successfully with these tools, I'll be better off in the long run.

One thing I have noticed: Everything gets worse when I go from Course to Fine. For example, it seems like I'm getting a good edge on the medium (brown) side of the Double Stuff, then I ruin it trying to hone on the white (fine) side. But even that is over-stating the case since the knife just isn't sharp.
 
you'll have to have the patience to learn the skill required.

I'd sharpen with a coarse stone

(Do not bother with fine hones at this time. A coarse bevel and edge will be just fine.)

Leave off the stropping until you get the fundamentals down with your stones

but these 2 x 6 diamond plates are not making my life easy.

Everything gets worse when I go from Course to Fine.
All fantastic advise, and your input is going to help you in the long run, you realize something is not working and that is half the battle. When learning and starting out, diamond sharpening mediums can be a nightmare. Get your self a cheap aluminium oxide 2 side sharpening stone, get a course grit and not so course grit, say about a 240 and 600 roughly. Get to know how to use these to begin with, watch what is happening, but listen, let the stone do the job it is intended for and listen to it working. Once you can form and remove burrs and apex your bevel, then think about moving to higher end stuff. But until you master getting an apex on your bevel, you will just be treading water. Patience, Patience Patience my friend, it will come to you, just takes time, but it will happen.
 
O and stick to the basics. Also if it’s sharp it’s sharp. My Grandfather used a basic old two sided oil stone and a leather strop for years and his knives would always be sharp.
👌. Sometimes we can just over complicate things, and make something so simple so complicated. E.G., your Grandfather and an oil stone and leather strop, and he would have have enjoyed himself so much sitting down to touch up his knife.:):thumbsup:.
 
One thing I have noticed: Everything gets worse when I go from Course to Fine. For example, it seems like I'm getting a good edge on the medium (brown) side of the Double Stuff, then I ruin it trying to hone on the white (fine) side. But even that is over-stating the case since the knife just isn't sharp.
Do you have a power LED flashlight? The experienced person can tell just by looking at the edge from different angles with a flashlight WHY\WHERE the edge isn't sharp and what needs to be done.

Leaving the brown stone, you probably managed (luckily) to shear off the macro burr. A blade can come off screaming sharp off the brown stones, with practice.

Happens to me too, grinding on the white stones produces a fresh macro or micro burr (order of magnitude size difference), which can be more stubborn. Books have been written on the differences of burr types. If it's micro burr, then that's where the skillful part of the entire sharpening process starts, the craft.

I learned with portable LED microscope, with flashlights, with sun rays. If everyone could see in realtime the edge manipulation (like cutting a circle out of a sheet of paper with a pair of scissors - kids can do it right away, because they can see in realtime what the scissors are doing, so they get better at it with more efforts and practice because ... they can see!), everyone would know what to do next (correction of the edge manipulation) in the sharpening process.

At the very end, very last step, they'd see the micro burr and know "oh there's some apex spots with micro burr bits on top riding - this must be removed next!". At that point, seeing and knowing isn't enough. Doing it , i.e. removing just the micro burr (without rounding off the apex or creating fresh burr), becomes the ultimate challenge.

i dunno. maybe a kitchen chef knife is NOT the optimal knife size for practicing because it has such a long edge (="more work"). i used to struggle with chef knives.

Successful sharpening is all about seeing (50%), understanding (50%), and micro deburring skill (50%).

good maths kreisl!
yeah :thumbsup::cool:
 
Last edited:
Back
Top