• The BladeForums.com 2024 Traditional Knife is ready to order! See this thread for details: https://www.bladeforums.com/threads/bladeforums-2024-traditional-knife.2003187/
    Price is $300 $250 ea (shipped within CONUS). If you live outside the US, I will contact you after your order for extra shipping charges.
    Order here: https://www.bladeforums.com/help/2024-traditional/ - Order as many as you like, we have plenty.

  • Today marks the 24th anniversary of 9/11. I pray that this nation does not forget the loss of lives from this horrible event. Yesterday conservative commentator Charlie Kirk was murdered, and I worry about what is to come. Please love one another and your family in these trying times - Spark

Sharpening Blades for Shearing Operations

Joined
Jan 27, 2013
Messages
2,078
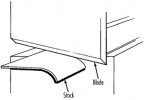
Are there special considerations for sharpening blades for shearing operations instead of standard cutting operations? I'm specifically looking at shearing 80-90 sheets of paper at the same time. Here is an image of the style of shearing operation I'm referring to:

MAC80F10.jpg


Does anyone have insight and/or experience with this?
 

Attachments

  • MAC80F10.jpg
    MAC80F10.jpg
    8.3 KB · Views: 16
A clean polished edge would be a good starting point. I would probably do a 220 belt followed by some green compound on a power strop.

To deburr the back flat I would use the power strop with care or a very fine and flat stone. Lay the stone flat on the steel and gently move down the blade to buff away the burr, using caution to not lift the stone and create any bevels.
 
I've never sharpened a machine blade like that, but I've done a number of inexpensive shears and scissors. The basic ideas of sharpening are all there: Sharpen the front side until you form a burr. Cleanly remove the burr from the back side. The blade in your diagram appears to be like a scissor blade, in that it is totally flat on the back and angled on the front. You want to do very little work on the back side and all of your grinding on the back should be flat against it. If you form any secondary edge on the back side, the shearing action will get jammed up because there will be a gap where the material will hang. So no angle at all on the back side.

But the back *does* need to be clean, burr free, and nick free. Depending on condition, you may find that there are significant dings, rolls, and other deformations on the back side. You need to remove these as part of sharpening.

I'm guessing that on a paper cutter you're not going to find much edge damage: Probably just some overall bluntness that you can fix with very little grinding.

Good luck!

Brian.
 
A clean polished edge would be a good starting point.

That's kind of what I was thinking too. Thanks for the suggestions!

I'm guessing that on a paper cutter you're not going to find much edge damage: Probably just some overall bluntness that you can fix with very little grinding.

You'd be surprised at some of the chipping I see :eek: Thanks for the help!
 
The big ones on our paper cutters at work are polished up to a bright finish with a bit of haze, maybe a 4k JWS or so. Most have a pronounced microbevel but the exact angle I don't have - I'd follow the existing if possible. I suspect they are in the upper 20s inclusive and crazy sharp. Those blades take a lot of abuse, and that with a clamp holding the stack, the shear cutter is liable to have even more forces applied to it and some sliding (creep) of the stock as it cuts. Then our larger cutters are chopping 6-8" stacks of material in a whack, so maybe not many similarities between the two.

The blade on our laminator guillotine that works much like your diagram is nearly 90* and finished to about a 600 grit finish. A clean edge on the bed/back knife is just as important as the blade itself. I've hand sharpened that one several times with good results.

A slightly rougher finish might do two things, prevent the stock from moving away from the cutter as it shears, and by being a slight bit less acute it builds up more pressure prior to initiating the cut, creating more of a burst effect than a gradual shearing through the layers.

This is a real science - I recall my father in law describing a situation where an automated book trimmer was pushing out the stock as it cut, leading to slight variation in finished size. The solution was to use a high polish to a submicron edge, then mill off the very edge into a flat about a half a mil across, maybe a touch less. This allowed the pressure buildup and results in a burst through the entire stack with a lot more accuracy as the rest of the stock serves as a clamp for what's beneath - too sharp and you loose this effect. Another side effect, a cut produced in this manner tends to release less fine dust and contaminants from the cut edge, though might appear slightly rougher than a finer cut. Probably not an issue with your application.

I wouldn't overthink it to start, just give it a nice edge at medium fine and see how it does.
 
This is a real science - I recall my father in law describing a situation where an automated book trimmer was pushing out the stock as it cut, leading to slight variation in finished size. The solution was to use a high polish to a submicron edge, then mill off the very edge into a flat about a half a mil across, maybe a touch less. This allowed the pressure buildup and results in a burst through the entire stack with a lot more accuracy as the rest of the stock serves as a clamp for what's beneath - too sharp and you loose this effect. Another side effect, a cut produced in this manner tends to release less fine dust and contaminants from the cut edge, though might appear slightly rougher than a finer cut. Probably not an issue with your application.

That's really interesting stuff!

Being that you are in the printing business *and* we are talking about cutting tools, when you say "a half mil" you must mean 1/2 of 1/1000th of an inch, or 0.0005 inches. I'm only asking because I had a rather large misunderstanding with a customer a while back who was asking for 1 or 2 mil thick stock of a product we sell, and I *assumed* anyone saying mil regarding thickness must mean mils, or thousandths of an inch. I even asked him. But he didn't mean that. He meant millimeters. I talked to a friend later who told me it's super super common in the car industry to refer to millimeters as mils. I had never heard that before.

Keep up the stories Martin. They really are interesting. :)

Brian.
 
The big ones on our paper cutters at work are polished up to a bright finish with a bit of haze, maybe a 4k JWS or so. Most have a pronounced microbevel but the exact angle I don't have - I'd follow the existing if possible. I suspect they are in the upper 20s inclusive and crazy sharp. Those blades take a lot of abuse, and that with a clamp holding the stack, the shear cutter is liable to have even more forces applied to it and some sliding (creep) of the stock as it cuts. Then our larger cutters are chopping 6-8" stacks of material in a whack, so maybe not many similarities between the two.

We have a dedicated cutter that performs quite well, very similar to this:

POLAR-N137ATHD-side-300dpi-15cm.jpg


It uses a 24 degree blade and can cut 6-8" stacks like you mention without any issues. However, this cuts against a soft "cut stick" instead of shearing against a bed knife.

The blade on our laminator guillotine that works much like your diagram is nearly 90* and finished to about a 600 grit finish. A clean edge on the bed/back knife is just as important as the blade itself. I've hand sharpened that one several times with good results.

I have been focusing a lot on the bed knives recently, and I'm glad to hear your suggestions. I have found several burrs on newly sharpened bed knives, and I suspect our sharpeners are not paying as close attention as necessary to these.

A slightly rougher finish might do two things, prevent the stock from moving away from the cutter as it shears, and by being a slight bit less acute it builds up more pressure prior to initiating the cut, creating more of a burst effect than a gradual shearing through the layers.

This is a real science - I recall my father in law describing a situation where an automated book trimmer was pushing out the stock as it cut, leading to slight variation in finished size. The solution was to use a high polish to a submicron edge, then mill off the very edge into a flat about a half a mil across, maybe a touch less. This allowed the pressure buildup and results in a burst through the entire stack with a lot more accuracy as the rest of the stock serves as a clamp for what's beneath - too sharp and you loose this effect. Another side effect, a cut produced in this manner tends to release less fine dust and contaminants from the cut edge, though might appear slightly rougher than a finer cut. Probably not an issue with your application.

I wouldn't overthink it to start, just give it a nice edge at medium fine and see how it does.

This is really quite interesting, we have actually had some problems related to bursting in some of our book trimming applications. I know it's not solely the top "cutting" knives, as they are also sharpened to 24 degrees. I could take a book and cut it on our large cutter and not have any bursting issues, so I figured the issue is related to the shearing interaction. Unfortunately, none of this is as simple as it seems at first glimpse :p

Thanks for the insight Martin.
 
That's really interesting stuff!

Being that you are in the printing business *and* we are talking about cutting tools, when you say "a half mil" you must mean 1/2 of 1/1000th of an inch, or 0.0005 inches. I'm only asking because I had a rather large misunderstanding with a customer a while back who was asking for 1 or 2 mil thick stock of a product we sell, and I *assumed* anyone saying mil regarding thickness must mean mils, or thousandths of an inch. I even asked him. But he didn't mean that. He meant millimeters. I talked to a friend later who told me it's super super common in the car industry to refer to millimeters as mils. I had never heard that before.

Keep up the stories Martin. They really are interesting. :)

Brian.

In this case I'm taking 1/1000 of an inch. Even in my business there can be some confusion, but anytime someone means millimeters, they should say it out - mils are mils, and not mm. When I started in printing it was all pound weight, now its grams per square meter (GSM) and pounds, and points (pt) which is just another way of saying thousandths - 12pt = .012.

I hate to admit it, but I'm ready for the metric system! I do a bit of woodwork around the house, medicine cabinets, jelly cabinets, stuff like that. My precision for fitting parts right off the saw noticeably improved when I started using cm and mm instead of imperial fractions. Sort of like a dial clock and a digital one - is it around quarter-after, or is it really 2:17:38?
 
Unfortunately, none of this is as simple as it seems at first glimpse :p

Thanks for the insight Martin.
That looks like one of our paper cutters. You should check out the steel the blades are made from - some of the newer ones are real interesting sandwiches of different steel types.

One of the things that really turned me into an "edge" nut was when I got assigned to the task of reconditioning helical cutters on our old equipment. These sheeted a moving web without any delay in travel, so the cutter made a straight cut across a moving web in motion. I was able to get them so sharp they would cut cover stock with momentum to spare when flicked by hand using diamond lapping pastes up to .5 micron. Far sharper than how the new ones came from the factory.

They still choked at press speed. We even had the assembly diamond coated using vapor deposition and then lapped against each other - frightful sharp, I didn't even like to touch it and that with an inclusive of nearly 90*. It still choked at press speed. Put in a new one from the OEM that felt almost dull out of the box, and it would chug away.

If it were me I'd try to match the original angle and just clean it up to a reasonable finish and see how it works. Its real helpful if you're also the guy that changes or services them, so you can get a look at new OEM stuff as it comes in - although like most print shops the owner(s) have a micro heart-attack at any mention of putting money back into the equipment!

We have three different types of blades, the cheapest are D2, middle ground have HSS inserts, and high end have tungsten carbide inserts. Factory settings are 24 degrees and it looks like 400-600 grit finish. We currently have them sharpened to match factory angle and sometimes finish with a 25-26 degree micro bevel. Your story about the sheeting blade is very interesting, did you get the chance to examine those edges under a scope? I've seen similar phenomena, where "dull" blades cut like a dream and "sharp" blades struggle. It seems there are different optimal blades based on paper weight, fiber content, humidity, page count, and even grain direction. I'm lucky that our company is willing to put a lot of resources behind projects, so I have had the pleasure of examining many OEM and resharpened blades. I haven't seen a direct correlation in cut quality vs. original or resharpened edges, but we definitely have improved longevity out of the OEM edges. Seems like I have a lot to mull over :)
 
I was able to look at the helical blades only with a 30x loupe, this was before the high-power microscope. I even approached my father in law about this, and the boss was ready to hire him to help.

When I spoke with him, he said the function of that sort of cutter is extremely complicated compared to other methods, dependent on speed and output requirements. It cannot be sharpened correctly by backlapping. He had no interest in tackling it...

A big part of that, the equipment needed to properly grind it also very specialized - the machine shop we use for our custom work wouldn't touch it, had no idea how to match the profile when shown a new OEM unit. The newer machines of the same line now use a paper loop and rotary shear - like a spring-loaded pizza cutter moving across a backing blade and they momentarily halt the web as it cuts. Individual blades have gotten upwards of 9 million linear feet of cut (Web is 20" wide), through stock as heavy as 17 pt - a tremendous upgrade.

I agree, OEM always seems to last that bit longer...
 
Surface finish/texture on these is definitely critical. They need to be sharp enough to shear the material cleanly but "grippy" enough to keep it from sliding as the cut is made. Hair cutting shears also are picky like this. Too fine an edge and the hair just pushes right out instead of cutting. Metal cutting shears are even more interesting - often they have a very narrow neutral edge that isn't tilted to either a postive nor a negative angle, then a positive rake behind that - similar to the description ascribed to Heavy's father-in-law in Heavy's post above. Many other types of blades have a similar feature - from wood chippers to lawn mower blades, etc. It seems especially beneficial in high speed cutting. This increases the cutting force a bit but pays major dividends in cutting edge longevity.
 
Surface finish/texture on these is definitely critical. They need to be sharp enough to shear the material cleanly but "grippy" enough to keep it from sliding as the cut is made. Hair cutting shears also are picky like this. Too fine an edge and the hair just pushes right out instead of cutting. Metal cutting shears are even more interesting - often they have a very narrow neutral edge that isn't tilted to either a postive nor a negative angle, then a positive rake behind that - similar to the description ascribed to Heavy's father-in-law in Heavy's post above. Many other types of blades have a similar feature - from wood chippers to lawn mower blades, etc. It seems especially beneficial in high speed cutting. This increases the cutting force a bit but pays major dividends in cutting edge longevity.

I'm really interested in exploring that type of edge, it sounds very interesting. I'm not sure if I have to worry about keeping the edge "grippy" as a clamp holds the paper in place during the cutting operation. Does that make a difference?
 
Guess I was thinking of a little different paper cutter, that's one serious machine :)
 
Guess I was thinking of a little different paper cutter, that's one serious machine :)

It's an absolute monster! That's actually the slower manual one though, the shearing operation trims up to 14,000 books an hour. That's why I'm interested in improving cut quality or blade longevity...little improvements add up very quick :D
 
@HeavyHanded & bgentry

For what it's worth comparatively, I come from an industry where for the 30+ years "mils" were millimeters or more specifically fractions of. 0.45-mil, 0.48-mil, 0.60-mils, 0.80-mil examples of standard nominal thicknesses of single-ply and multiply membranes used in commercial construction for waterproofing, and much thinner for vapor barriers and/or liquid applied products.

Regards :-)
 
Back
Top