-
The BladeForums.com 2024 Traditional Knife is available! Price is $250 ea (shipped within CONUS).
Order here: https://www.bladeforums.com/help/2024-traditional/
You are using an out of date browser. It may not display this or other websites correctly.
You should upgrade or use an alternative browser.
You should upgrade or use an alternative browser.
Sharpening Choil on 110/112?
- Thread starter Lenny
- Start date
- Joined
- Jul 3, 2019
- Messages
- 14,799
I've put one on a few knives.
I use a DMT coarse diafold serrated knife sharpener.
Go slow at first, and use the small end.
I use a DMT coarse diafold serrated knife sharpener.
Go slow at first, and use the small end.
Hickory n steel
Gold Member
- Joined
- Feb 11, 2016
- Messages
- 20,947
Yes.Anybody put one on theirs?
How did you do it?
Pix please?
Thank you.
Here's my 110LT and my new 505, I do this with every knife that doesn't have one.
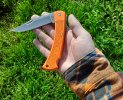
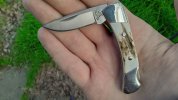
To do this I just use a little round diamond tip bit in my dremel rotary tool, but you can also use a diamond needle file or a piece of sandpaper wrapped around a small steel rod or screwdriver...etc
I have also used a rat tail chainsaw file when I'm okay with a slightly larger sharpening choil, I don't have any fancy steels so it goes easy and takes no time.
Hickory n steel
Gold Member
- Joined
- Feb 11, 2016
- Messages
- 20,947
I have used that method as well, and have used a dremel cutoff disk too.I add a very small sharpening choil, only as deep as the edge bevel.
I use a 4 inch angle grinder with a cut off wheel and a very light touch.
Since I have a few different sizes of the diamond grit bits I use them now, but I've done it enough that I can usually do fine with just about every method.
Hickory n steel
Gold Member
- Joined
- Feb 11, 2016
- Messages
- 20,947
Are you talking about a perfect 45° where the edge meets the riccaso?I've thought about it. Ultimately, I've taken a diamond file to it to create a sharp 90 degree angle to the plunge line. That allows me to take the stone to the very rear of the edge bevel without screwing it up.... If that makes sense.
I'm taking about that little spot where the factory sharpening belt leaves a little radius. Instead of cutting a notch, I just file that radius as flat as I can get it to match the rest of the edge bevel. That way the edge doesn't get hung up on the stone at the beginning of the sharpening stroke.Are you talking about a perfect 45° where the edge meets the riccaso?
It sort of eliminates the reason for that sharping notch, for me, but your mileage may vary
I can try to get a before and after pic since I'm probably not explaining it very well.
Last edited:
eveled
Basic Member
- Joined
- Mar 11, 2016
- Messages
- 8,242
J
Jeff O
has it figured out. That little curve is my pet peeve. It will ruin the corners of your stonesand/or lift the edge off the stone. They start like this 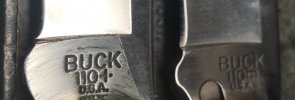
I cut a choil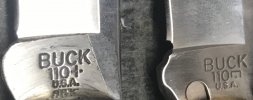
Then sharpen them on diamond plates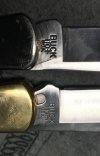
Which eliminate that sweep at the Ricasso and any recurve. Ultimately it ends up like this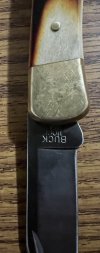
Perfect is no choil no recurve perfect crisp 90* at the Ricasso

I cut a choil

Then sharpen them on diamond plates

Which eliminate that sweep at the Ricasso and any recurve. Ultimately it ends up like this

Perfect is no choil no recurve perfect crisp 90* at the Ricasso
Last edited:
Thanks, Eveled. That's exactly what I was trying to articulate. That little recurve drives me nuts.
I use a small diamond file to clean it up. I suppose a guy could use a small triangle or round diamond file to cut the notch if so desired.
In fact, after this thread, I might cut a notch in factory-blem 112 I've got. Just to see how I like it.
Maybe I'll file it in like a tiny double-beveled serration. That way it'll still cut string instead of just catching on it.
Last edited:
Ok, here's what what I came up with. I used a diamond round file with the blade clamped in a vise, between two pieces of leather. I finished it with some 320 grit wrapped around the file handle. It looks like it could have come from the factory that way.
Sorry, my file skills are better than my photo skills, in this light.View attachment 2491039View attachment 2491050
Sorry, my file skills are better than my photo skills, in this light.View attachment 2491039View attachment 2491050
Last edited:
- Joined
- Jul 3, 2019
- Messages
- 14,799
Man, great work.Ok, here's what what I came up with. I used a diamond round file with the blade clamped in a vise, between two pieces of leather. I finished it with some 320 grit wrapped around the file handle. It looks like it could have come from the factory that way.
Sorry, my filling skills are better than my photo skills, in this light.View attachment 2491039View attachment 2491050
eveled
Basic Member
- Joined
- Mar 11, 2016
- Messages
- 8,242
A little large for my taste, but it looks great. It is very Buck like reminds me of the choil on a 119 Your file skills are top notch.
Don’t go any farther back with it, on a folder part of the ricasso is also the kick, the kick regulates how deep the blade folds.
This brings up another point about choils. It is better in my opinion to not have a factory choil, so the end user can make the decisions to add one or not, and how large or small to make it.
Last edited:
- Joined
- Jul 3, 2019
- Messages
- 14,799
I think you mean “down”, right? He can bring the choil back to the spine and not impact the kick.Don’t go any farther back with it, on a folder part of the ricasso is also the kick, the kick regulates how deep the blade folds.
Thanks for the kind words.
It was a little bigger than I would have liked too but I followed the radius that was there from the factory. I feel like if I used a smaller file, the smaller radius cut into the larger radius would have looked awkward. Ultimately I wanted the apex of the curve to be right where the edge meets the ricasso. I got pretty close. It was fun to experiment on 20 dollar knife.
As far as the kick goes, it's untouched. It stops the blade in the exact same position.
Last edited:

