How To Shield inlay using parsher plate/template: Harden plate? What endmills?

Joined
Sep 27, 2004
Messages
3,041
Hey,
I've finally acquired some of the nice shield parsher plates and shields from leading edge fabrications and they are super high quality and crisp.

I now realize I'm not 100% sure how to get a perfect cut with these. I have a milling machine and a dremel to use. The plates are 1075 annealed.

Initially I envisioned running some kind of cutter along the inside. Do I need to harden these plates or are people using some kind of endmill/cutter that has a smooth edge the same OD as the cutter with some kind of shallow bit?

The only way I could envision it would be to use something like a 1/32 or 1/16 endmill, after fully hardening the plate and then just running the cutter into the plate itself around the edge and letting it dull or throwing it away after each shield. I'd avoid carbide so as to not actually cut the plate.

Once I did that, it seems I could just set a depth on my mill, drop it onto the handle material with the plate fixed to it in some way and move the handle around under it?

Just wanting to also confirm what endmills other are using. 1/16 looks like it may work but for shapes that have sharp corners a 1/32 might be better?

If anyone has pics of the setup they are using that would be great.
 
Are they not intended for use with a parser? Making a parser to use with them would seem to be a good move?

Search for "parser drill" to avoid most of the references to parsing tools in IT.
 
Are they not intended for use with a parser? Making a parser to use with them would seem to be a good move?

Search for "parser drill" to avoid most of the references to parsing tools in IT.

Ive seen parser drills and have seen them lightly discussed. I also know a ton of makers are using these plates and I have heard ZERO in the last 5-10 years using them with actual modern home-made parser drills. Most mention a dremel or mill setup. The parsher drills simply mimic a cutter dancing around the inner edges but thats what im asking how people accomplish without an old school pasher drill (which i assume would still require me to harden the plate.)
 
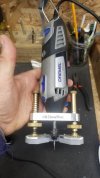
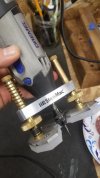
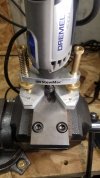
Dremel 113 bit works well with Mark's plates, you can also use the 111 for tighter templates like the corset. You can use it in your mill or dremel. You can harden the plates, but if you dont gouge into the edges you shouldn't have a problem. Mark's prices for new plates is extremely reasonable so if you have to replace after doing a bunch of shields no biggie. One trick is to not use the same side of the template everytime. I've considered using my mill for cutting pockets but I prefer to use my shield clamp with my dremel and I've upgraded to the StewMac router attachment. However the base of the StewMac is aluminum and my clamp is tool steel so I've attached a piece of thin UHMW so it slides around easily. Personally I prefer to manipulate the tool to cut the pocket and not the other way around. I can attach some pics of my setup later this evening.
 
Harden the plates and leave then full hard. Only temper at 300F to relieve stress.

Use a flex shaft or dremel with a HSS cylinder bit (not carbide). I like a 1mm bit, but you may need an even smaller bit for the corners and other tight places. The hardened plate will wear out a HSS burr before the burr does any damage. You will get many inlays with one bit, and once you get a deft hand may not even wear a bit at all.
Work the bit around the center first to make a depresion and then walk it up to the template sudes. Be sure to make the center a bit deeper than the sides to make a reservoir for the resin. I like to leave a 2mm wide shoulder around the pocket for the shield to seat on. Lastly, if possible, drill a small hole through the center of the pocket. This allows pushing the inlay out during fitting, and allows the excess resin to squeeze out when gluing the inlay in place permanently. Many folks silver solder a stud on the inlay that goes through the hole and is peened to lock the shield in place forever.

Note:
If your template is larger than the actual inlay shield, then you need a bit with the correct shank size or bushing to make the inlet the correct size for the shield plate.

Added - The StewMac router base fitted with a dremel tool is a superb inlay tool. It is very handy in many knifemaking tasks and advanced inlay projects.. https://www.stewmac.com/luthier-too...s-and-bits/routers/precision-router-base.html
 
Last edited:
No matter how you use your parser plate, I would definitely harden it.

Tony Bose goes over how he uses his in his Backpocket Construction tutorial. It starts here: http://boseknives.com/backpocket-construction/pages/70backpocketconst_jpg.htm

The hard plate dulls the cutting bit just above the cutting area so that it will then act as a bearing.

Another option you might look into is a desktop CNC router. It's a bit of a learning curve and will take some setup, but once you get your file dialed in and setup your toolpath, it's pretty slick.
 
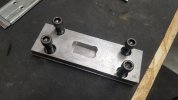
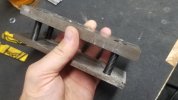
Here are the pics I promised. First is my clamp. Not the best looking, my bolt holes aren't square but it's true. It was my 1st milling project. :) Next is the StewMac router attachment with the UHMW sheet mod. I use additional shields as my depth gauge but also can use my dial calipers to dial in my depth perfect with the StewMac. Hope this helps.
20201103_174129.jpg

20201103_174141.jpg

20201103_174549.jpg

20201103_174558.jpg

20201103_174619.jpg
 
Thanks everyone. I threw them in the oven and they are screaming hard now. I'm going to order some 1/32 and 1/16 straight HSS bits to play with, as well.

I appreciate the holding jigs. Pretty simple! I assume I could superglue the plates to flat materials then clamp so nothing moves in the process.

How do you guys use these on uneven surfaces like stag? It seems the plate needs to remain parallel with the liners to have the shield lay flat but there's nothing to "clamp" it to that is even other than the high point in that case. Do you use some kind of carefully placed spacers? A different jig that holds the plate above the handle material and then affix the handle to something below it independent? I was going to use the plate for some stag last night and I ended up just cutting it by hand before having the process figured out.

I did a very basic test on flat material with a 1/16 cutter using my mill and it was very good. A few tiny nicks with a razor and it was in...may not even need cleanup with a 1/32. I do have a dremel and like the idea of moving the cutter vs moving the workpiece so I'll give that a try, as well.

Thanks for the advice!
 
I dont ever glue the template to my cover. Another benefit, at least for my methods, with the clamp I use is that with uneven material you can square up the side to side with calipers. As long as the front to back is straight you should be gtg. The clamp pressure holds everything in place perfectly. I haven't had one move on me yet. Have fun trying it all out. There is literally no consensus "right" way to do shields. In the end if they look good and the method used is what you like best that's all that matters.
 
I dont ever glue the template to my cover. Another benefit, at least for my methods, with the clamp I use is that with uneven material you can square up the side to side with calipers. As long as the front to back is straight you should be gtg. The clamp pressure holds everything in place perfectly. I haven't had one move on me yet. Have fun trying it all out. There is literally no consensus "right" way to do shields. In the end if they look good and the method used is what you like best that's all that matters.

I’ll have to play quite a bit here! Its amazing how much variation exists in the ways we do common tasks! I met someone recently who does all their sanding and grinding from tip to plunge, not the other way around. Never even occurred to me to try it that way!
 
Back
Top