Slipjoint Issues

tsavickas36

Gold Member
Joined
Jan 14, 2025
Messages
54
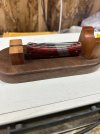
Here is another one of my "newbie" questions for the experts. Last fathers day my cousin asked me to make a folding (I decided on a slipjoint) knife for her husband.

I had never done it but was up for the challenge. Truth be told I watched a lot of Youtube looking for guidance on all the parts, importance of layout, how to temper a spring, how to set the tension on a spring, etc...

After remaking it 4 times I finally got an acceptable knife for him, although the spring tension was a little much but it worked.

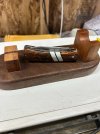
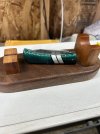
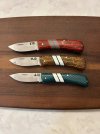
A women I work with asked me to make her husband and two boys folding knives for Christmas gifts. I am on attempt number 4 just trying to get my tension and holes to line up and cannot figure out what I am doing wrong this time.

I have followed my template for the pivot and spring holes, glue the liners together to make sure they match, drill my front spring hole in the liners, trace on the liner then move up 3/4 width of my 3/32 pin and drill the back holes.

I cannot get tension on my spring for some reason. The other issue I am having is my 3/32 pins don't slide through my 3/32 holes so I have ground them down with a drill and sandpaper but now they seem sloppy.

I am not really looking for you to fix my problem I will get it figured out, I am not giving up and will get them done, but I was looking to hear your top slipjoint advice for the inexperienced maker hearing my issues.

Thanks in advance.
 
Hi! I'm not a slip joint maker, but if it were me attempting this for the first time, I'd go buy a bunch of cheap old slip joints at the flea market and take them apart, then put them black together repeatedly until I could put them together so they worked very well again.

That way you're getting the assembly process down on known good parts.

Slip joints are notoriously finicky, and the assembly process makes a big difference to their function.

Remove as many variables as you can when you're trying to learn something.

I'm this case, if it worked before you took it apart, and it doesn't after you put it back together, it's your assembly that sucks, not the pieces.
 
Is the weak at halfstop, open, or closing?

If the spring is rotated enough to overlap the tang, which is sounds like yours is (rotating 3/4 of a hole), I've seen 3-4 things that can cause tension lower than expected.

1) I've ground too close to middle pivot hole at the spine. When shaping the scales and trying for flat back or whatever profile I am looking for, I ground too close to that middle pin. There is a certain point where spring tension starts to degrade;

2) the tang itself has gotten too small. I've found some breakpoint where the square dimension of the tang can just get too small. Tension at half stop and open can still be decent, but closing tension gets too light.

3) If you have taken too much meat off the spring in front of the pivot hole

4) playing around with placement of the middle spring hole in terms of how close or far away it is from the spring tip is worth doing to see how the pull feel changes in relation to walk/talk snap. that hole placement impacts leverage of the tang corners moving the spring tip.
 
Okay update and me admitting that my life is too busy right now and I feel like a bonehead. I didn't harden the steel and my spring was bending. Apparently I need to write some notes down on my process to avoid scrapping so much metal.

Heat treating tonight and should be on my way to finishing these out this weekend.

Thanks for taking the time to comment.
I know there are a few slip joint makers using 17-4 precipitation hardening stainless for back springs.

If you can find some it’s very easy to heat treat, simply heat to around 925’f for an hour and it comes out at about 45hrc with good lubricity.

Hoss
 
One of the best comments was about getting some old junkers to copy. My method is usually to have the front (pivot) pin and the center pin
in the knife. Then raise the back of the spring and vise grip clamp it, drill the hole, if there is too much tension it can be adjusted by grinding
the inside of the spring. If the tension is too little you didn't raise the spring high enough at the back . I call this " wrapping the knife around
the frame", in this case the frame being the blade and spring. If all the holes are drilled in a flat template sort of pattern it can be tough to get
decent tension--- as Bill said you could bend the spring.

Ken
 
I know there are a few slip joint makers using 17-4 precipitation hardening stainless for back springs.

If you can find some it’s very easy to heat treat, simply heat to around 925’f for an hour and it comes out at about 45hrc with good lubricity.

Hoss
D DevinT Can you tell me more about 17-4 stainless ? Do you heat treat it in foil? When you say 'lubricity' does that mean that slick feeling of the blade tang sliding on the spring face?

I just started googling around where to buy it. Does it come in flat bar stock in typical slip joint sizes likes 0.100ish-0.125"?
thanks.
You don’t need foil, the heat treat temperature is around 900’f -925’f. It’s basically like a high tempering temperature.

I bought some from Fry Steel in California.

It’s made for some bearing applications.

There are different conditions that it comes in so be careful. You need the one that is ready to heat treat.

Hoss
 
Thanks for your continued input here everyone.

Update: After watching a bunch of videos and reading through a step by step process by Brian Dougherty on another forum I realized another foolish mistake I was making. I had way too much pressure in my spring. Not sure why I didn't realize this before other than inexperience.

I thinned out my spring and really focused on getting all my three tang dimensions to be as close as possible with limited tools, it now works great.

This week I am working on creating two more blades and springs then onto handles. Praying I don't do anything foolish with them as I am running out of time for Christmas gifts these were intended for!

Thanks again.
 
Well, that was a fun ride. I completed the knives on Dec 23, one day early after a few 1:30am nights leading up to completion.

I thought I would share my final product on here. These were definitely not perfect but these wanted it to look like it was handmade so I left a little pitting from the heat treat on the blades.

Overall I was happy with the way the custom handles came out and the slipjoint springs operated.

Thanks again for everyone's help.
 

Attachments

  • IMG_5253.JPEG
    IMG_5253.JPEG
    146.6 KB · Views: 3
  • IMG_5255.JPEG
    IMG_5255.JPEG
    143.7 KB · Views: 3
  • IMG_5257.JPEG
    IMG_5257.JPEG
    144.8 KB · Views: 3
  • IMG_5258.JPEG
    IMG_5258.JPEG
    166.2 KB · Views: 3
For your first ones you did a good job. it's sad that who you made them for equates hand made with a crappy finish.
Sorry that was a confusing statement, they wanted them to look handmade. They were very excited when they opened them Christmas morning. Overall a success but I am excited to keep making them and add some bolsters moving forward.
 
Back
Top