So Many Mistakes in my "Work"

Joined
Nov 13, 2004
Messages
650
Hi All,

I've watched this forum for quite a while but seem to finally have been bitten by the bug. Hopefully I can make something presentable if I stick with it. I recently bought the videos by Paul Long and Chuck Burrows but there's so much there that it will take a while to absorb.

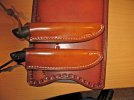
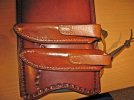
Below are some pics of some sheaths I've tried lately. They look better than my first attempts but I make so many foolish mistakes that it drives me crazy.

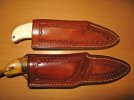
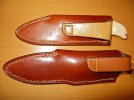
I'd really appreciate any thoughts on how to improve. Especially how to avoid the unsightly bulges at the top of the welts when I bring the welt up high like in the first two pics? The top one is a Spyderco Mule and the spine has a strong downward cure. The bottom on is a Spyderco Bushcraft and has a relatively thick handle. They fit well enough but...

Thanks,
Dave


attachment.php
attachment.php

attachment.php

attachment.php
 

Attachments

  • IMG_0903.jpg
    IMG_0903.jpg
    67.7 KB · Views: 322
  • IMG_0907.jpg
    IMG_0907.jpg
    64.3 KB · Views: 318
  • IMG_0908.jpg
    IMG_0908.jpg
    67.3 KB · Views: 315
  • IMG_0909.jpg
    IMG_0909.jpg
    70.6 KB · Views: 319
I don't see anything that a little practice and "time-in" won't resolve.
Keep at it....take a little thickness out of those parts that come together by skiving each sides. I think you're doing fine.
 
D.Dave, when you design the welt taper it to a curved point about 3/4" above the toe split junction. When you glue it in it should extend above the the inverted "V" notch by that far. Then when it's all glued up ready to stitch you can actually grind most of the unsightly "bump" off and give the top a smooth curve right there. Your grind will get into that extra 3/4" mentioned earlier and will appear as just more of the edge on the outside. Second, under no circumstances curve your stitch line up at the junction point as you did by a couple of stitches on the bottom sheath in the first photo. This makes a little bit of finishing grinding in that area impossible without grinding into the stitch. Review the Basic Pouch Sheath DVD in the beginning during the making of the pattern and check the shape of the welt on the pattern for clarification.

For your thicker handled knives put in a tapered wedge secondary welt glued on top of the main welt from the top or mouth of the sheath down about 2 to 2 1/2" inches. This will give you extra room at the top of the sheath.

In the bottom photos it appears that you did not pull the hand stitches up evenly and have the lock showing instead of in the middle of the stitch or if it is machine work your bobbin tension is loose.

Other wise those look very good. You are well on your way to first class work!

Paul
 
Last edited:
Thanks very much for the tips and encouragement.

Paul, I'll definitely watch the Basic Pouch Sheath DVD again before my next try.

Thanks again,
Dave
 
I don't see anything that a little practice and "time-in" won't resolve.
Keep at it....take a little thickness out of those parts that come together by skiving each sides. I think you're doing fine.

I second this completely. If you look at the masters on this forum - they have been at it for MANY years. Heck, I think Paul made some sandals for Jesus. ;)


TF
 
I don't think Tio Paulo goes back quite that far......


.... but I've seen the scabbard he made for Vlad the Impaler;)

If I remember correctly, Chuck's video shows how to make sure your back-side stitches line up perfectly. He re-sets the holes on the back side using an awl, which goes into the gouge line on the backside next to an errant hole, then is pushed through to the hole on the front. Result is all the holes on the backside are perfectly centered in the gouge line. Then run over the entire length of the gouge line with an over-stitch wheel and the errant holes disappear almost completely, and your back side stitch line will be nice and straight:) You may want to dampen the gouge line slightly before using the overstitch wheel.

Mike
 
Thanks Mike,
I'm going to try the stitching method from Chuck's video in my next sheath. I'll gladly spend the little extra time required if that's what it takes for me to get it right.

Among other things my last sheath taught me that:
1) Lubricating the awl with paraffin wax seems to work better for me (using nylon thread) than beeswax or saddle soap - tip from Lee Douglas

2) No good comes from rotating the awl between stitches. My awl was bent and I happened to turn it 180 degrees (for no good reason) between stitches and got alternating short and long spaces between the holes on the back. I was trying to line up the hole using the handle as a reference rather that the blade itself. Do accomplished people do this or focus on the orientation of the blade itself?

3) A good awl is whole different animal than an inexpensive one. I just received one from Bob Douglas to replace the Craftool or Osborne awl I was using. It cuts like a dream and I hope I can keep it that way. The geometry produces a wider diamond hole for easier stitching. The better/harder steel should hold an edge better and will break before it bends. (Lee said if it bends they'll gladly replace it because the heat treatment wasn't right but that if it breaks it's my fault.) It was very nicely polished and very sharp as delivered.

Dave
 
Back
Top