Some help for wiring another DIY etching machine :D

Joined
Apr 10, 2021
Messages
44
Hello all!

So I wanted to get an etching machine and seeing how the nice ones are expensive and the conversion rate is insane, figured I'd do like everything else I have so far in this "hobby" and build one because there's so many tutorials online now. I wanted to make an adjustable one because, why not just do the complicated options right off the bat... I've got pieces for two different ones since most of the stuff came in copies and I had some things lying around so I figured I would build one right now to be used soon ans tinker around another one with a POT and such if it's needed later and seems more complicated a bit.

I wanted something that looked clean and professional and that stored away easily so I used one of my Systainer Minis to build the unit inside, like they do with jobsite compressors (since I use a lot of them for tools). Once the insides are down I'll put a lid on the top and use the leftover space as storage for the wires and stamp. :D I made a cutout bottom out of leftover steel piece from the oven and glued some Baltic birch under to raise it a bit so the screws wouldn't piece through the bottom. Used some recessed Banana sockets for speakers in the face for a different little touch. Otherwise could have normal sockets near the switches so they don't stick out the main body.

394294394_303719102513483_1610791061523953424_n.jpg

394362372_342673905085714_7281883453378878706_n.jpg


I'm nearing the end of the build, just gotta make the power plug cutout and connect it but I was still not 100% sure about the wiring because a few similar diagrams are out there with some slight differences and I had some questions:

- Does it NEED to have an On/Off switch on top of the AD/DC switch and 12/24v switch? I figured there should be a way to wire the 12/24 switch to act as the main power also as it's an On/Off/On and power has to go in it before hitting the rest of the circuit. As it is now power runs in through the fuse and directly in the transformer.

-I figured I wouldn't need a light with these switches? They light up when powered on right?

-If I were to add a DC/DC Buck converter and POT, where in the setup would it be installed? I figure it would replace where the 12/24 witch is (but then it would actually require a separate On/Off switch?)

The plans I'm going off of are mostly these two:


electro-etcher-plater-marker_circuitDiagram.gif

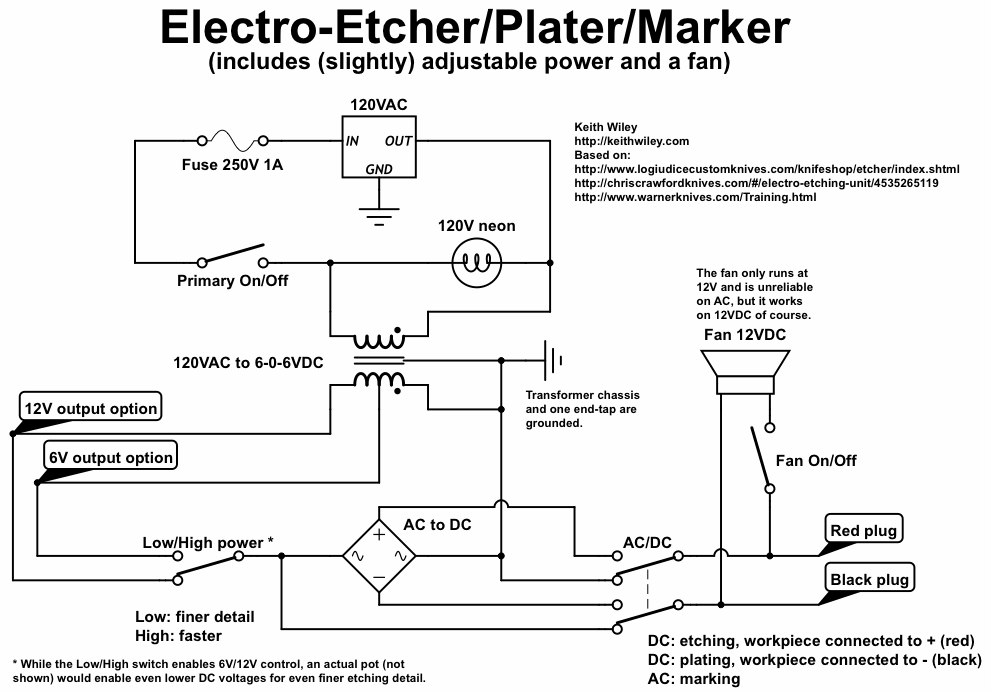
and https://www.logiudicecustomknives.com/knifeshop/etcher/electro-etcher_circuit.pdf (can't seem to attach a picture of it.


So I modified that second one to be the wiring I figured would work. I'd like everyone's input before I blow something up :D Would this diagram work properly with the withdrawal of the main power switch and its function being put in the extra DPDT for controlling voltage??

394212893_683216430571233_5806870536607525823_n.jpg


Thank youuuuuuuuuuuu
 
There is a short at secondary 1 and 2. This is the place to put a high/low switch. Your DPDT is for AC/DC switching.
Edit: was looking only at the schematics. The photos explain more but it would be awesome if there are one or two more from different angles. Seems OK, but to be sure. :)
 
Last edited:
You should always have a main power switch between the source (Black from plug) and the fuse.
 
Hmm I can't have a switch between the source and fuse because I took units that have the fuse incorporated in the plug like these. So how would I go about doing that? The Logiudice diagram also had it after the fuse.
612pAhXqnIL._AC_SL1100_.jpg


A high-low switch just seems to be a DPDT switch too so I took one. Last night I think I found out I didn't have the right idea about how the wiring goes in and out though... Meaning the thing would have blown up or shocked me to death :D... SO 1-5 is one toggle that always come out of 3 and 2-6 is the other that always come out of 4

So this is what it SHOULD look like to work?:
394190152_363115456049143_8828655691939687331_n.jpg

Btw, stealing the portable case idea. Smart thinking. :)
Gotta make it look pro :D adds about 30-40$ to the build but my whole setup at shop uses Systainers so this just makes it fit right in ^_^. I had some spare cases. The way I spaced it out also means the right side of the box it totally free too. I'll just build a little box-off out of thin material
 
Sooo I tried to turn the unit on after wiring everything... nothing much happened. I thought the lights on the switches would turn on but I guess the circuit isn't closed because of the two clamps so they won't?

I clamped the black clip to a piece of metal and touched it with the red clip and got a spark then the fuse blew up. Is that normal?

Could I have inverted the wires from the power socket to the transformer (not sure which prong is white and black, I found pictures of both so... I went with the one connected to the fuse as Black)?

Is it because I shouldn't touch both clips on the piece of metal? Wouldn't that complete the circuit like if I was etching?

as for the DPDT switches, are the numbers of the pins from a front view of looking at it from the back? Also I thought it was
1-2
3-4
5-6

But I just found some images that show its:

1-4
2-5
3-6

.... That would explain problems but also not how come the thing worked for a second. In both cases. looking at the switch from the front, as it sits in the case, 1 would be the top right corner?

I'll keep looking into it but I'm not finding answers so far :(
 
If it was for a second, it's overcurrent, not a short. You need some resistance to keep it from blowing. I'm building a plasma electrolytic machine and the plan is to put a resistor (big one) before primary. That way the secondary even with a short will not create havoc. It's not the usual way, but works. Decide what current you want on the etch and put a resistor in the circuit to match. My build is way more simple. Direct wiring with simple switches. No DPDT's and no terminal blocks. No need to switch every wire, just the faze. No electronics. Analog rocks. :)
Give some photos.
 
Time is scarce. To build this I think you need a buddy familiar with electric circuits. There are things you didn't consider. Voltages are too high for etching. Amps should be less than 6A. Consider making useful power 2-6V and 0.5-6A. Make it fixed or changeable. In the first picture you posted of a circuit there is a resistance (neon) in parallel. I would choose series. Many ways to skin a cat.
Electric buddy is your best option.
 
The transformer is 12/24V 2.8A. Triad F-56X suggested on Crawford’s site. The build is pretty much the same as Red Beard Op’s with an added switch so the voltage and amperage should be totally fine. I also have a Hammond 24V CT 3A one

Having an electrical engineer friend would be great but I don’t know any… and part of the fun is getting things right without blowing up 😬 the internet has all the knowledgeeee

Pretty sure I just have my wires messed up on the switches…
 
You are probably right. A simple misconnect. I'm in high energy stuff and forget about the resistance of the transformer which is sufficient in this manner to keep things right. For etching I have a power supply and don't think much about it.
 
Welp, something isn't working and I've rewired it 3 times lol. Now I know everything is where it needs to be on the plugs because I took out the multimeter at me shop to test the connectivity after blowing 4 fuses and getting fed up -_- I was surprised by the fact that when the flip is switched On on the up side, it’s the bottom terminals that are activated and vice versa.

Could it be that I also need to run the ground to the 3rd wire of the transformer like that first diagram did? It’s the only one I found using a switch for the voltage.
 
I took a good look at the last schematic and don't see any errors.
I can't tell much from your photo of the actual build. I keep getting the feeling that something isn't right, but can't see which wire it is.
Is that red jumper on the terminal block supposed to be there? (white and blue wires are all tied together?)

Make sure you have the proper fuse. It should say 1amp/250V slow blow.
Make sure the rectifier is wired correctly. Double check that the AC is on the right two terminals.

What do you have the transformer case grounded to? Is it the same ground as the power cord green wire? There should be nothing else grounded in the circuit.

The switch is a DPDT center off. The two center pins go to the rectifier. What it is numbered should not matter. If unsure, test with a multimeter to confirm which are the center pins.

Things to try:
1) Connect a multimeter to the banana plugs and set the meter to AC voltage. Set the switch to AC and turn the unit on. What does it read? Flip the 12V/24V switch and see if it changes.
2) Repeat with the meter set to DC and the etcher set to DC. Do the same switch tests. What happens
3) Try etching with the unit and a felt pad. Did the fuse blow?
4) Try a 2A fuse and see what happens. If it blows too, there is something wired wrong.
 
Yah, I didn’t have that many different wires so it was hard to have all matching colors 😕

The ground is screwed on one legs of the transformer case. Edit **I don't see any wire that I could connect a ground to on the transformer?**

The jumpers are all where they should be: there’s 3 different groups.

The transformer wire 1 is plugged in the right DPDT #1 (white wire). Wire 2 in #5 and wire 3 goes to the red terminal blocks that split to #2-#6. Then #3 goes to the black terminal blocks and #4 to the white terminal

I did have 5 1A slow blow fuses. 2 blew after touching clamps to metal and 2 just…. Blew when I plugged it in I guess lol.

I’ll post some pictures in a bit when I’m on the computer, no idea how to do it on my cell 😑
 
Last edited:
Don't the burn marks on the pink heat shrinks, didn't have a blower so used a lighter...
Also, I find the the non shrink spade connectors don't hold well so I use terminal crimps to have something thick to clamp on to. That shouldn't cause issues right?

Think I redid some wires for this because I don't have the blue in there anymore. This is how I tested it today.


368048963_1671373760016625_3192857730861185515_n.jpg
393973980_333279719250281_5383910870751312410_n.jpg
368041881_807212261153500_6113118041130796332_n.jpg
367926495_1143011050009654_1833359365358333530_n.jpg
 
so I figured I’d gamble the last fuse because I’m getting more tomorrow and plugged in the unit. Everything actually works fine on the multimeter. AC read well at 14-28V and so does DC in the banana sockets (which is higher than the 25.3 the transformer should do).

I don’t have an etching pad yet so I figured I’d try with the Q-tip thing with salt water and it doesn’t work… I don’t know if I’m doing it wrong but probably 🙄. Tried clipping the piece with the black, the red, no difference.
 
Ehhh… it worked?… Seriously, electricity is dumb. But it worked! Just gotta make an etching pad and finish the box off the inside and it’ll be good to go! ☺️

Thanks for the help and input everyone! I still don’t understand why it just shorted before but I guess it’s all fixed haha

Now, does anyone know how to wire this thing with a buck converter to have actual control over the Voltage? 😬 I have the spare pieces to make another one haha
 
Now, does anyone know how to wire this thing with a buck converter to have actual control over the Voltage? 😬 I have the spare pieces to make another one haha
Buck will give you a set voltage. A rheostat would give you a lot of freedom in voltage. With a rheostat you could ditch the 12V and have 1-24V from the 24V source. Add a V/A meter or two and have a direct display of your setup. So, what kind of control would you like?
 
Back
Top