Sometimes ya just gotta break some knives(pics)

Joined
Jul 9, 1999
Messages
3,316
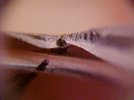
I needed to know what's going on with the HT with this 1084 I'm using. I single edge quenched one blade and triple tempered it. No normalizing. It's 1/8" stock. I then broke one of my banana knives(3/16" stock) which was triple normalized, triple edge quenched and triple tempered.
Here are some pics of the results. Your observations and comments are very welcome as I'd like to know the board's consensus of what's showing in the pics. I'll have to post one, then follow with a thread with another pic and so on 'cuz that's the only way I know how to do it.
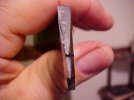
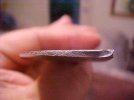
Pic one is the three x three. It broke near the plunge line after it nearly broke me trying to break it. I ended up having to use a pair of 12" Channel-lock pliers to give me the leverage to break it. BTW, I'm 275 lbs. and still ended up falling flat on my butt when it finally gave up the ghost.

edited to add:
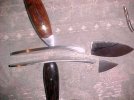
Actually, the first pic is of the two blades that I sacrificed with a finished sample of the same model on top and bottom. The only difference is the 1/8" stock model's finished sample is in 3/16" stock and was treated 3x3.

Thanks for looking and responding!
 
Okay, I'm blaming the new software but it's likely there is a new procedure I'm currently unaware of.:footinmou

edited to add:
Okay, I just went to Service and Support and see I'm not the only one having problems posting pics from attatchments. I'll post the pics when the prob is resolved. Promise.
 
Ok, let's see if the attatchment feature is working. This first pic is a bit blurry but you'll get the picture. They are two blades I broke with a finished example on either side of them just to show what a finished model is supposed to look like.;)
 

Attachments

  • mvc-074s.jpg
    mvc-074s.jpg
    27.7 KB · Views: 170
Here is a pic of the 3/16" banana blade. This is the blade that received triple normalization, triple edge quench and triple temper.The grain changes from the spine of the blade down to the edge. Right around the middle you can see a transition area where the edge quench begins. It's right about where a dark area is near the middle of the blade. Hopefully it will show up in the pic.:footinmou
 

Attachments

  • mvc-072s.jpg
    mvc-072s.jpg
    21.5 KB · Views: 129
Here is what happens when a blade is not normalized after shaping and grinding and taken to the bright red(almost orange) state prior to the quench. As you can see, the grain is quite large and coarse.
 

Attachments

  • mvc-070s.jpg
    mvc-070s.jpg
    21.7 KB · Views: 247
A final pic is the top view of the sacrificial blades. If you can see thru my bad photography you can see the final set the blades took as they gave up the ghost. I'm interested in this because of the way they bent. The 1/8" stock blade took a better, fuller bend overall but it seems to have bent steeper in certain areas along the blade. Kinda more like this ] than this ) when viewing from the top.

Thank you for taking the time to look and all comments and observations are most welcome. I have thick skin so if you need to critique anything please feel free.

Thanks!
 

Attachments

  • mvc-065s.jpg
    mvc-065s.jpg
    33.8 KB · Views: 95
Cool to see these and your text, Misque.

mvc-074s.jpg

mvc-070s.jpg

mvc-072s.jpg

mvc-065s.jpg
 
I am pleased to see your experiments. The photos are very interesting. How close to non-magnetic were you when you quenched? I have not worked with 1084 that I know of, the multiple quench fracture seems to have an occlusion in the lower third at the transition line (?). If so that could have innitiated the fracture. The crystaline structure is much different that that I see in 52100 or 5160. You have provided some insight, especially with the non normalized overheated blade.

Thanks for sharing.
Take Care
 
Thanks Gaben!:D

Ed,
On the 3/16" stock blade I took it up to magnetic and let it set in the forge another 3-5 seconds before quenching it. It was a nice bright cherry red.
I've managed to get my 7x loupe on the end of my digi-cam to get a closer view of the occlusion and a little better view of the grain at the transition area. I hope it shows up well enough so you can see what's going on there.

The 1/8" stock blade was taken to non-magnetic and left in the forge another 25-30. It was a bright reddish-orange when quenched.

On a very happy note here, I got my anvil yesterday and mounted it today so now I can begin hammerin' hot steel. Can't wait to see what results I get from that.:cool:


All the best,
Mike U.
 

Attachments

  • mvc-034s.jpg
    mvc-034s.jpg
    24.9 KB · Views: 180
It appears that was your weak spot. It was occurences like this that convinced me to switch to 5160 from load control shafts from John Deer Tractors, it is highly specked steel, all have been of high quality and I have yet to find fauly with blades forged from then. The 52100 steel we are using now is also high quality stuff, I have yet to find any serious faults in the blades. Sometimes a minor cosmetic flaw may show up, but nothing as serious as you found in this blade.

I found some 1084 steel in my supply stuff today, if I have time I may try working some into a blade just to see what I get. I take it the blades were stock removal rather than forged? thermal cycles alone can improve some steels, as you have demonstrated, but in conjunction with forging things really begin to happen.
You might try deep freezing with dry ice or liquid nitrogen along with the other cycles you are doing, this might help, but nothing can improve faulty steel. I believe this is where many bladesmiths get caught, they do everything right and still know failure just because of the steel. It is fun to work with unknown steel, but there are some pitfalls.

Just as a point of interest, any time the liquid nitrogen improves steel significantly, you can very probably achieve the same results by working on the forging, or heat treating methods.

You want to stay real close the the nonmagnetic range and there is no need to soak with the multiple quench, a few seconds to even the heat is all you need. Soak time on blade size stock only takes the chance on grain growth.
 
Ed,
The blades were stock removal this time. I've got things set up now so I can begin forging and am ready to take that next step up in knifemaking.:D
After I start smashin' hot steel I suppose the next logical step is to sub-zero freeze treat some blades and see how that affects overall performance and grain structure. Of course, I'll have to try the same thing with a couple of stock removal blades for comparison. Thanks for the feedback!


All the best,
Mike U.
 
I believe Ed hinted at something that may have been missed.

One advantage to forging is that the steel goes through so many thermal cycles during the process (along with normalizing and/or heat cycling) that the steel is actually improved. As far as carbon steels go, this is a good thing. (If the steel is overheated during any part of the process then all bets are off!)

Although stainless steels can be forged, they do not tend to benefit from this and for the most part, forging is a mute point (unless yo just want to). You really don't end up with a better steel than what you started with. I don't think you could really tell much of a difference at all between a forged stainless blade and one that was stock removed (all things being equal).

If comparing blades made of carbon steel that are stock removed and forged, then I believe you would see a difference in performance.

C Wilkins
 
Back
Top