- Joined
- Apr 18, 2011
- Messages
- 487
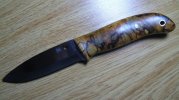
I recently had a chance to pick up a Spyderco Bushcraft with the spalted maple burl handles. This is my first non-kitchen fixed blade; I've been into knives for a few years, but I've always preferred folders. I've been eyeing the Bushcraft for a while for a nice general purpose outdoors fixed blade and because of all the praise it has gotten for its super comfortable handle. I came across pictures of the original versions of the knife with the maple and knew that was the version I had to have. It took a bit of looking around, but I scored a nicely used fairly affordable Bushcraft with the maple handles.
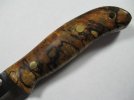
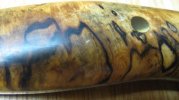
One of the things I read was common in the original version of the Bushcraft was the cracked handles, which was why Spyderco switched to G10 for the current version of the Bushcraft. As expected, my handle has some pretty decently sized cracks all over the left scale. I found the original description on Spyderco's website, which stated that wood fillers could be used to fill in the cracks; I also recall having read about people filling in the cracks with super glue.
Has anyone reading this who has one of the original maple handled Bushcrafts tried filling in the cracks? If so, what did you use (wood filer, super glue, etc?) and how successful was it? Pictures of your handywork would be greatly appreciated!


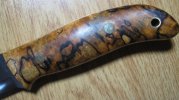
 . I'm going to keep the burl handled knife as a display piece and use the G10 knife. I'm a little worried about how stable the wood handles are, and I'm too lazy to coat the entire handle in cyano to try and help weatherproof it a little (filling in the cracks was enough for me). I thought I read that Spyderco treated the handles with boiled linseed oil after realizing they didn't get the stabilized wood they requested. Has anyone just used their burl handled Bushcrafts without further treating the handles, and if so how have they held up?