Stag Bowie Sheath Take One

Joined
Jan 9, 2008
Messages
588
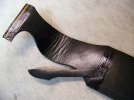
I spent a part of yesterday making a pattern for a 10.5" bowie. I did my best to follow the example in Paul Long's DVDs.
I intend for the sheath to angle forward for easier extracion of the blade and hope that the angle of the belt loop will accomplish that. I also added some length to the loop to allow for the bend, and radiused the angles at the bend, hoping I did it correctly.
The acute angle where the retention strap meets the loop was pretty sharp so I also hope that the best way to deal with that is to punch a hole at the apex.
I don't know how the retention strap will behave coming over the oval guard of the knife, so left the strap long. Hopefully the stud ends up in the right location!
Sheath will be a right hand carry. Pattern is drawn with back on top.
Leather will be 8-9oz tooling and 1.5-2oz pigskin lining.
I am open for any and all critique, especially if I can get it before I start cutting!

Pattern with the knife
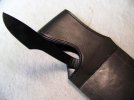
image.jpg
Clean pattern
image.jpg

Merry Christmas everyone!
 
Looks good keep us posted. Could I suggest tracing the pattern on thin cardboard like a cereal box? I find it real easy to trace the cardboard on leather. When I used paper the pen wandered under and above the cardboard.
 
Redesign the end of the belt loop so that it matches the sheath width from the mouth down about 3/4 inch. Then plan to roll the belt loop over from rear to front and cement the matching tab to the interior of the back piece. In other words it will wind up being tucked into the mouth of the sheath. Think about this before you do any lay out or cutting. To accomplish this the back piece including the loop will have to be exactly backward to the front of your sheath. The way you have drawn your original pattern would be correct for the back piece after you redesign the loop end.

The retention strap will go between (skived to zero) the belt loop tab and the interior of the back of the sheath and can be at any angle you choose because it is a completely separate piece. Keep in mind that I line everything so if you don't you will see flesh side of the leather on the inside of the loop. In my photos it's grain side on both sides.

The photos below may give you a better visual understanding of the loop and retention strap installation.

The spine side welt should go all the way to the tip and the sharp edge welt should curve and cut off when it meets the spine side welt. The welts will be installed after the belt loop and retention strap and have been set and cemented in.

The way you have the pattern drawn, the front piece of the sheath would be the exact reverse of the way it is shown.

The stud positioning is not critical because you do not punch the hole in the strap until the very last thing with the knife set in the sheath so you pull the proper tension and then punch your hole and trim off any excess.

One last word of caution. I don't think the angled belt loop is a really good idea. Looks good on paper but doesn't function all that well in real life, unless you put a stitch line across the loop down about 2 inches to absolutely lock it on the belt at that angle. The longer the loop, the less stable on the belt particularly at and angle.

Edit to add: forth photo showing another sheath of this style finished with tooling and stitching.

Paul
 

Attachments

  • 100_2587.jpg
    100_2587.jpg
    78.1 KB · Views: 78
  • 100_2589.jpg
    100_2589.jpg
    65.7 KB · Views: 75
  • 100_2590.jpg
    100_2590.jpg
    66.1 KB · Views: 74
  • 100_1256.jpg
    100_1256.jpg
    94.9 KB · Views: 78
Last edited:
Wow Paul, I never considered doing the loop in that manner. Just to be sure, in the first photo I'm looking at the lining, correct? When does the end of the loop and retention strap get sewn?
I think I will also take your suggestion and make a straight loop if it isn't going to hang as I want. This knife, most likely, won't ever be carried anyway.
Thanks again for your generous help.
Jonathan
 
First photo, yes that's the inside of the loop, the lining. The loop gets secured with stitching when you do the side seams. They catch the skived edge of the loop tab on each side, and also everything gets pulled in nice and tight so the retention strap can't move and it is NOT stitched.

I added a forth photo to my last post showing the final stitching and a finished sheath in this style.

Paul
 
Last edited:
image.jpgimage.jpg
I redid the pattern ala Mr Long this morning. I feel like a plagerist! I think I got it right this time, and added a little recurve to the sheath to reflect the sexiness of the blade.
The guard is 3/8" proud of the blade. Should I add a wedge to the top back side of the welt to compensate for that?
View attachment 602449
View attachment 602450
 
Last edited:
image.jpg
Well, like the subject says this was take one. I made the newbie mistake of getting a shoulder of finished leather for the project. It said veg tanned in the description so I assumed...........
It won't case at all, and the stamping was verrry difficult and as you can see, came out poorly.
I placed an order for some unfinished vegetable tanned tooling leather and do take 2 when it comes in.
I plan to finish this one out anyway as I need the practice in every aspect of the process. I am learning that like blade smithing, leatherwork is a process of recovery, but perhaps less forgiving.
View attachment 602723
 
Last edited:
Jonathan, none of you photos are showing on my Mac. I get an "invalid attachment" flag when I click on your link.

Paul
 
Hi.

Very nice designs and once more great share on those small "tricks" that help make a better sheath.

Thanks!

:thumbup:
 
Keeping in mind that this is my "learning" project (and making believe that they all aren't) I moved forward on take one.
I had to cut quite a few more pieces of welt because of the guard lifting the blade quite a bit. I chose to feather them and make them progressively shorter so the whole sheath didn't become nearly an inch thick, and retains some gracefulness.
I've learned some good lessons so far:
1) Even a stitch groover can screw up your work if you're not careful with it.
2) Get a head knife. My Weaver round knife came in tonight. Wow, what a difference it makes!
3) Be careful with the round knife. Sharp!
4) Stitch grooves are not part of the tooling process. Don't make them until all the edging is complete. I made the mistake of placing them early and by the time I finished trimming and sanding sections needed to be redone. Bad.
5) Oh yeah. Don't use pre finished leather.
6) Make sure all stitching that will be impossible after assembly is done prior to assembly.
7) Keep the knife vertical when cutting.
8) If you hit the button hole punch hard enough it will go through the leather, and the cutting board!
9)Pay attention to the pros willing to give guidance here! Their advise is gold.

Some progress pics
View attachment 603106image.jpg
View attachment 603107image.jpg
View attachment 603108image.jpg

Am I supposed to push my awl through 7/8" of leather to hand stitch this sheath? Won't I then end up with huge entry holes? Is there a way to burnish out the grooves I made by mistake? Oh, did I mention I was thrilled with the round knife!
 
Last edited:
image.jpg
OK! finished take one! All stitched up. I don't think I'll go this thick again as long as I am hand stitching. That was kinda tough. I learned a lot through this process and am excited to apply all I learned to take two. Thanks for the help.
PS. I don't know why the upside down thumnbnail is in the post. Doesn't show up in the edit.
 

Attachments

  • image.jpg
    image.jpg
    71.5 KB · Views: 15
Back
Top