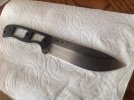
Stripping the BK-7 properly - would like feedback on process before attempting

Joined
Feb 7, 2018
Messages
4
Hey all, first time Becker owner looking to strip the coating from my BK-7. I've done some research and mainly found seemingly irresponsible and questionable techniques from the most popular YouTube walkthroughs. Hoping some experienced folk here can make sure I'm doing this right.

After removing the scales I'll soak the full blade hanging upright by a small wire, within a stainless steel water bottle full of paint stripper. I figure keeping things upright and contained within the water bottle will provide a clean container for transporting the used paint stripper to a hazardous waste collection site ran by the city.

After 10-15 minutes I'll remove the blade from stripper, and use a nylon gun cleaning brush to scrape the coating off into a disposable pan, scrapings carefully transported to the container when complete. Soak/repeat until clean. I got PU coated nylon gloves for protection.

I picked up a 120-grit sanding sponge like this: https://www.amazon.com/gp/product/B00OB250I0/ref=oh_aui_detailpage_o01_s00?ie=UTF8&psc=1

I figured the grooves in the sanding sponge would help remove coating from tougher angles around the blade handle. Is that grit fine enough, once the process is complete and I've washed the blade, do I need to do some further buffing with a finer grit? Is there some kind of fancy oil treatment I really do need to give it at this point? Can I instead just walk out to the forest and start chopping some logs? I'd rather cover my blade in forest than mustard.

I've seen some choose to force a patina with mustard, etc. to protect the blade. Personally, I've just enjoyed watching my blades gain a natural patina from use in the mountains. I'm a fan of how Alfie's has turned out with similar treatment:

Are we really sacrificing that much life of the blade by allowing a natural patina instead of forcing a mustard patina, etc.? I don't really like how the forced patina/blueing looks. I'm happy to buy a few spare BK-7s if that's what it will take to get a lifetime use if I am opting for too much abuse.

I picked up stainless hardware and blue loctite for re-assembling with micarta scales when all is done. I'll post a pic once it's complete.

Final question, anyone know of a better sheath maker for these blades? I will probably end up just finding a local leather worker to make something custom if there isn't someone out on the internet specialized in making better sheaths for these BK-7s.

Thanks a lot for any insight.
 
Last edited:
Congrats on the 7, and welcome to the madness!

You don't need a water-bottle-full of stripper. Just a decent coating and about 15-20 minutes if it's the nasty stuff. Heavy coating overnight if you go the citri-strip method.
I just scrape it off with a plastic scraper or putty knife - then rub down with steel wool. Gloves for sure!

You may want to consider leaving the scales, or some tape, on the handle tang in order to preserve the coating there. I've started doing it that way. My first couple where I stripped it all off had had moisture get in. Even though I forced the patina on the tang, it gets a little orange and gunky. I think I've got decades before I need to worry about the corrosion compromising anything in the knife, but now I choose to keep that part protected rather than disassembling for cleaning every few months.

Pretty much, follow Dub's tutorial.

I've used various acidic foodstuffs to force patina on my Beckers, but woods time should do just fine, too.
I have a carbon steel petty that turned several shades of dark just from the first 2 weeks of use (though I must admit to cutting lots of lemons, grapefruit and tomatoes in that time.)
When my idiot house-sitter left it in a damp sink for three days a couple years ago, the hideous orange stain buffed out with just a little 0000 steel wool. I can still see where it was, due to a deeper level of dark-gray there, but there is no rust or permanent damage.

Pics of the 7 all de-ramped, scaled, and patina'd are all held captive by the evil BotoPhucket, so nothing to share right now. High time to get make some more!

Many talented sheathmakers on here. Try a search. Psyop did the leather for my 7.
 
Last edited:
Congrats on your new BK7 :).

I've only stripped one knife (older BK9, with the smooth coating). I did it by just covering the coating with the stripper on a disposable pan, then scraping it off with a putty knife. The stripper I used was relatively thick and paste like, so I didn't feel the need to cover it in a solution/suspend it inside it, etc.

One thing I really wanted to point out though, is that bluing and a patina are not the same thing at all. Both help prevent bad red rust, and have vaguely similar appearances, but that's about where the similarity ends imo. The most important part to know about rub on cold "gun bluing", is that it is not food safe. A patina is a "friendly/useful" type of rust, that prevents the bad red, bubbly, cracking rust. It develops naturally over time, but can be accelerated or "forced" by applying pretty much anything acidic to the blade. Most commonly done by something like vinegar, mustard, hot sauce, etc.

Unless some giant huge red crumbly rust sneaks up and attacks your knife (aka, as long as you don't put it away wet, and leave it for extended durations), there is going to be no difference in the longevity of the blade if you force a patina, or just let it occur naturally.

Good luck with the project, and enjoy your new blade.
 
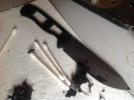
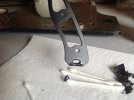
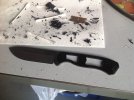
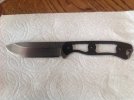
There's a lot of ways to strip. I like to keep it simple. First you need to decide if you want to deepen the logo, if you do that has to be done before stripping. I I'am not in any way saying my method is better than anyone else's this is just how I go about it . I trace the scales with a pencil then remove em put a small amount of paint remover in a small metal container and with a q-tip I work up assed it to the pencil line not passed it . Here's some pics hope this helps :D
View attachment 844324 View attachment 844325 IMG_0664.JPG IMG_0666.JPG IMG_0667.JPG IMG_0668.JPG IMG_0669.JPG
Learned not to use a plastic container to hold the very Small amount of remover that's needed to strip a blade :thumbsup:
 
Last edited:
As promised, here's the big 7.
De-ramped, stripped, patina'd, handled, and sheathed:

r4z63h0.jpg


bDQzNT7.jpg
 
Last edited:
Love those scales. Got a real 'rattlesnake' look to 'em. Haven't seen those. Did you make them?

The sheath is awesome too. Nice work.

Thank you!
Did the scales myself.
Layered brown and natural burlap mycarta.
White G10 pinstripe.
mycarta was a little thin, so dropped on top of burgundy canvas micarta bought online.
All laminated together with the same resin.
Was a lot of work, but I really like how they turned out.

I'm no good with leather, so I had Psyop make me up the dangler sheath.

These were the original "rattlesnake" scales - done up for my first Becker - the FPR 16.
I didn't know any better yet, so used Bondo resin for this set.

zqKOH69.jpg
 
The Klean Strip works good.
Coat the knife and let it hang 15-30 min. It seems to work better if it’s warmer. I’ve put it by a halogen light to excel the process. Usually just a razor blade is needed to scrape off the coating...maybe a small wire brush.
Repeat process if needed.
Remember, this isn’t rocket science. You can’t really mess anything up so just go for it.
Basically just like Xr6x showed. :D
 
As promised, here's the big 7.
De-ramped, stripped, patina'd, handled, and sheathed:

r4z63h0.jpg


bDQzNT7.jpg

How do you cut your hex nut shape into the micarta? I’m at wits end trying to figure this out! Your’s look great, so I figured i’d ask.
 
How do you cut your hex nut shape into the micarta? I’m at wits end trying to figure this out! Your’s look great, so I figured i’d ask.
Thank you. That's nice to hear! The 7 was my third try, and it was probably 4 years ago. When I look, I just see the areas where I thought it could be better. But they've held up!

I've tried a few different things. The one that worked best for me was a small Dremel high speed cutting bit mounted in the drill press.
Drill to depth with a drill bit. I forget which size - smaller than the nut. I think 1/4". Finish off with a router bit of the same size for a flat base.
Clearance Through-hole with drill bit.
A counterbore bit with desired through-hole diameter, enlargement diameter, and height would be ideal. But I never expected to do so many that it would be a worthwhile investment.
(In the end, to date, I've made 4 micarta and 4 wood Becker scales that I can think of, and modified another wood and a G10 set. But on some I decided to countersink and use flat-head hardware.)
Back to the process:
Mount nut on top of the scale by tightening down a bolt through the screw-hole.
Trace the outline of the nut. Remove.
Install cutting bit into drill.
Place the scale on the drill press table with the bit in the through-hole.
Set the table height.
Slowly, carefully, move the scale around on the table, cutting just to the inside of the trace.

Honestly, it's a very tedious process. Lots of measuring and checking. I often forget to keep the scale clamped down for through-hole, countersink, counter-bore and to keep it moveable (carving out the hex.)
I would do well to follow my own instructions precisely on my next set!
I usually forget a step, or run out of patience, and try something different on one or two of the holes. Small drill bit. Chisel. X-acto. Heat and pressure (most worked better on wood than phenolics, but also lost one to excessive pressure).
High-speed cutter gives cleanest results, but the others offer some degree of success with enough rework.

On several occasions I thought to document with photos, but my pics are generally crap and I get so involved in just making it work that I don't get around to capturing it.

There are also supposedly tools which will allow rotary machines to cut polygonal holes, but I haven't had the pleasure of trying any.

** Daizee and JD have had good luck, in Micarta, with counter-bore, then red-hot nut and pressure **

https://www.bladeforums.com/threads/making-hex-head-holes-in-knife-handles.856229/
 
Last edited:
Thank you. That's nice to hear! The 7 was my third try, and it was probably 4 years ago. When I look, I just see the areas where I thought it could be better. But they've held up!

I've tried a few different things. The one that worked best for me was a small Dremel high speed cutting bit mounted in the drill press.
Drill to depth with a drill bit. I forget which size - smaller than the nut. I think 1/4". Finish off with a router bit of the same size for a flat base.
Clearance Through-hole with drill bit.
A counterbore bit with desired through-hole diameter, enlargement diameter, and height would be ideal. But I never expected to do so many that it would be a worthwhile investment.
(In the end, to date, I've made 4 micarta and 4 wood Becker scales that I can think of, and modified another wood and a G10 set. But on some I decided to countersink and use flat-head hardware.)
Back to the process:
Mount nut on top of the scale by tightening down a bolt through the screw-hole.
Trace the outline of the nut. Remove.
Install cutting bit into drill.
Place the scale on the drill press table with the bit in the through-hole.
Set the table height.
Slowly, carefully, move the scale around on the table, cutting just to the inside of the trace.

Honestly, it's a very tedious process. Lots of measuring and checking. I often forget to keep the scale clamped down for through-hole, countersink, counter-bore and to keep it moveable (carving out the hex.)
I would do well to follow my own instructions precisely on my next set!
I usually forget a step, or run out of patience, and try something different on one or two of the holes. Small drill bit. Chisel. X-acto. Heat and pressure (most worked better on wood than phenolics, but also lost one to excessive pressure).
High-speed cutter gives cleanest results, but the others offer some degree of success with enough rework.

On several occasions I thought to document with photos, but my pics are generally crap and I get so involved in just making it work that I don't get around to capturing it.

There are also supposedly tools which will allow rotary machines to cut polygonal holes, but I haven't had the pleasure of trying any.

** Daizee and JD have had good luck, in Micarta, with counter-bore, then red-hot nut and pressure **

https://www.bladeforums.com/threads/making-hex-head-holes-in-knife-handles.856229/


Thanks for sharing your method! Imagine the tedium without the results, has been my experience. I will try the method you suggest. I’ve always wanted to find a quick way to do this so I could provide other Becker knife owners with a reasonably priced alternative to the $40-55 set they sell now, with the same 1 tool removal option. It looks like I won’t be doing so anytime soon, but in the meantime I can slap together handle slabs for other knives quite easily with what I’ve learned by trying. I actually thought it would be easy enough that within a month I would be selling these for about $25 a pair! With all the work involved I can see why people either pay the $50 or make them without the hex and replace the hardware.
 
Here's a link showing how I stripped my Cam BK2, and added a mustard patina. https://www.bladeforums.com/threads/mild-bk2-mod.1393307/#post16057350 .

Thank you for the walk through! I used the same method as you with the masking tape and reapplication of scales before applying paint stripper, it worked perfectly.

You don't need a water-bottle-full of stripper. Just a decent coating and about 15-20 minutes if it's the nasty stuff. Heavy coating overnight if you go the citri-strip method.
I just scrape it off with a plastic scraper or putty knife - then rub down with steel wool. Gloves for sure!

You may want to consider leaving the scales, or some tape, on the handle tang in order to preserve the coating there. I've started doing it that way. My first couple where I stripped it all off had had moisture get in. Even though I forced the patina on the tang, it gets a little orange and gunky. I think I've got decades before I need to worry about the corrosion compromising anything in the knife, but now I choose to keep that part protected rather than disassembling for cleaning every few months.

Yep, per yours and others advice, I opted to use much less paint stripper. A water bottle full would have been overkill for sure and suspending the blade upright was not necessary. Only a small amount was needed, enough to coat the blade is sufficient. I used a disposable metal tray with an angle to it, poured the stripper directly onto the blade, flipped the blade and coated the other side, and a cue-tip to apply stripper along the spine and fine detail areas of the blade. The angle of the disposable metal paint rolling tray allowed the blade to be fully coated on both sides without touching much of the tray on the down side.

I've only stripped one knife (older BK9, with the smooth coating). I did it by just covering the coating with the stripper on a disposable pan, then scraping it off with a putty knife. The stripper I used was relatively thick and paste like, so I didn't feel the need to cover it in a solution/suspend it inside it, etc.

One thing I really wanted to point out though, is that bluing and a patina are not the same thing at all. Both help prevent bad red rust, and have vaguely similar appearances, but that's about where the similarity ends imo. The most important part to know about rub on cold "gun bluing", is that it is not food safe. A patina is a "friendly/useful" type of rust, that prevents the bad red, bubbly, cracking rust. It develops naturally over time, but can be accelerated or "forced" by applying pretty much anything acidic to the blade. Most commonly done by something like vinegar, mustard, hot sauce, etc.

Unless some giant huge red crumbly rust sneaks up and attacks your knife (aka, as long as you don't put it away wet, and leave it for extended durations), there is going to be no difference in the longevity of the blade if you force a patina, or just let it occur naturally.

Yep, I went with the disposable pan and the stripper I used was also thick and gel like, it was called "brushable" paint stripper. There really was no need to suspend the knife at all.

Thanks for pointing out the difference between bluing and patina. I had read that information while researching but neglected to mention it in the thread, and it's definitely an important distinguishment. Thanks for the feedback on natural vs forced patina, I'll post some progress pics as the natural patina takes hold with some usage.

A few mor pics. Take your time or if you don't want paint under the scales just paint it on much faster than sanding :D

Thanks a lot for sharing the pics, it inspired me for sure to retain the coating underneath the handle and take my time carefully taping up around it. It sure was easy after applying the scales back on, using a razor blade to cut around the edges, and cue-tips for fine detail around the spine and such.

The Klean Strip works good.
Coat the knife and let it hang 15-30 min. It seems to work better if it’s warmer. I’ve put it by a halogen light to excel the process. Usually just a razor blade is needed to scrape off the coating...maybe a small wire brush.
Repeat process if needed.
Remember, this isn’t rocket science. You can’t really mess anything up so just go for it.
Basically just like Xr6x showed. :D

Thanks for the advice. I used Klean Strip and it sure did the job fine. I did it in the cold and didn't have much problem at all. A razor blade made quick work of it, along with my wire gun cleaning brush. You're right - there wasn't much tediousness or special care needed for this job, just attention to safety mostly.
 
Some pictures of the process:

QGPE1Uy.jpg

Scales off, fresh BK-7 ready to be stripped.

NRanF5o.jpg

Taping up to protect the coating under the scales, I only used long pieces along the spine, otherwise several small ~3/4" pieces wrapped around each contour.

OjBlpy8.jpg


eQiOzmP.jpg

Ready for scales to be reapplied and excess masking tape cut away.

goyEE12.jpg

Scales back on, as you can see I'd already cut away the excess masking tape around the top of the handle, about to cut the excess off the rear. I used that same razor blade tool to strip the blade after exposed to the stripper.

jhi8hap.jpg


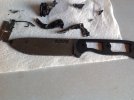
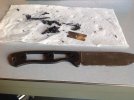
Stripping the blade after about 20 minutes of soaking. Coating came right off with the razor blade. Used the wire brush to clean the blade as I scraped and remove excess flecks. PU coated nitrile gloves worked great for protecting my hands from the stripper. It was gel like "brushable" stripper, didn't splash around much which helped too.

MtL68HG.jpg

After I was done stripping the blade, I wiped it off with a garage cloth until there wasn't any more visible stripper. Let it air out for a bit and then rinsed it off with water into some gravel. After removing the scales, the little bits of water soaked masking tape were easy to remove with a pair of pliers. It was like unwrapping a mummy.

VF8POm6.jpg

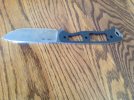
Success, a bit of sanding cleaned up the small bits I missed with the razor during the stripping process.

aanipab.jpg


w3xDWoC.jpg


5MHnpeVr.jpg


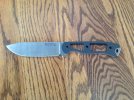
New micarta scales and stainless hardware with blue loctite, job done! Thanks everyone for the advice. Pretty pleased with how it came out, not concerned about the minor coating remaining. It's going to be a well used blade.
 
Back
Top