Surface grinder Chuck questions

Taz

Knifemaker / Craftsman / Service Provider
Joined
Apr 28, 1999
Messages
2,494
I am getting ready to build a surface grinder attachment for my 2x72 belt sander. For the magnetic chuck, I am using 6, 150# magswitches in the aluminum chuck itself. The chuck will be 24" long (so I can do longer blades/billets if needed), but most of my blades are between 7" and 15" in length. I am thinking of spacing the magnets centered 2.5" apart; does this sound OK? Should they be evenly spaced or is it OK to do say 4 close in the middle and the other 2 further out for longer billets? IE one at 0, 2.5, 5, 7.5, 10, 12.5 (even spacing) or do one at 0, then 4", then 7, 10, 13 and the last at 17? I was going to get some 95's to put closer to the end of the chuck so if I do a longer blade, I will have some magnets at the farther ends so they aren't just in the center of the chuck. Any issues using the 95's at the far end versus the 150? There shouldn't be much flex difference due to the different powers of the magnets because the blade will be supported by the aluminum bar anyway. Longer blades will generally be thicker and flex less if there are different power magnets.

The chuck will be 1/2" thick aluminum bar, attached to 1/4" aluminum angle iron (3/4" off set for the 150 mag chuck) with a thin spacer under the magswitches (prob 1/16" G10, or some SS washers if I can find them) to give me some extra meat to grind the chuck fully flat once I get it installed.
 
I would suggest setting it up so that when you grind the chuck flat on the grinder that you also grind the MagJigs flush with the aluminum. That way you don't have an an air gap as an air gap will greatly decrease the holding power. Maybe this was your plan but since you mentioned 1/16 spacers I thought that seemed like an excessive amount of aluminum to have to grind off. I believe you can safely grind at least 1/32 off the MagJigs without damaging them. That should be plenty to get the chuck flat.

I like the idea of having 4 of them spaced close together in the middle with the other 2 out towards the ends.
 
Ah, gotcha! Once I get the mag switches installed into the chuck, I can see what I need to do in order to get everything flat and even and if I need a spacer or not. Figured the spacer would give me plenty of meat to grind to get everything flat and flush.
 
Taz, I sorta think I like the center spacing with one on each end. That allows lots of magnetic force in the center for all blades, even the short blades. The long blades will still have the center, plus the mag on end will help hold the blade in place.

Not sure how much metal can be removed off the face of the mag switches. Might consider mounting them a couple thou below surface to have room to grind the finish flat? That grinding step is for sure required, and will need repeating from time to time.

Be sure to post progress so we all can see how mounting the mag switches are handled. I've thought the mag switches would be my choice where I to build another SGA
 
Depending on how you are planning to mount the magnets I have the dimensions of the through hole and flange bolt holes I could share.
 
Center with ends it is! I may put some thin washers (or g10 pieces or something pretty thin) between the magswitches and the angle iron so they will be slightly recessed, so I can grind everything flat without having to grind the magnets much. I can add extra spacers if I run out of regrind room and can replace the 1/2" aluminum bar if needed as well over time and use the aluminum angle iron over again. I wanted switcheable magnets, but didn't want to have to deal with power cords and stuff with the door magnets at this time.

I have 6, 1/16" thick Magnacut Shechita blanks to make now, so I will surface grind them for a smoother finish after HT and to remove any warpage/straightening marks. These have 18" blades, plus the handle, so they are long and it will be much easier to surface grind them than try to use my 8" glass platen! LOL!

I picked up a 90 Durometer, 6" rubber contact wheel, manual sliding actuator table and the 5 bearing inner linear rail set up and the 6 Magswitch 150's, plus some aluminum angle and 1/2" thick bar. With the AmeriBrade, it uses a 2" tubing arm, and I saw on Dennis Tyrell's build he needed a 1/2" spacer on his build to get the chuck lined up with the wheel, so I may not need that extra 1/2" spacer because my tool arm is 1/2" wider! Hoping to start on it soon, maybe even tonight! I will mount the wheel to my SGA arm, but may do one using the 6" hard wheel on my Combo Platen so I can do fullers eventually with it. I think mounting the wheel to the arm will be more precise and repeatable though.

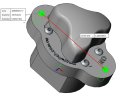
I picked up a 35mm carbide tipped hole saw for aluminum and read to do 2 holes, slightly spaced apart (like 5/16" apart or something?) to get an oval hole so the magnet doesn't twist as much and there isn't as much gap around the magnet body itself? I think I will mount them horizontally on the chuck so I get more magnetic length instead of width if that makes sense? Or maybe alternate them a bit? 2 centered horizontally, 2 vertically and the far 2 horizontal. I just need to get the hole/screw dimensions for the screws to mount them to the aluminum, they look like maybe 10/32 or 10-24 screws just eyeballing them? I think thats the flange bolt hole where the wings have holes on them to mount to a jig?

I will probably start laying parts out today and may start drilling/tapping some of the pieces, cutting aluminum angle iron and barstock, etc. I gotta get a spacer (need like 1.75" or so to line up with the other wheels), 7" long 1/2" bolt for the wheel axle, screws and nuts, etc at the hardware store on the way home.
 
MAGJIG150.JPG
It's a weird spacing for the mount holes. 4mm screws fit snug in the holes so #10 screws wont fit unless they are drilled out.

If you drill two 35mm holes space them each 3/16 off center or 3/8 apart and that should fit nicely.
 
why not use a magnetic lock for a door ??? they rate to 1500lbs hold force....
just apply power to engage... cut power to dis engage.... and only need 12v power (Cordless tool battery)
 
I didn't want to deal with cords, batteries and power for this build.
 
As a electrician I've used a lot of mag locks. Hate them for door security for tons of reasons. BUT they have incredible strength and wondered why more people don't use them for this. I've saved several that we retrofitted for the ton of reasons they are horrible for door locks.
Example if they loose power they become unmagnetic. But this alone is overcome with a power supply with battery back up. That's one on the list of many of their problems when using for door security.
 
Last edited:
yes indeed i spent the past 20 ish years putting them in ... told many many people of their shortcomings. but they wanted them because they were the cheaper option..
give it power and it works beyond what you need for surface grinding a blade (de magnetize afterwards... and they can be had for like $50.00...
 
3sJn9jW.jpg


Still have 2 more 150's to put at the end of the chuck, but this is how I did them. Looks ugly, but it works! I will do the others at the ends of the chuck. I have 3 in a 8" span and the 4th is a little farther out.

WIP post is up for the build, too! Still needs some work, but it's functional! The steel on the chuck holds the magswitches in places without being attached to the chuck via screws...lol.
 
Back
Top