Stacy E. Apelt - Bladesmith
ilmarinen - MODERATOR
Moderator
Knifemaker / Craftsman / Service Provider
- Joined
- Aug 20, 2004
- Messages
- 38,235
A while back, Charles at Atlas sent me the prototype forge for the new Graham line. This is a larger forge than the Atlas-Mini. I have used it a good bit and have made a review of it for print. I thought you chaps would like the sneak preview. I will post a bunch of in-use photos in the next day or two.
Forge review Atlas large size forge
Charles at Atlas sent me a new prototype forge to test out. This is my review of it.
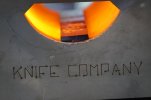
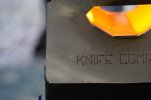
The design is a rectangular forge with a firebrick refractory. The chamber is oval, 12"X5", with the burner port at the front, angled rearward. This is a feature of the Atlas forges, and is a feature Charles has developed. It makes good sense to have the larger part of the dragons breath exit out the rear, instead of out the front at you. The tangential swirl path of the burner flame is much better than the straight down you see on many budget forges. It greatly reduces hot spots and evens out chamber temp and refractory soaking.
It arrived packed in a sturdy box, padded with Styrofoam. The foam was pretty well pulverized. Charles has changed the packing to a stronger type. The forge itself was in perfect shape. The construction of welded sheet metal, strong bracing, and solid firebrick insulation made for easy shipping and no damage. There is a top handle that makes lifting and moving the forge easy. It is a bit heavy to be called portable, but isnt too heavy to move from place to place in the shop, or transport to a hammer-in or demo.
Upon taking it out, it was a complete unit with only the burner to install. My first impression was that this was a real beast. It is a good bit more than just a scaled up mini-forge. Style, shape, and basic construction were good. Sure, the welds were a bit less pretty than ones from a production factory, but they were strong and sufficient. I am sure that was also partly due to this being a prototype.
The burner installed with three bolts, and is a very simple burner. It is a venturi type that is welded together, so no adjustments are needed. The only adjustment is moving it in and out of the burner port tube to find the sweet spot where it burns best. To be honest, I had my doubts about it, but it ran surprisingly well for as simple as it looks. Charles has done his homework on burner design and function, and eliminated the more expensive parts and features that arent directly involved in burning. The basic result is a good low cost burner. I dont think you could build one from scratch for the price he sells his burners for.
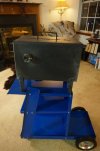
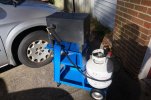
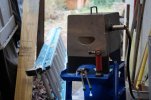
I set the forge on a Harbor Freight rolling welder cart. They cost about $40. It was like the forge was built to be on it. All your tools, tongs, and stuff can be placed on the shelves below the forge, and the propane tank can sit on the back lip where the gas tanks would go. The forge ports height was also perfect on the cart. This type cart is how I would recommend the forge to be used.
The burner comes with a simple regulator, hose, and the burner assembly. It is plug and play. The setup is very simple, but works well. If someone wanted to make a better burner system, change the regulator to one with a gauge, or go with a small blown burner - the burner port tube is more than large enough to accommodate it. This is good, as it allows growth for the forge in the future.
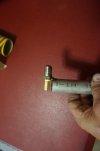
The forge lit with only minor difficulty. I had to play with the burner position in the tube, and the gas pressure, to get it to light. I ended up putting it almost flush with the chamber wall, and turned the gas up high. I put a black marker line on the burner at the port tube so I could see how to move it in and out when fine tuning. It runs on just the right amount of gas pressure. Too much and it blows out, too little and it wont form a flame, or back-flashes. It was quick to figure out where to set the regulator and get running. After about 5 minutes warm up, I moved the burner in and out and got a good burn and sound. It runs fairly quite for a full size forge.
It heated the chamber well. The front left area was hotter than the rest, but not unreasonably so. I think any forge has a hot spot from the burner flame path. After about 10-15 minutes soak time, the whole chamber was pretty evenly heated. I tweaked the burner one last time, and made a small cut mark on the burner with a hack saw to allow placement in the exact right spot if removed for transportation or burner changes. The mark is where the burner enters the port pipe.
Running and Forging:
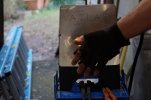
The forge certainly got hot! I had to throttle it down some to keep it from being too hot. While I havent tried yet, I am sure you could weld in this forge. I kept two 1X.25X24 bars in the forge at the same time, and could do a forge heat with one, and stick it back in the forge, then remove the other. The prior bar was back up to heat by the time the second bar was cooled below the forging temp. I had to back it down a bit more to keep up with it. The bars were a bit hotter in the front than the back, but that allowed for selective placement to forge specific areas on the blade. Overall, the forge worked great for general forging. The back port allows long bars and swords to be worked.
One sort of funny thing is that when running for a while, it tosses out fine white sand which is the ash and dust from the liner bricks. They have loose grit on/in the surfaces that is blown out the ports. It is of no harm, and stops after a few hours of run time.
HT:
I tried turning it down to see if it would hold at HT temps around 1500F. It was a real trick to keep the 100K burner from back-flashing into the burner tube at that low gas pressure. I think that the smaller 35K Atlas burner would work great for HT and the larger 100K for forging and welding. This is just another good thing about the Atlas series of burners and forges the burners are interchangeable. I hear that Charles is working on a very simple blown burner. Im interested in seeing how that turns out.
Overall impressions:
It is a good medium duty forge at a very reasonable price. It ships well - not all forges survive shipping. Some come with the refractory items un-installed, and you have to build the liner yourself.
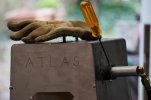
The basic black high-temp stove paint finish is good. It could be touched up if needed, or be a base for those who want to creatively decorate their forge. I may add red flames to this one.
It is simple and has no real learning curve set it up, light it, adjust the flame forge.
A sliding work shelf at the front port would be a good feature. I mentioned this to Charles, and he is looking at incorporating this into the design.
The front panel was installed with only two screws. It needed more screws, as it warped a bit at the top and bottom in the heat, but that was because this was a prototype. Charles said he has addressed that in the production models by using four clips. It was not an issue as far as use, and I just straightened the front panel and it was fine.
While it ran great at full blast, the burner was hard to get down to a stable low flame. I used a piece of bent tin to make a simple choke, which worked well. Charles is adding a sliding choke to his burners that will greatly improve the burners tuning adjustment for low flame use.
The oval ports are just right for general forging. They are wide enough for larger and curved blades and forging projects. They might be too small for some larger and wider things like hawks. They are not high enough for large billets, but would allow smaller damascus billets. Since the refractory is firebrick, and the sheet metal is thin and removable, modifying the front port to be larger if needed would be simple enough for anyone.
Would I recommend this forge Absolutely. This is a great step up from the Atlas mini, and can stand on its own against other commercial forges in its price range (actually, most commercial forges that are equivalent are much more expensive). I would think that many new smiths will have an easier start with one of these, and may never need a bigger forge. It wont replace a NC Whisper with a side door, or a big vertical welding forge but it isnt intended to. It is a very good general forging forge for bladesmiths, at a very affordable price.
Forge review Atlas large size forge
Charles at Atlas sent me a new prototype forge to test out. This is my review of it.
The design is a rectangular forge with a firebrick refractory. The chamber is oval, 12"X5", with the burner port at the front, angled rearward. This is a feature of the Atlas forges, and is a feature Charles has developed. It makes good sense to have the larger part of the dragons breath exit out the rear, instead of out the front at you. The tangential swirl path of the burner flame is much better than the straight down you see on many budget forges. It greatly reduces hot spots and evens out chamber temp and refractory soaking.
It arrived packed in a sturdy box, padded with Styrofoam. The foam was pretty well pulverized. Charles has changed the packing to a stronger type. The forge itself was in perfect shape. The construction of welded sheet metal, strong bracing, and solid firebrick insulation made for easy shipping and no damage. There is a top handle that makes lifting and moving the forge easy. It is a bit heavy to be called portable, but isnt too heavy to move from place to place in the shop, or transport to a hammer-in or demo.
Upon taking it out, it was a complete unit with only the burner to install. My first impression was that this was a real beast. It is a good bit more than just a scaled up mini-forge. Style, shape, and basic construction were good. Sure, the welds were a bit less pretty than ones from a production factory, but they were strong and sufficient. I am sure that was also partly due to this being a prototype.
The burner installed with three bolts, and is a very simple burner. It is a venturi type that is welded together, so no adjustments are needed. The only adjustment is moving it in and out of the burner port tube to find the sweet spot where it burns best. To be honest, I had my doubts about it, but it ran surprisingly well for as simple as it looks. Charles has done his homework on burner design and function, and eliminated the more expensive parts and features that arent directly involved in burning. The basic result is a good low cost burner. I dont think you could build one from scratch for the price he sells his burners for.
I set the forge on a Harbor Freight rolling welder cart. They cost about $40. It was like the forge was built to be on it. All your tools, tongs, and stuff can be placed on the shelves below the forge, and the propane tank can sit on the back lip where the gas tanks would go. The forge ports height was also perfect on the cart. This type cart is how I would recommend the forge to be used.
The burner comes with a simple regulator, hose, and the burner assembly. It is plug and play. The setup is very simple, but works well. If someone wanted to make a better burner system, change the regulator to one with a gauge, or go with a small blown burner - the burner port tube is more than large enough to accommodate it. This is good, as it allows growth for the forge in the future.
The forge lit with only minor difficulty. I had to play with the burner position in the tube, and the gas pressure, to get it to light. I ended up putting it almost flush with the chamber wall, and turned the gas up high. I put a black marker line on the burner at the port tube so I could see how to move it in and out when fine tuning. It runs on just the right amount of gas pressure. Too much and it blows out, too little and it wont form a flame, or back-flashes. It was quick to figure out where to set the regulator and get running. After about 5 minutes warm up, I moved the burner in and out and got a good burn and sound. It runs fairly quite for a full size forge.
It heated the chamber well. The front left area was hotter than the rest, but not unreasonably so. I think any forge has a hot spot from the burner flame path. After about 10-15 minutes soak time, the whole chamber was pretty evenly heated. I tweaked the burner one last time, and made a small cut mark on the burner with a hack saw to allow placement in the exact right spot if removed for transportation or burner changes. The mark is where the burner enters the port pipe.
Running and Forging:
The forge certainly got hot! I had to throttle it down some to keep it from being too hot. While I havent tried yet, I am sure you could weld in this forge. I kept two 1X.25X24 bars in the forge at the same time, and could do a forge heat with one, and stick it back in the forge, then remove the other. The prior bar was back up to heat by the time the second bar was cooled below the forging temp. I had to back it down a bit more to keep up with it. The bars were a bit hotter in the front than the back, but that allowed for selective placement to forge specific areas on the blade. Overall, the forge worked great for general forging. The back port allows long bars and swords to be worked.
One sort of funny thing is that when running for a while, it tosses out fine white sand which is the ash and dust from the liner bricks. They have loose grit on/in the surfaces that is blown out the ports. It is of no harm, and stops after a few hours of run time.
HT:
I tried turning it down to see if it would hold at HT temps around 1500F. It was a real trick to keep the 100K burner from back-flashing into the burner tube at that low gas pressure. I think that the smaller 35K Atlas burner would work great for HT and the larger 100K for forging and welding. This is just another good thing about the Atlas series of burners and forges the burners are interchangeable. I hear that Charles is working on a very simple blown burner. Im interested in seeing how that turns out.
Overall impressions:
It is a good medium duty forge at a very reasonable price. It ships well - not all forges survive shipping. Some come with the refractory items un-installed, and you have to build the liner yourself.
The basic black high-temp stove paint finish is good. It could be touched up if needed, or be a base for those who want to creatively decorate their forge. I may add red flames to this one.
It is simple and has no real learning curve set it up, light it, adjust the flame forge.
A sliding work shelf at the front port would be a good feature. I mentioned this to Charles, and he is looking at incorporating this into the design.
The front panel was installed with only two screws. It needed more screws, as it warped a bit at the top and bottom in the heat, but that was because this was a prototype. Charles said he has addressed that in the production models by using four clips. It was not an issue as far as use, and I just straightened the front panel and it was fine.
While it ran great at full blast, the burner was hard to get down to a stable low flame. I used a piece of bent tin to make a simple choke, which worked well. Charles is adding a sliding choke to his burners that will greatly improve the burners tuning adjustment for low flame use.
The oval ports are just right for general forging. They are wide enough for larger and curved blades and forging projects. They might be too small for some larger and wider things like hawks. They are not high enough for large billets, but would allow smaller damascus billets. Since the refractory is firebrick, and the sheet metal is thin and removable, modifying the front port to be larger if needed would be simple enough for anyone.
Would I recommend this forge Absolutely. This is a great step up from the Atlas mini, and can stand on its own against other commercial forges in its price range (actually, most commercial forges that are equivalent are much more expensive). I would think that many new smiths will have an easier start with one of these, and may never need a bigger forge. It wont replace a NC Whisper with a side door, or a big vertical welding forge but it isnt intended to. It is a very good general forging forge for bladesmiths, at a very affordable price.
Last edited:


")