Titanium for guards and fittings

It's just hard to work with. I tried to do a guard with it but my mini-mill just gummed up while slotting it. Had carbide mills and ran slow with minor depth each pass and finally got through it. As it turned out, I slotted it too wide and couldn't use it for that blade so it's just sitting in a drawer for later.
 
My take on it:

6-4 is harder and more scratch resistant than mild steel, has a lovely color, takes a good polish and retains it well. But it is a bugger to work, expensive, and the color is different than steel and may not look right on some knives.
 
Thanks guys. I realize that the colour won't work well on all knives, but I think it would be fine used with the right associated materials. Being hard to work with is a problem though.

I wouldn't think the price would be much of a deterrent. Maybe on lower priced knives, but not once you get to the mid price range.
 
BTW good tip in working with Ti
cool tool when cutting and good cutting lube when tapping

if the Ti gets warm when milling it will likely brake your bit cause of how gummy it gets
 
Keith, the amount of work required to make a through guard or even a slotted guard would push a mid priced knife into the $800 plus range.

The other considerations are tool breakage(most of us mill without high volume flood cooling), the problem of pinning the guard in place, and the difficulty of final filing of the slot to exact size for the blade for a tight fit.

I know that some makers do have the technology and training to do this sort of work but they tend to apply that to folders, Brian Tighe comes to mind right off.

George
 
I just happen to have a Bar of Ti thats 1/2" x 6" x 6ft. Perfect for guards and such.:D
 
I guess that depends on if your relying on it for part of the weight. You can always take some of the weight out of the blade by grinding or add weight to the handle with a butt plate.
 
Ti is certainly more difficult to work with than other common fitting materials. I've been doing a few knives with Ti guards/fittings. It requires changing methodologies a bit, but I think it can add something to the knife that can't be achieved with commonly used guard materials. This knife will be at the Blade show.....

blade09fossilcamp.jpg


What I have found as far as the weight/balance issue by using Ti, is that it makes a knife feel deceptively "light and fast". Even my wife commented about how light this on was for such a large knife. (10" blade).
 
I really appreciate all the replies.

That is a beauty, Ed. Heat colouring like that is one things about Ti that I think makes it a very interesting material for guards and fittings.
 
As Mr Newberry mentioned, I do almost all my handle furniture in titanium. I use CP grade 1 or 2 for most of the pieces. Here are some pics including some shots of the finished piece and one showing the guard plates pierced but still squared, not yet shaped. I do use a pommel (also titanium) in order to balance the knife better. Some parts are flat plates that have been pierced and shaped and filed, others are collars and curved pieces that have been hammered to shape and TIG welded. The knife is constructed using a modified Japanese style "toggle tang" method so it is a complete takedown piece. It comes apart into seventeen separate parts... which is why I call it a haiku.

I used to do all these parts in stainless steel. A similar knife with stainless furniture might weigh 9.5 oz... this knife weighs barely 7 oz. and the balance is exactly on the first finger.

I'm totally sold on titanium for the furniture. Yes it's more work, but it makes a better knife. If it makes it cost more then it does. The idea is to make the best possible knife, no matter what it takes. Titanium has some really great properties that makes it work for this application. I think that if titanium had been known to the ancients, it would have been the true mythical "mithril" metal and it's worth would have been many times that of gold. The weapons and armor of the greatest and wealthiest kings would have been made with it.
 

Attachments

  • 919-Photo-09-Compressed.JPG
    919-Photo-09-Compressed.JPG
    29 KB · Views: 70
  • 919-Takedown-01.jpg
    919-Takedown-01.jpg
    48.5 KB · Views: 82
  • 919-WIP-01-Compressed.JPG
    919-WIP-01-Compressed.JPG
    56 KB · Views: 71
  • 919-Photo-10-Compressed.JPG
    919-Photo-10-Compressed.JPG
    34.5 KB · Views: 61
Tom,Ed

those are beautiful knives!!!

I'm mainly into the folders,and pretty much exclusivly use TI.sharp tool's/belts and a little experience it just becomes second nature
:) Now milling alot of it....,Sucks :D
 
Tom - thanks for posting the photos of the takedown. I was really glad to meet you at the show.

I do some ti furniture, but mostly bolsters for screw constructed knives. You can put a very nice, non-colored finish on ti with a little work. Colored ti liners on some fixed blades also look cool, it goes rather nicely with MOP.

I don't make high-end knives like Tom, I'm just not that good.

Cap
 
Mardi (i can't even began to spell his last name) at Tooth and Nail Metalworks makes some really stunng pieces using titanium for fittings. The stuff he had at Blade was really bad ass!
 
Tom, GREAT looking knife :thumbup: :thumbup: Lots of questions for you ;) :D

Is this Haiku the same construction as Dudleys "Grail Knife" ?

I'm curious as to the construction method used to create the Habaki on the Haiku, is that one of the TIG welded parts ?

When TIG welding Ti are you cranking the argon flow way up or did you use some type of contraption to help create an atmosphere compatible with/for the TIG welding of the Ti ? Could you share some Ti TIG welding tips with us please ? :o :)

Are you using CP Ti for your furniture mainly because its easier to machine or is there another reason ?


Ed, another BEAUTY !! Great looking Damascus ! Beautiful guard work ! Very nice looking handle !! Perfect :thumbup: :thumbup: ;)


:cool:
 
Q#1: Is this Haiku the same construction as Dudleys "Grail Knife" ?
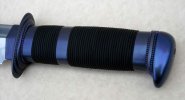
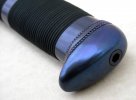
Q#2: I'm curious as to the construction method used to create the Habaki on the Haiku, is that one of the TIG welded parts ?
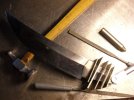
Q#3: When TIG welding Ti are you cranking the argon flow way up or did you use some type of contraption to help create an atmosphere compatible with/for the TIG welding of the Ti ? Could you share some Ti TIG welding tips with us please ? :o :)
Q#4: Are you using CP Ti for your furniture mainly because its easier to machine or is there another reason ?


Hi David:

Q#1: Yes the Haiku have the same construction as Dudley's "grail". His was done earlier this year before I had come up with the name. There was no real planning involved... just serendipity. I had worked out a method involving a certain way of putting it together... and seventeen was the minimum number of parts to make the system work. It suddenly struck me that this was also the number of syllables in a haiku poem! This seemed appropriate on so many levels that it was just one of those dope-slap-to-the-forehead moments. So Dudley's is a pre-haiku Haiku... if you will....

Q#2: Yes, the habaki is formed in more or less the traditional way... by folding a flat strip of metal over the top and then fusing at the bottom. Normally this would be done by soldering in copper. Long ago I switched to using stainless steel for the habaki and TIG welding it. Now I've switched to titanium and updated the TIG technique to accommodate the material.

Q#3: The TIG welding of the titanium was quite a problem for me. Fortunately I did not have to reinvent the wheel... welding titanium is frequently done in aerospace applications and there are books and reference materials that cover various methods of insuring a complete argon shield. Since the parts are very small the most effective method I found was the "purge bowl". Basically this is a stainless steel salad bowl with holes drilled through the sides to accommodate clamping and fixturing hardware. A T-block and second regulator are affixed to the argon bottle. The second line goes to a fitting welded into the bottom of the bowl, a fine mesh screen is placed over the inlet to diffuse the gas flow. Gas is turned on to the bowl at 20 cfh or so for at least 20 seconds before welding begins. Argon being about 1.4 x the density of air has a tendency to sit in the bowl. The torch then has the second argon feed from the top. The workpiece must of course sit well down into the bowl below the rim. Between the two gas feeds it is enough! Parts are cold hammered to final shape after welding, so if the weld is bad it will break or crack. You can see this right away. I use the 0.040" thoriated tungsten electrode... the pulser set at 2/s and max power of about 25A.

Q#4: Mostly I started using CP because I also make coins, and CP is soft enough to actually make coins out of. So it's not so much the machinability as the formability that makes it superior. The CP stuff is a little stiffer than mild stainless... just need to use a bit more force and sometimes a heavier hammer. The habaki and the collars are all formed by cold-hammering and that ultra-stiff and springy 6-4 material is simply unsuitable for the purpose. The pommels are actually 6-4 because I could not find CP thick enough to use for those, but they are machined and ground and need no cold forming. Machining 6-4 is a bit of a pain but if tools are kept sharp and cool it works okay. I have not tried TIG welding on the 6-4 material, but I have heard that it displays significant dimensional change (shrinking) which could cause problems with close fits.
 
Last edited:
Back
Top