-
The BladeForums.com 2024 Traditional Knife is ready to order! See this thread for details: https://www.bladeforums.com/threads/bladeforums-2024-traditional-knife.2003187/
Price is$300$250 ea (shipped within CONUS). If you live outside the US, I will contact you after your order for extra shipping charges.
Order here: https://www.bladeforums.com/help/2024-traditional/ - Order as many as you like, we have plenty.
You are using an out of date browser. It may not display this or other websites correctly.
You should upgrade or use an alternative browser.
You should upgrade or use an alternative browser.
Vacuum Pump?
- Thread starter Tom Lewis
- Start date
what kind of hardner to use in stabilizing
Min-Wax makes a product called Wood Hardener. This product is made to strengthen rotted wood. I tried it in my acrylic vacuum container and came back 30 minutes later to find it damn near ate the thing up. It is caustic and toxic. Rit dye will mix with it with some effort.
From Lee Valley Woodworking , you can get a product called Pentacryl, which is a wood stabilizer. This is non-toxic 'siliconized polymer'-- what ever that is. It doesn't eat acrylic, which is nice. It will add noticable density and weight to your wood after treatment where I found the Wood Hardener simply made it hard. It will also slightly darken your wood, the MinWax product doesn't darken it much at all. Rit dye, at least the liquid, doesn't like to mix all that well with the Pentacryl, but it will with some effort. I will have to try the powder. It is slightly more viscous (like thin maple syrup) than the Wood Hardener.
Once I use my Wood Hardener up, I will switch to Pentacryl until I find something better.
- Joined
- Nov 19, 2000
- Messages
- 96
The Pentacryl sounds like just the kind of stuff I'd like to try, but it sounds a bit thick to get good penetration. What is used for thinning and cleanup for it?
On the vacuum pump note, e-bay always has a slew of these that can be gotten reasonably. That's where I got mine and it will pull 27lbs in about five seconds in my 2.5 gal chamber.
Steve
On the vacuum pump note, e-bay always has a slew of these that can be gotten reasonably. That's where I got mine and it will pull 27lbs in about five seconds in my 2.5 gal chamber.
Steve
but it sounds a bit thick to get good penetration
Make that real thin maple syrup. I have treated maple burl scales in about 30 minutes. I haven't tried typical blocks yet but will soon and report back. Problem is I ran out but have more coming. I suspect it will penetrate fine with a little time and some vacuum. I'm also playing with dye so I should be able to see clearly the penetration. I was using a food saver for this, and will continue using it for small stuff. I did pick up a vacuum pump from ebay and will give that a whirl on some larger pieces other than scales. Pentacryl reccomends no thinning so I haven't. I believe it is the way to go for the small shop considering toxicity and results obtained so far with it.
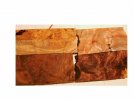
Here is a comparison of Pentacryl to Min-Wax Wood Hardener.
4 pieces, the top two are Wood Hardener, the bottom two are Pentacryl treated. The right two are redwood burl, the left two are maple burl.
The Pentacryl pieces are noticiably darker than original and tend to increase contrast of the wood grain. I think the Pentacryl enhances the pattern of the wood. You might feel differently The Wood Hardener pieces are slightly darker than original and take on a wet,shiney look.
Attachments
While I'm at it here, I'll post a couple more pics.
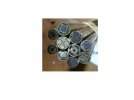
Making Mosaic Pins
Here are some mosaic pins I made using my Food Saver. This the As seen on TV gadget that seals food in a bag. It also has a tube you can attach and pull a vacuum with.
I cleaned out all the local RC model hobby shops of their small wires, tubes and sqaure tubes. Brass, copper, stainless, aluminum, what ever. I also went to a couple hardware stores and welding supply places. I ended up with dozens of assorted wires and tubes. I mixed up some epoxy (West System 105) in a small dixie cup, about an inch worth and added some liquid Rit dye. Also on one of my knife supply shopping junkets, I had picked up some assorted sizes of poly tubing. I found a piece of tubing that would fit the Food saver and the mosaic pin tubing. Making the mosaic pin stock is simply trial and error. Keep it to 12" or less, pulling the epoxy any higher than that is tough. The pins should be a tight fit. If the pins in the tubes are loose, you won't get a consistant pattern as the pins or tubes inside wallow around. Clean all the pin material with acetone to help the epoxy grip a bit better.
Pulling the epoxy up the tube from the dixie cup of epoxy, takes a bit of time -- 20 to 40 seconds. When the epoxy finally makes it out of the top, keep it coming so you have an inch or two of extra epoxy in the poly tube. This will allow a little settling in case an air bubble works it's way up.
Now, how do you plug the bottom of the tube so the epoxy doesn't leak out? I used a small wad of kids playdough, tossed it in the epoxy and then pushed the bottom of the (epoxy filled) mosaic pin into the playdough to act as a plug. Cut the poly tube off at about an inch above the epoxy and stand it upright in the corner to harden.
In one batch I used some acetone to thin out the epoxy, it thinned it but left the epoxy slightly rubbery instead of hard. I doubt this is going to be a problem but thought I should point it out.
Attachments
- Joined
- Nov 19, 2000
- Messages
- 96
How much vac, how many times, etc.?
Thanks again. I'm definately going to have to gift this stuff a try.
Steve
Thanks again. I'm definately going to have to gift this stuff a try.
Steve
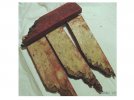
Ok, here is a pic of attempting to stain and harden a piece of maple burl. I used Rit red dye in some Min-Wax Wood Hardener under a vacuum for 24 hours. The original block was approx 2"x2"x5". When I sliced it up, I could see where the hardener had penetrated the outer 1/4" and worked it's way all the way through any voids in the wood. I don't believe the wood hardener soaked the wood as completely as I had hoped for. The red dye shows it made it through some of the spalted areas and large pores in the burl. The tight grained areas showed little, if any dye or wood hardener.
I am convinced that a scale of 3/8" or so would get soaked and dyed effectively with a 48 soak under vacuum. From other tests, I also know the scale will warp a bit. When it comes out of the soak, stack it under some heavy weight until it dries and hardens. This will keep it fairly flat but do plan on some loss to sanding to get it flat again.
On this test, the red dye appears red and blotchy on these scales, almost as if you had spilled Kool-aide on it. Not at all attractive.
Maybe some one else can comment on their tests..
My question is, what kind of vacuum pump do you use,
I use a A/C service vaccuum pump. Before I got that, I used a York Air conditioner compressor off an old Ford car. They are a dime a dozen and will draw about 25-27"hg depending on how worn out the pump is. The only reason I quit using the york is because I was given the other pump. You should be able to set one up for <$20. If your interested in using one e-mail me and I can give you the particulars.
- Joined
- Oct 10, 1998
- Messages
- 224
I'm a desciple of Wayne Goddard (tightwad ;-) ), and make do with what I have available.....old compressors out of refrigerators will pull almost 30" HG of vac, and cost next to nothing.
The BEST stuff I found for using as a solution is LocTite RTC 90 (IIRC), which is heat activated. Can pull it out ofthe chamber soaking wet, put it in an old toaster oven at 250F for a couple hours, and will set up hard as nails....
It ain't cheap, but the best I;ve found.....
Harry
The BEST stuff I found for using as a solution is LocTite RTC 90 (IIRC), which is heat activated. Can pull it out ofthe chamber soaking wet, put it in an old toaster oven at 250F for a couple hours, and will set up hard as nails....
It ain't cheap, but the best I;ve found.....
Harry
")
- Joined
- Dec 4, 2001
- Messages
- 3,824
Harry, where do you get LocTite RTC 90 (IIRC), and how well does it penitrate? I am useing an old refrigerator compressor and it pull 26" of vacume.
So far I havn't had any real sucess yet, been useing thined polyurithane. I tried some Rit Dye and wood hardner on some scrap bone, wasnt' 100% dyed, and a lot of the wood hardner boiled off.
Thanks, Will
So far I havn't had any real sucess yet, been useing thined polyurithane. I tried some Rit Dye and wood hardner on some scrap bone, wasnt' 100% dyed, and a lot of the wood hardner boiled off.
Thanks, Will