Walters axe with knob end handle WIP - Pic Heavy

Square_peg

Gold Member
Joined
Feb 1, 2012
Messages
13,793
Here's the full story of restoring an old Walters and creating a knob end handle for it. The inspiration for this build came from an old thread we had last Spring:

Full size single bit design
https://www.bladeforums.com/threads/full-size-single-bit-design.1480730/#post-17035485

I started with a perfect hickory stave sent to me by Quinton. Air dried, perfectly straight grained and about 39" long - enough to do whatever I pleased with.
Stave%203.jpg


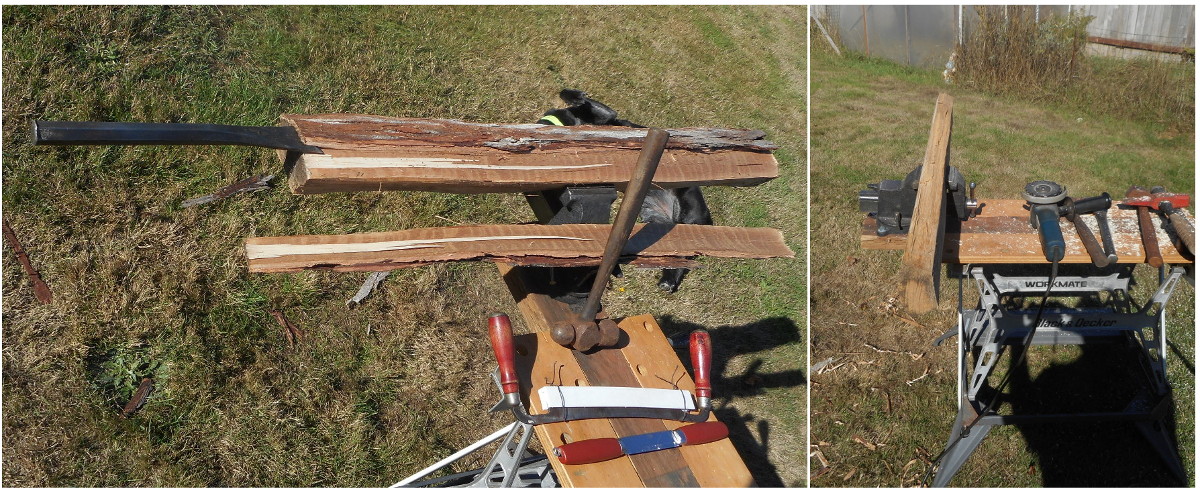
I have never worked with a hickory stave before. It's not available here in the NW. First thing I learned is that it is tough! Even the bark is miserably tough. A draw knife wouldn't touch it. I had to chisel the bark off with a heavy slick and I was still beating the slick until I got to the last 1/2" from the end of the piece. Amazing stuff that hickory bark. I learned it is used for weaving chairs. My friends wife does some weaving so I called her and she actually needs some hickory bark to repair an old chair so the bark is claimed.

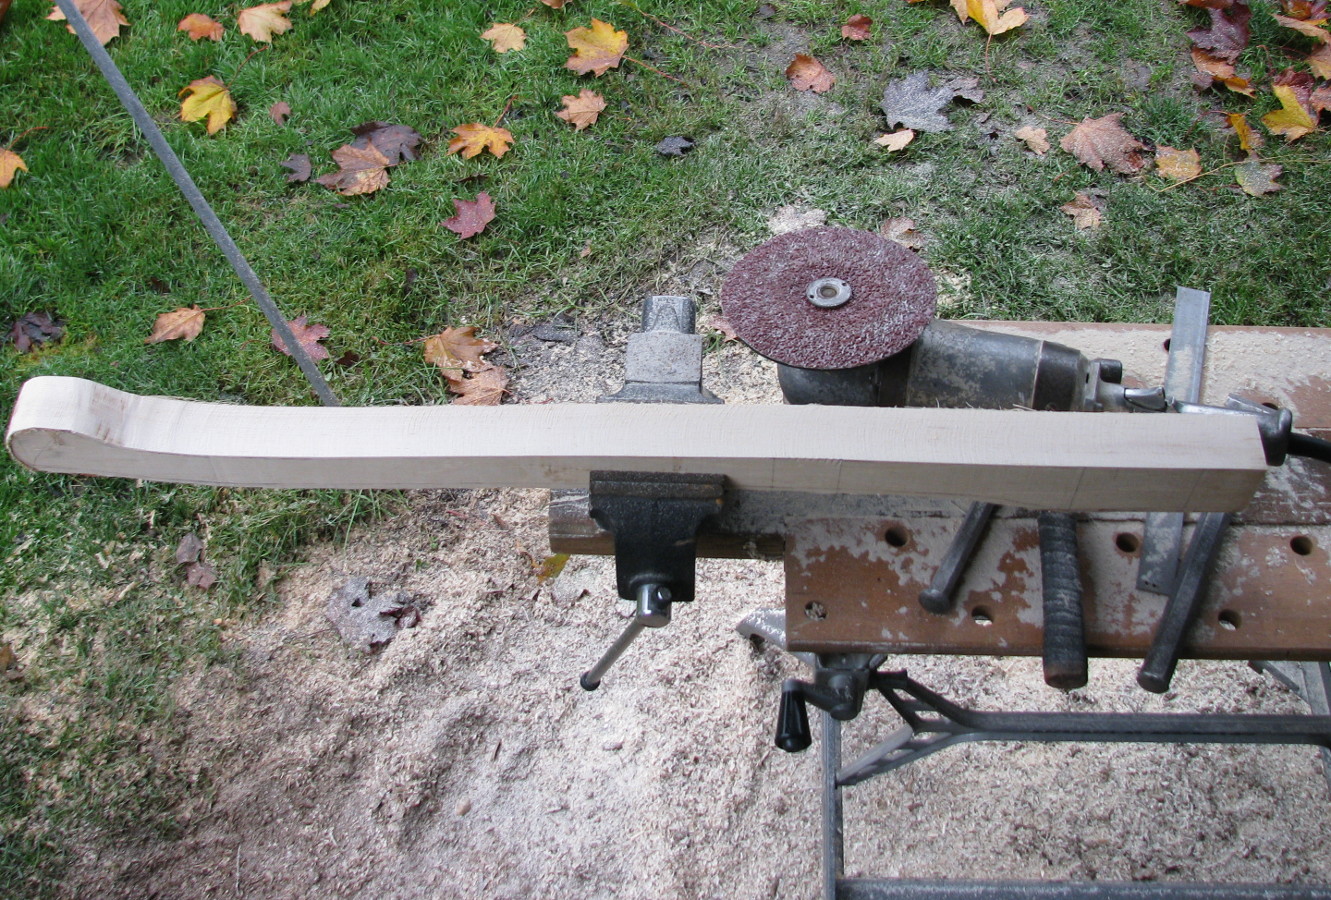
After de-barking I rough shaped the stave with a Lancelot carving tool on my angle grinder. A Lancelot is a real wood eater.

Next I power planed it just enough to give me flat surfaces to lay out my pattern. I shaped the swell similar to some Walters hafts that 300Six posted on these forums.
Stave%206.jpg


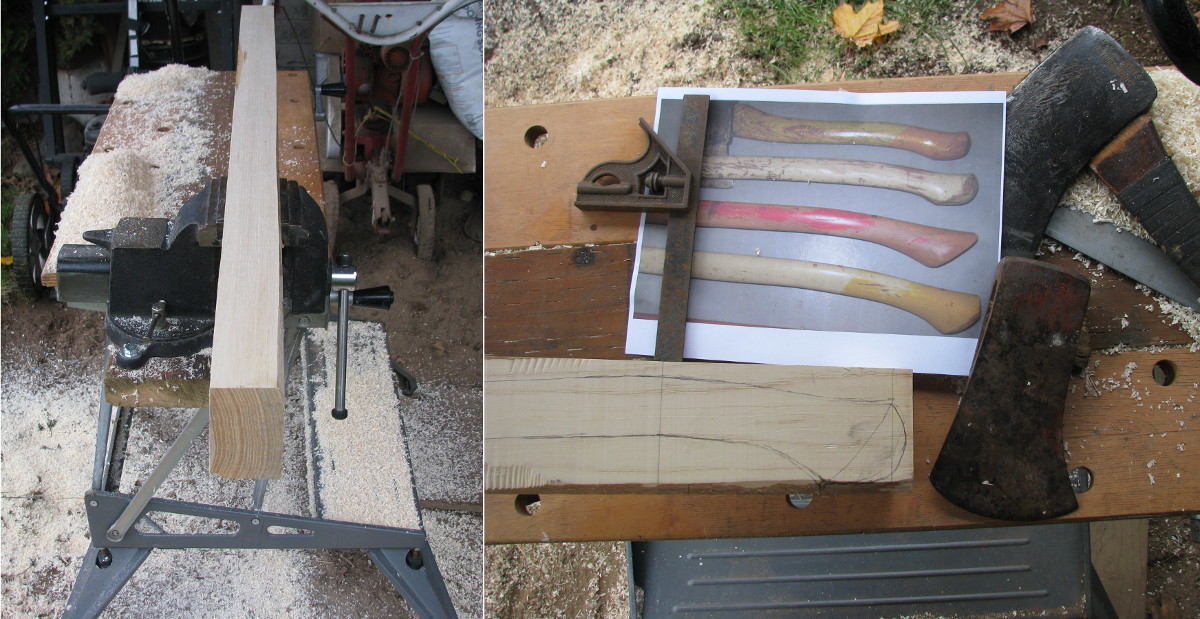
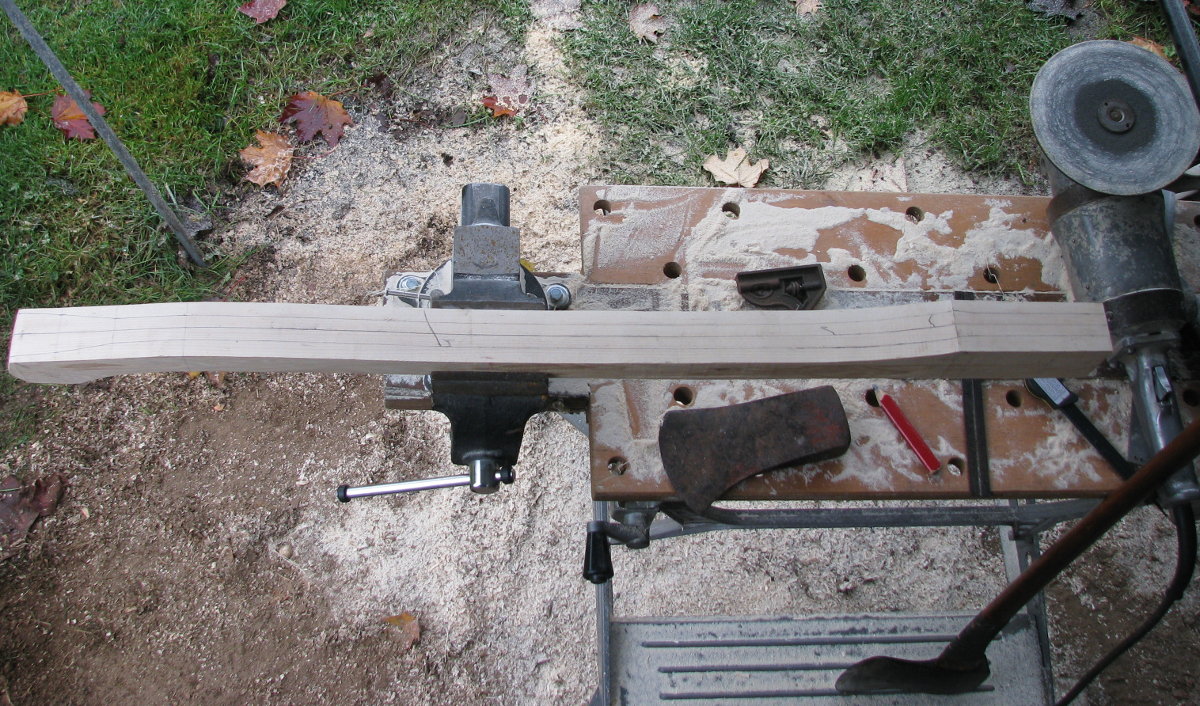
Then I cut kerfs 3/16" short of my pattern and chiseled off the chunks. I designed for a 36" haft from top of eye to top tip of the grip. The swell adds another 1/2"
Stave%207.jpg

Stave%208.jpg


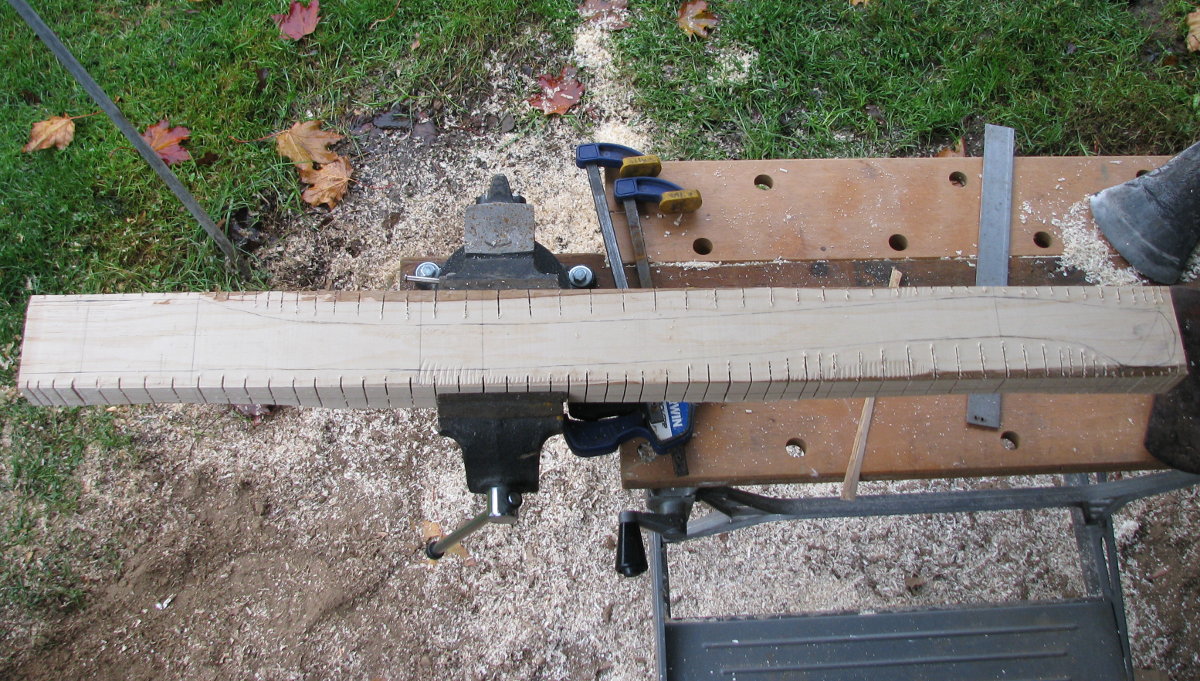
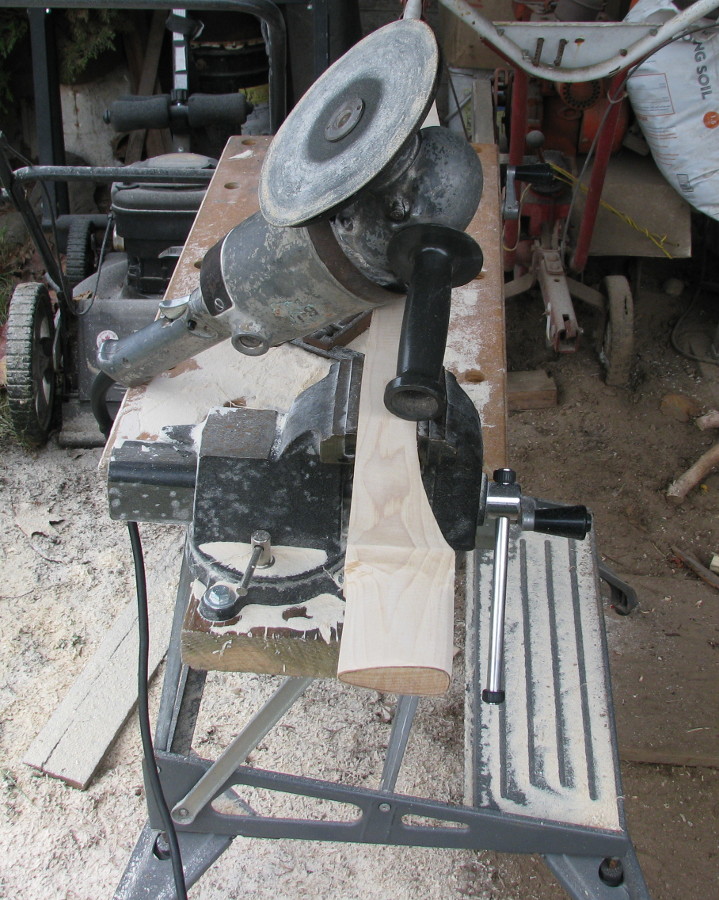
Next I sanded close to my lines with a 16 grit disc on a 7-1/4" angle grinder. This made quick work. I switched to a 60 grit disc and cleaned it up to lay out my next profile.
Stave%209.jpg


I scribed a center line off the flattest side of the stave and laid out my pattern from that.
Stave%2010.jpg


Again I kerfed, chipped and sanded.
Stave%2011.jpg

Stave%2012.jpg


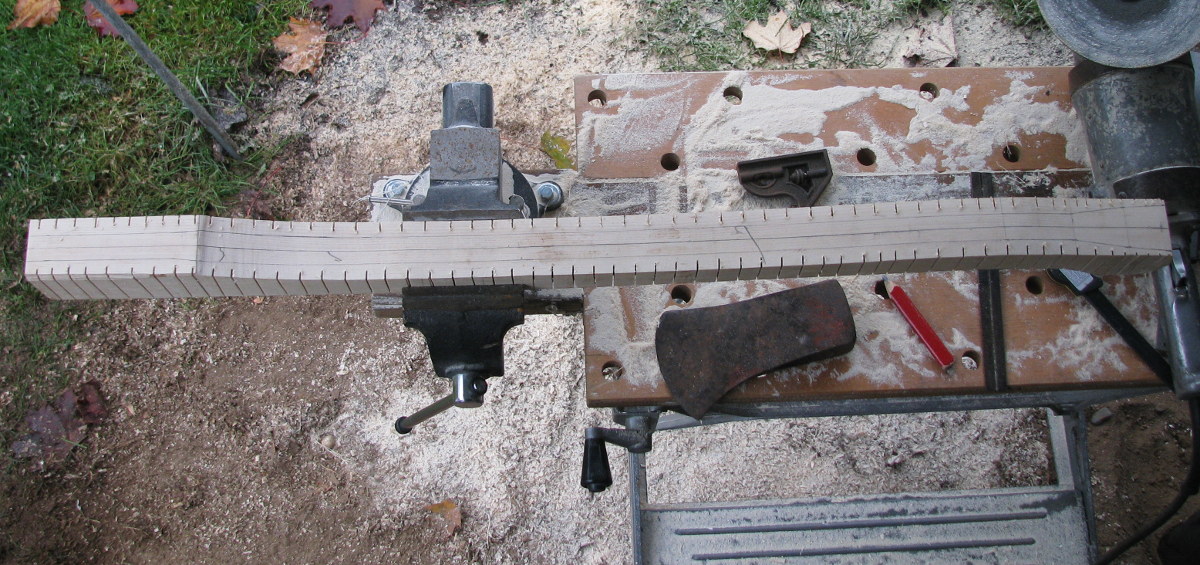
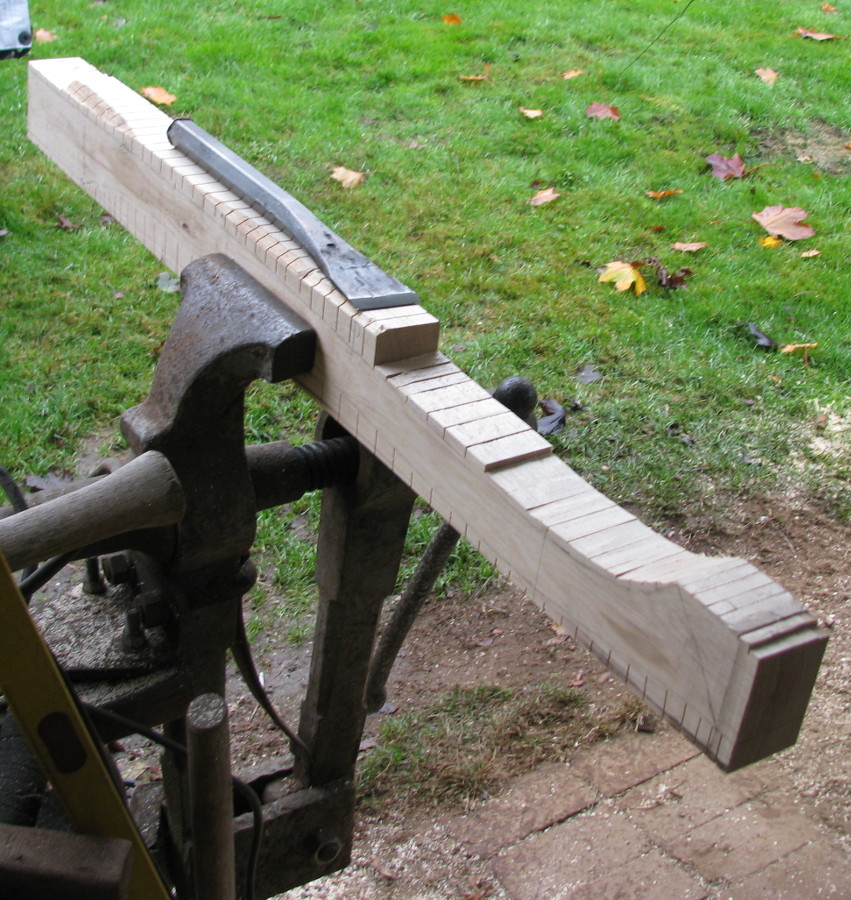
At this point I had a pretty good handle blank. I set my axe on the blank, aligned the bit to the haft and traced the eye on the end of the haft. Some of you may have run across axes where the eye didn't align perfectly with the bit. By tracing the eye with the bit aligned to the haft I avoid trouble here.
Stave%2013.jpg


I cut out the eye with the disc sander.
Stave%2014.jpg


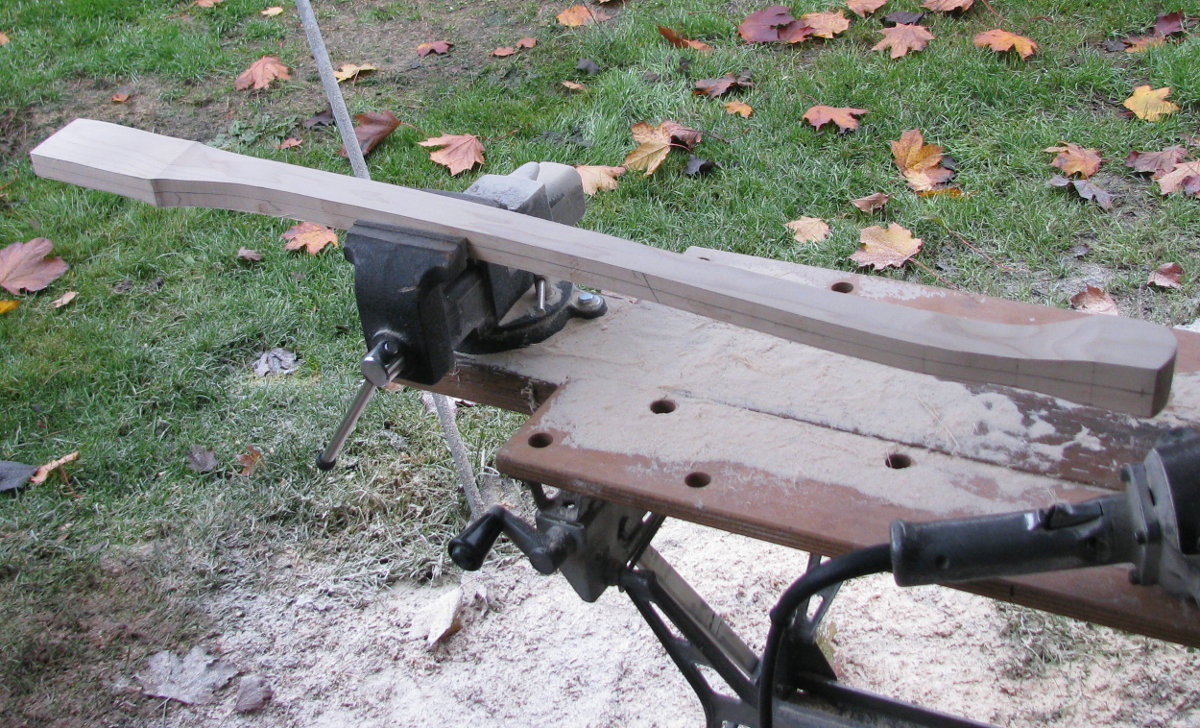
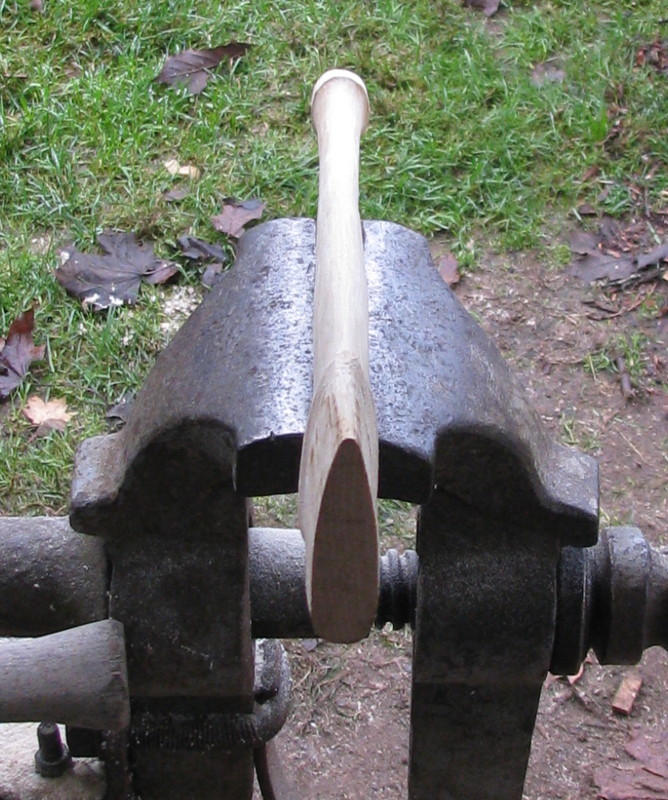
Now I can reference bit alignment the whole time I'm shaping this haft. The shaping was done from here with rasps. Small half round rasps for the swell, larger flat rasps for the haft. Rough work is smoothed out with a 10" 4-in-hand rasp.
Stave%2015.jpg


Occasionally I would stop and sight down the haft to make sure I was keeping it straight and symmetrical.
Stave%2016.jpg


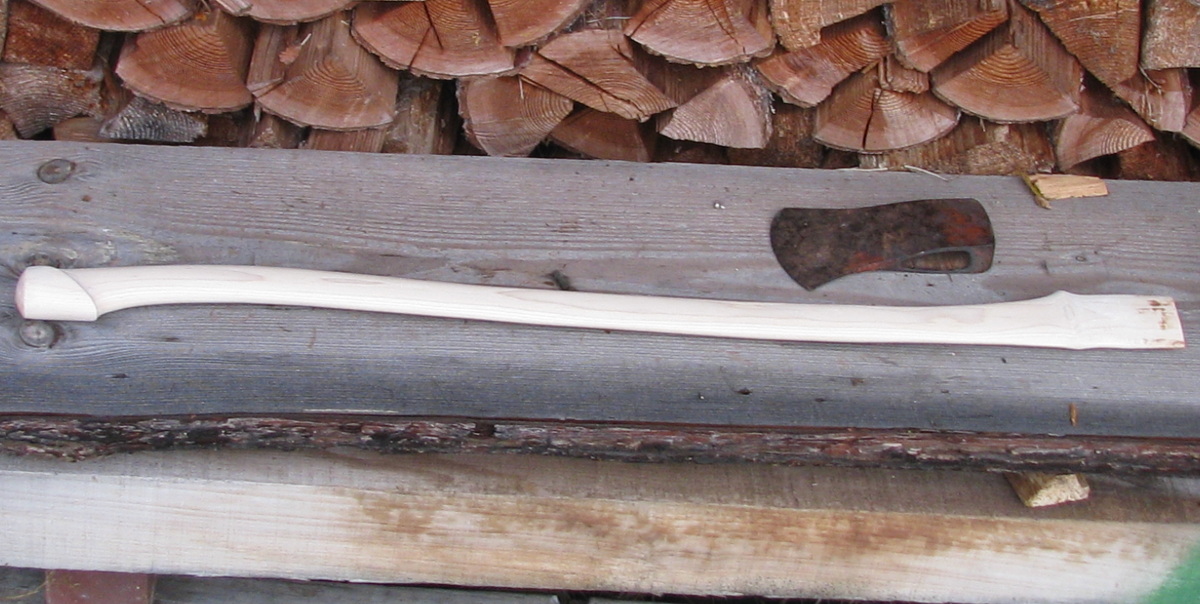
After about 8 hours work I had a finished handle.
Handle%201.jpg


Axe restoration work in my next post.
 
Last edited:
I started with an axe that weighed just 2.76 pounds but was full sized and had a full size eye. Like many old axes the heel and toe were worn. First order of business was to lay out and reshape the bit.
Axe%201.jpg


The cutting is done with the axe held at 90° to a coarse grinding wheel. I like my heel to be just a little short of the toe. This axe already had that. I just needed to remove some of the roundness from the bit.
Axe%202.jpg


This axe had been sharpened many times and the edge was a bit thick. After shaping I wound up with a bit that was 3/16" thick in places.
Axe%203.jpg


Not only was it thick but it was lopsided. One cheek had a large bump it that wasn't on the other cheek. The bit did not center well with the heel and toe. I ended up tracing the bits' centerline by using a bent hacksaw blade as a straight edge. The photos didn't come out well - hard to focus on an axe edge. You can see the issues with the bit.
Axe%204.jpg


I set on it with hand files from here.
Axe%205.jpg


I'm pretty handy with a file. The slower process gives me better control and plenty of time to frequently check the edge for alignment. As my files got close to the center of the bit I stopped to check it more often. This helps me to remove any irregularities and further align the bit to the haft. I gave it a banana grind. The actual shape of the banana is really determined by the shape of the cheeks. The lumpy cheek took a little different shape than the flatter cheek. But that doesn't concern me. My bit has the same profile and angle filed back on each side. That's what's key.
Axe%206.jpg


I started the honing process with these Norton utility stones. I LOVE these! I'm so glad Old Axeman shared this secret with us. These do a great job of removing the file marks from the bit and refining the edge. I use them wet, frequently dipping them in a bucket of water.
Axe%207.jpg


After these I went to a hard black Arkansas stone and then finished with Frank Swaty razor hone. I have a polishing wheel and a buffer, I could give it a mirror finish if I chose to. But I prefer the look of hand honed bit.
Axe%208.jpg


After painting the haft and axe head in traditional Walters colors and patterns I assembled the finished pieces. Of course the handle also got several coats of BLO and tung oil.
Walters%20Finished.jpg


I haven't swung it yet. One last coat of tung is still drying. I think it's gonna be a fine little beast. After filing, the axe head was down to 2.6 pounds. As hung the whole things weighs just 3-3/4 pounds. It's perfect for packing on trail work projects. Long enough to support a pocket underbuck for crosscut saw work. Thin enough to stick when you need to set an underbuck but convex enough not to stick too badly. I think I'm gonna love it for a long time.
 
Last edited:
The swell is the greatest, I have a handful of top notch unused vinatge replacement handles with the exact same shape at the swell. I believe that they are left that way for fitting, and then are meant to be cut off at the ridge to form the fawn's foot when hanging is complete.

I have to say that the knob end does make it easy to drive the haft into the eye. With a white rubber mallet I installed and removed this many times. The knob makes it easy. Walters never cut them off and I don't really see any need to. Personal taste.
 
The shaping was done from here with rasps. Small half round rasps for the swell, larger flat rasps for the haft. Rough work is smoothed out with a 10" 4-in-hand rasp.
Stave%2015.jpg

At this point I was constantly redrawing the ridge of the swell. Every time you carve a little you need to reconnect your lines to keep yourself on track.

The thing does look awfully phallic in those photos. :(
 
I'm glad to hear that you are going to put the axe to work. I've used, and seen these riven handles used my whole life without failure. So put it through its paces....

It was the quality of the riven and air dried stave which gave me the confidence to make a haft this long and slender. I'm very grateful for this piece of wood.
 
So, will any off the shelf handle ever suffice again?

They'll have to. I don't expect I'll see a piece like this again.

Off the shelf handles never suffice as sold. I do have a couple local sources of Tennessee Hickory Products hafts. Their wood is still quite good even though it's not riven. And I don't know their drying process. Their stuff is fat and it gives you something to work with. If you hand select their straightest stuff you can make a pretty nice handle.
 
what an amazing amount of work! i do my own haft myself, but never this quality ! is the head Michigan pattern?
i am pretty amazed that fire wood along the trail is not salvaged by anyone to home heating!
go and pick up some with that little wagon!;)
 
I've been thinking more about this project. The obvious thing is that you could get to a good usable handle much quicker if you just grabbed a hatchet and started banging it out. The drawback to that method is a higher risk of making a fatal flaw. If I had a stack of hickory staves out back I might have chose that method. But when I only had one chance and wanted to be sure of my result I went with a more conservative, more exacting method.
 
Starting off with a factory-turned 'club' is much easier because reference shape, curves and swells are already defined, and hidden knots/blems have had a better chance of being exposed in advance. When you consider the time and effort (and expertise) that goes into crafting a properly-aligned 'stick-built' handle you can only afford to do it as a wood-working challenge and/or for personal satisfaction. It's nice to see stuff like this happening though and a hand-crafted handle/hang definitely imparts personality on to a 'user' tool.
 
Thanks for sharing, Square_peg, that's beautiful work!

I'm glad to hear that you are going to put the axe to work. I've used, and seen these riven handles used my whole life without failure I. So put it through its paces and enjoy your wonderful craftsmanship!
No GD wonder you are a diehard fan of horizontal grain! Were we all to be able to experience first class riven wood (and proper air-curing of it) there might be many more converts.
 
I am pretty amazed that fire wood along the trail is not salvaged by anyone to home heating!
Go and pick up some with that little wagon!;)

That's my wood cart. It's mostly used to transport from the splitting block to the woodshed and then from the woodshed to the patio. Very handy cart, made from an old wheel chair.

Around here there tends to be plenty of wood you can back a truck up to. No need to use the cart to gather until the zombie apocalypse.:D
 
It was the quality of the riven and air dried stave which gave me the confidence to make a haft this long and slender. I'm very grateful for this piece of wood.
You are more than welcome, and thanks for taking the time to share! You have always been helpful and forthcoming with your knowledge on the forum. From prior projects I saw you were also quite a craftsman, so I had hoped you would share the the handle making process with everyone.
 
You are more than welcome, and thanks for taking the time to share! You have always been helpful and forthcoming with your knowledge on the forum. From prior projects I saw you were also quite a craftsman, so I had hoped you would share the the handle making process with everyone.
Thanks for sharing this hickory stave with Square_peg
 
I've been thinking more about this project. The obvious thing is that you could get to a good usable handle much quicker if you just grabbed a hatchet and started banging it out. The drawback to that method is a higher risk of making a fatal flaw. If I had a stack of hickory staves out back I might have chose that method. But when I only had one chance and wanted to be sure of my result I went with a more conservative, more exacting method.
Thanks for this valuable tutorial
 
Back
Top