- Joined
- Aug 27, 2004
- Messages
- 12,955
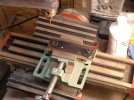
Everynow and then I get some jobs I do that I have to wonder why I'm the one doing it because it seems sometimes that it would be something automatic during the manufacturing process. Nevertheless the case was that the barrel clip installed on this folder didn't stay put as it was set up from the factory. Being that I'm somewhat of a big Spyderco fan I'm quite familiar with barrel clips so once I got it I knew what I would be doing. It was time to nest this clip down in a recess I was going to have to mill myself in an effort to lock it in place so it won't move all around once clipped to the pocket.
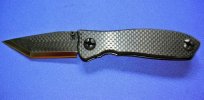
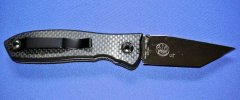
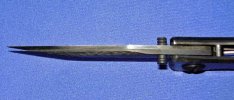
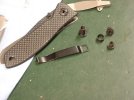
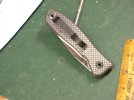
In the end I got her done. Here are some pics. I've never seen one of these folders. High quality thats for sure. All this carbon fiber screams, "I am expensive!" and even though there is no feeling like jumping in with both feet to tear into someone's high dollar folder I proceeded to take steps toward doing surgery on it. Seen here in this post are some before pictures showing this rather unigue Warren Thomas Creation. Note the laminated blade of carbon fiber and steel! It is a chisel grind and pretty much terrifyingly sharp too!
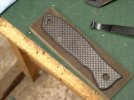
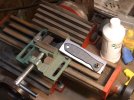
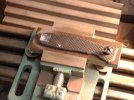
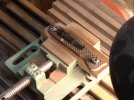
In the later pictures I decided the best way to hold this puppy was to take the scale off the folder and mount it to a block of micarta. I used the sole screw in the scale to thread the block of micarta and lined up the inlay drawing on the scale from the clip tracing with my block after squaring it off good. Then I drilled the 21/64 pivot barrel size (talk about weird sizing) and used one of the barrel bolts to secure it down. By the way, these may look like Spyderco barrel bolts but believe me they are much heavier duty than anything from Spyderco, longer too. This one had to be shortened in the end for the rear clip mount but not by much. Just enough to allow the clip to seat.
STR
In the end I got her done. Here are some pics. I've never seen one of these folders. High quality thats for sure. All this carbon fiber screams, "I am expensive!" and even though there is no feeling like jumping in with both feet to tear into someone's high dollar folder I proceeded to take steps toward doing surgery on it. Seen here in this post are some before pictures showing this rather unigue Warren Thomas Creation. Note the laminated blade of carbon fiber and steel! It is a chisel grind and pretty much terrifyingly sharp too!
In the later pictures I decided the best way to hold this puppy was to take the scale off the folder and mount it to a block of micarta. I used the sole screw in the scale to thread the block of micarta and lined up the inlay drawing on the scale from the clip tracing with my block after squaring it off good. Then I drilled the 21/64 pivot barrel size (talk about weird sizing) and used one of the barrel bolts to secure it down. By the way, these may look like Spyderco barrel bolts but believe me they are much heavier duty than anything from Spyderco, longer too. This one had to be shortened in the end for the rear clip mount but not by much. Just enough to allow the clip to seat.
STR