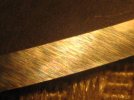
What Should The Edge Of A Knife Look Like When It Is Apexed?

Joined
May 29, 2013
Messages
35
This seems like a very dumb and noobie question to ask for me because I have been sharpening for 3 years and get very good edges. But, I always want to improve and sometimes I just mess up edges, it happens. Most times when I look at my edge, it looks like there is a very thin, barely visible microbevel on the very end of the edge, and I don't want to have a microbevel, it just happens on accident. What I am wondering is this: What should my edge look like after the coursest stone? Please post pictures!!!
 
It should look like the scratches go to infinity.

Picture1479.jpg
 
Ah Jason! I was hoping you'd reply to this post. I learned most of what I use now from your videos and posts. What exactly do you mean by "go to infinity"?
 
The apex is the point where both slopes meet and is considered where the edge meets air or where it reaches to infinity.

If this point is clean and de-burred the grind lines will be seamless and reach to infinity as the edge meets air. Make sense?
 
IMO. Intersection of 2 planes (bevel) is a line, where a line has no width. Thus apex width converges toward zero.
 
Yes that makes perfect sense, thank you. I have one more question. How do you figure which angle to sharpen at? I sometimes find myself bady convexing my edge not because of holding an angle, but because of using all different angles. So do you just sharpen using the angle you want to have or do you feel it by rocking the edge back and forth, or something of that nature?
 
If I am sticking to the existing bevel I just feel it out, if I'm settng new or trying to flatten out a bevel I just pick a angle and stick with it until the edge is formed.

I don't really think about angles when I sharpen, it's about as useful to me as knowing how much metal I removed after sharpening. To me, it's more a action of shaping and polishing.
 
Holding a consistent angle is one of the keys to a clean, crisp apex, where both sides of the edge meet in a clean, burr-free line. A burr forms when your reach the apex. Then you have to remove the burr without damaging the underlying edge. The beauty of guided systems like the Edge Pro and Wicked Edge is that they allow you to maintain a consistent angle through all your stones and strops, and the allow you to set a precise angle that will give you the best performance for that blade and your particular uses of that blade.

Anyone can do freehanding and achieve at least OK results. I did it as a kid and it worked OK. But my edges were far from optimal. Freehanding is really designed for people who have talent and patience and who spend a lot of time sharpening knives. Over a long period of time, they get a good feel for what works and what doesn't. But for most of us, a guided system is the best investment we'll make for high-performance edges.

And guided systems allow you to make small adjustments to wring every last bit of performance out of your edge. Lets say you start with a high-performance 30-degree (inclusive) edge, and it chips on you. You can add a microlevel or you can raise the angle of the edge by a degree or two degrees or three degrees until the edge can handle everything you throw at it. At that point, you'll know that you have the best edge for that steel, for that blade geometry and for your usage. Pretty hard to make that kind of precise adjustment by freehanding, especially if you don't spend countless hours developing your skill.

Oh no. I get hair whittling edges freehanding, I'm just always looking for areas that could use improvement. I do think the EPA is pretty cool but I just get more enjoyment from freehanding and knowing you created an edge that is that precise by hand is very satisfying.
 
Yes that makes perfect sense, thank you. I have one more question. How do you figure which angle to sharpen at? I sometimes find myself bady convexing my edge not because of holding an angle, but because of using all different angles. So do you just sharpen using the angle you want to have or do you feel it by rocking the edge back and forth, or something of that nature?

Pretty much what Jason said - follow the existing edge for easiest route.

Otherwise I just have two "pre-set" angles when freehanding - low and lower. In reality due to inherent wobble in the mechanics I wind up with 24 or 28* inclusive, give or take a degree. Generally do not go much below the low to mid 20s inclusive as lateral stability falls way off and the knife then becomes something of a specialty tool. I have yet to see any evidence that 30* inclusive is not tough enough for pretty much anything else, including hatchets and machetes.

To learn this I made some marks on my block and referenced by eye to get started. Most knives come from the factory with very broad edges - upper 30s to mid or upper 40s inclusive. A bit of thinning will make them cut way better.

Edit to add:
hope you're enjoying the early Holiday blast, am just up the Thruway from you and we only got an inch or two...
 
Have to add to the above as I misread your post and thought you were talking about angles in general.

Is not enough for most to simply use muscle memory, though it will get the ball rolling if changing the angle.

I go by tactile feedback - what can be felt through the fingertips primarily of the non-dominant hand. I keep my fingertips right on top of the spot that is in contact with the stone. If I feel like I'm loosing reference point, I'll lower the spine so the shoulder drags on the stone, lightly, for a pass or two. Then elevate the spine till the increased feedback from the shoulder dragging lets off and keep grinding. This can be done on the fly as often as needed, especially useful when lowering the angle.

When I first start out, I'll elevate the spine and get a feel for location of the cutting edge to the rest of the mass of the knife or tool, then lower until I hit the shoulder - this is the working range and also tells me how rounded the edge is, or what the difference in degrees (roughly) exists from shoulder to apex. After this initial interview I won't elevate the spine again, and just reference to the shoulder by lowering it. This means I am working from the shoulder to the edge and the intended angle won't get any larger by floating between the two reference points. On a convex or Scandi, I go more by visual inspection of the scratch pattern initially, but always start out by thinning the face on the convex just behind the cutting edge, and on a Scandi I want to see scratch pattern start at the shoulder, and none at the edge, unless it is dead flat and then marks from shoulder to apex almost from the get-go.

Feedback will increase again as the edge is apexed and the edge is now in total contact with the abrasive, as opposed to the dull, blunted, or formerly broad edge floating just off the abrasive surface, and the abrasive is contacting a curved (or un-flat) surface. When I cannot discern any difference or increase in feedback by lowering the shoulder, and a small burr has formed, I know I've made an edge as flat as my mechanics+senses can create.

Feedback also undergoes a similar shift when kicking up to a finer hone even with a nicely flattened cutting edge - starts out less, and increases as the steel surface comes into balance with the abrasive surface.

This is the page in my manual that brings this point up
7357763_orig.jpg
 
Do a search on the term "wire edge". A nice apex will glisten. You probably won't be able to see it with your eye, but it's possible. You'll see it under magnification.

Also, it's easier to feel a properly apexed edge. You'll feel the burr scraping your finger.
 
Thank you very much. All of these posts are very helpful. HeavyHanded, I just got finished helping the plow contractor clean up my driveway. I got about 3 feet. Cars are 7' mounds. I live right on the boarder of West Seneca and Orchard Park.
 
Thank you very much. All of these posts are very helpful. HeavyHanded, I just got finished helping the plow contractor clean up my driveway. I got about 3 feet. Cars are 7' mounds. I live right on the boarder of West Seneca and Orchard Park.

I was driving to work that evening, saw all the Thruway closures and had no idea the weather that was coming in. I figured the Senecas had shut down the Thruway again...:D

A coworker that lives near LeRoy got two inches, just a mile up the road they got four feet - literally a wall of snow.
 
I was driving to work that evening, saw all the Thruway closures and had no idea the weather that was coming in. I figured the Senecas had shut down the Thruway again...:D

A coworker that lives near LeRoy got two inches, just a mile up the road they got four feet - literally a wall of snow.

Oh the snow is rediculous here! Lucky I got a plow contractor to come dig us out. Worst part is I have my third Izula coming in the mail and USPS cancelled deliveries!
 
Oh no. I get hair whittling edges freehanding, I'm just always looking for areas that could use improvement. I do think the EPA is pretty cool but I just get more enjoyment from freehanding and knowing you created an edge that is that precise by hand is very satisfying.

On the money. I love my EP, but freehand is the craft that gets me off.
 
Anyone that wants to learn secret #1 of sharpening, Feeling The Bevel On The Stone, should read HeavyHanded's post again. Heavy does some things that I don't do, but I should try them, as his description of the entire process is VERY much in line with my experience. Particularly the part about the feedback increasing as you cut the bevel. Which makes sense; you are flattening the bevel, so it will come into stronger contact with the abrasive as you go.

One thing he didn't mention that I do: Using the off hand fingers, I sometimes move them not just to the bevel, but further until my finger tips are touching both blade *and* the stone at the same time. This is one simple way to tell if the edge of the edge is touching the stone or not. You can feel it very clearly when it is. Of course this will NOT guarantee that you are at the perfect angle. You may be too high. It's more of a check to see if you are too low. I do this as a double check, but I don't keep my fingers in place for very long as I start moving, as you can easily rub off the skin on your fingertips or cut yourself. After the double check, I move my fingers back to the edge bevel and use them to apply pressure and feel how the blade is touching the stone.

Brian.
 
Back
Top