What temperature should water be at for 1084.

Joined
Jun 25, 2007
Messages
898
I understand the some of the ideas that make water quenching safer; like 1475-1500F, 1/16-3/32 edge thickness, and 3 seconds in 2 out (repeat 3 times then get that sucker in the preheated oven fast). I haven't seen any information on what temperature the water should be at for the quench though, any help fellas?

Yes I am crazy and I expect a 50% fail rate but I only want to water quench display knives that could use the extra detail in the hamon.

Is polishing the curve of the plunge line important? It seems like you could take it to 400grit and stop while taking the rest of the blade to 2000+grit and you would not notice much contrast because the sharp curve would make it hard to observe the polish. Also I don't know where to get sandpaper up to 8000grit to match the waterstones, is there any out there?

Thanks
-Dan
 
I'm not an expert, but I always understood 170*F to be the temp you want brine to be. Not sure about just plain water though. Maybe someone will come in with more info than I've got for you. Also, I don't take them out of the quench, just agitate some to get break the vapor jacket.

If you're trying to get more activity out of the steel, you might want a more shallow hardening steel with less Mn.
 
Water should be about 100-130F.

Unless you are using a clay coating to attain sori and hamon, just quench the blade and forget the in-out-in-out-in-out routine.

If you are going to do an interrupted quench, it helps to understand why.
The first IN is to bring the edge (on a clay coated blade) below the pearlite nose.
The first OUT is for about two seconds to give the heat from the coated area a little time to migrate back toward the edge and into the mune (the spine,which is often uncovered). This helps create the ashi , and assures a soft mune.
The second IN is to allow the covered area to finish cooling and contract a bit, while the edge converts to martensite and becomes hard. This will suddenly cause the blade (on a sword) to curve upward, usually with a groaning sound, and yes.....often with a pinging sound. The blade needs to be in the water long enough that all shaking/groaning has stopped.
The second OUT is to quickly look and see if you still have a whole blade and if it is straight.The blade should be somewhere between 400F and 600F in the core, and 300F to 400F on the edge. Straighten large warp/twists immediately if needed.
Then back in to cool down to about 150-200F.
Then out to check the edge to see if you need to rehearse your list of Japanese profanity. The blade should not be sizzling when pulled out, just some steaming vapors.
Then back in to cool the rest of the way.
Temper before doing any additional work (beyond cleaning off the clay).

Not much reason to take any part of a 1084 blade beyond 400 grit, since you will be re-sanding the entire blade after quench.
Stacy
 
and yes.....often with a pinging sound.

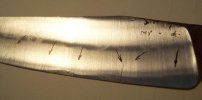
this is my last attempt at a water quench :o (last week)

Hey, you're going to make a few mistakes.... right ;) , and you have to admit, there is nice symmetry on the quacks :D

FWIW, this was clay coated, forged 1095, austinitized at 1470*, water (straight H2O, no brine) was at 130*, edge thickness at ~ .040 with interupted quench. My next try will have a bit more meat left on the edge and a better finish than the 220 belt finish that, I think, helped to cause this cracking :grumpy: :grumpy:

Thank you for the excellent explanation of "why" when doing interupted quench Stacy :thumbup:

Anyone have thoughts on a technique described in Machinerys Handbook, that being, water with a thin oil layer floating on top to lessen severity of the water quench ???

And I'll be reading that link you posted again Robert :thumbup:, and again, and again ;) thanks


:)
 

Attachments

  • waterquenchcracks@130.jpg
    waterquenchcracks@130.jpg
    34.3 KB · Views: 75
Last edited:
Dan , what type of blade are you making ? As you heat the water the quench rate is lowered. The in and out technique adds many variables .So as Stacy says unless you want the Japanese technique stick to normal edge quench ,even with light oil ,rather than heating water.
 
hey
i second all the great information Stacy gave, and i learned alot from reading that just now..
I dont want to say that i have got it down.. but i have recently started doing alot more of my quenching in water, and it has work pretty good.

i dont want to say i am really lo tech about it.. but i am. i heat the water (in a 5 gallon plastic bucket) with a couple peices of red hot steel from the forge till the water is warm but not quite hot. then i heat my blade checking it with a magnet (and i do it at night so i can see the heat of the blade to keep it even) after the whole blade is non-magnetic i give it a couple more stokes int he forge and then into the bucket with the "ins" and "outs" stacy was talking about.

i used to crack alot of blades. but i also used tog et them way too hot because i would literally put them in the forge and just wait for them to heat up. now i use tongs and stoke them through the forge, which allows me to control the heating of the blade. it is more work.. but i think it is paying off.

i dont want to say "dont worry about the spesifics" but i think if normalize, and or anneal your blade before heat treating (i do three or four cycles for the artsy blades) you keep the blade cool (it only needs to get just over non-magnetic) during heating, and get it into a tempering oven pretty quick... you should be okay. just pay attention to the steel. you have to baby it.

I would HEAVILY recommend Walter Sorrell's Hamon DVD here:
http://www.waltersorrells.com/blade...tta start somewhere. hope this helps! ~Chris
 
Last edited:
i wanted to add one thing..
david, have you tried draw-filing? leave a little bit of meat on your blade and then with your blade clamped flat to a surfacce, draw-file your blade from tang to tip (on the blade.. gotta be careful with the plunges and stuff) and take out all the grinder scratches. then run over the edges with some 180 git paper to get rid of some of the burs. you just dont want any really sharp edges or angles (especially in the ricasso)

the vertical grinder marks allow for possible stress risers and those evil little vertical cracks. the file marks also really make the clay stick.

hope this helps!
~Chris
 
Well I'm working on a medium sized bowie and a traditional tanto, both will be coated with a thin layer of clay and then ashi to make the hamon.

I'm staying at 80 grit before the quench because the rougher surface helps the clay stick, I'm just wondering if the contrast would be noticeable or make the blade look... odd. My list of Japanese profanity is small so I'll mix some English in if necessary. :p

Thanks for the help guys!
 
Stacy has summarized things quite well so there is little to add to the techniques described above but I might just point out a couple things to ponder. Your particular setup and routine for quenching in water might just need to be worked out to make it more succesful. There maybe a little something that just needs to be tweek for your particular way of doing things that will make things work. The other is that I consider important to look at the steel while is being heated for the quench. The blade colors will tell you a lot as for when the blade is ready. Pyrometers are great as a reference but there could be problems with the calibration an other unforseen issues. I do use a pyrometer to get an idea of where the general temperature of my heat treating forge is. The rest is done by looking at the blade and watching the colors. Keeping the ambient or background light consistent. It helps me to do it this way. I am not saying that what works for me will work for you. And yes, there is quite a bit of trial and error in the begginning and many cracked blades but if you persevere you'll find a way.
 
Back
Top