WIP - Building my First Auto

Burchtree

KnifeMaker & Moderator
Moderator
Joined
Mar 15, 2002
Messages
5,368
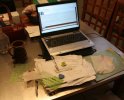
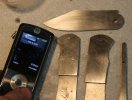
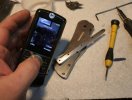
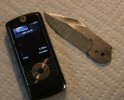
I built this as a "build-off" piece and had 5 days to build, document it and finish it. This was definitely a learning experience and I hope to make another one soon before the "how-to" escapes my mind. Big thanks to Jody Muller and Don Hanson for answering all my questions. :thumbup: Some of these pics suck, but I was in a hurry. You'll also see some with my phone in it, this was to show a "time stamp" to ensure that pieces weren't made before the build-off started.

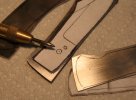
1. I started my first day with my sketch book and some really unmanly erasers. :D I like to use sketching paper to make folders since I can rotate each piece and see where things are lining up. I really, really, really need to learn CAD. :)

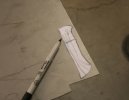
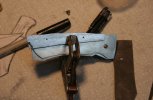
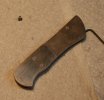
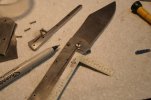
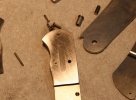
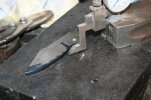
2. After I draw the knife up, I make a copy and cut it out to start cutting.

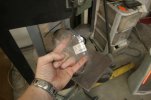
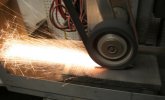
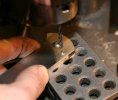
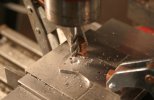
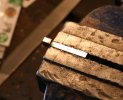
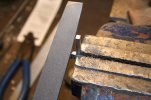
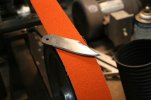
3. New bandsaw blade just for this occasion -- a new blade will turn any knifemaker's frown upside-down. :D
 

Attachments

  • 09bofolder1.jpg
    09bofolder1.jpg
    52.2 KB · Views: 118
  • 09bofolder2.jpg
    09bofolder2.jpg
    25.4 KB · Views: 116
  • 09bofolder3.jpg
    09bofolder3.jpg
    34.8 KB · Views: 126
1. Blade cut out of some forged-down W-2. A little time stamp too.

2. Gotta surface-grind that blade down to about .150 (hey; that's thin stock for me!)

3. A slightly smoother blade.

4. Using a spring punch to mark my drillin' holes.

5. Using a reamer so the holes are nice and smooth --

6. Time to drill some holes for the backbar. Was going to use some 1-72 screws, but they didn't come in, so 2-56 it is. :(
 

Attachments

  • 09bofolder4.jpg
    09bofolder4.jpg
    55.8 KB · Views: 104
  • 09bofolder5.jpg
    09bofolder5.jpg
    37.4 KB · Views: 99
  • 09bofolder7.jpg
    09bofolder7.jpg
    35.9 KB · Views: 94
  • 09bofolder8.jpg
    09bofolder8.jpg
    48.9 KB · Views: 97
  • 09bofolder9.jpg
    09bofolder9.jpg
    40.4 KB · Views: 103
1. I still put in a stop pin since it is pretty hard stuff and what I'm used to using. I want something that won't wear easily since it will get repeated abuse from the auto firing. After drilling the stop pin holes, I trace the tang clearance with a sharpie.

2. Drilling through the stop-pin holes into the backbar.

3. Pretty!!

4. Using a counterbore to make the IKBS race -

5. Balls in! :D I use hardened 440C bearings in the race. This is the biggest pain in the ass of using IKBS, you gotta take those greasy little suckers in and out many times.
 

Attachments

  • 09bofolder12.jpg
    09bofolder12.jpg
    42.6 KB · Views: 95
  • 09bofolder14.jpg
    09bofolder14.jpg
    47.4 KB · Views: 89
  • 09bofolder15.jpg
    09bofolder15.jpg
    22.9 KB · Views: 89
  • 09bofolder16.jpg
    09bofolder16.jpg
    56.1 KB · Views: 95
  • 09bofolder17.jpg
    09bofolder17.jpg
    39.6 KB · Views: 107
this is great!
 
hi michael i think i can build a auto also
looks like you have drill press a good beltsander
and some good basic hand tools.
where did you get the cutters and all your parts
 
Thanks -- most all my tooling comes from MSC or Enco.
 
1. Cutting out the bolsters -- I'm using some of my trashcan damascus material.

2. And I have lot's of surface grinding to do to get down to about .100

3. Time to drill some holes. This is sort of tough because I've got to put holes on each side of my toggle-doohickey on the front and still make it look symetrical.

4. Looking good -- first time using 1-72 screws!

5. First time doing the ol' "hide the pivot" thing too. I marked through the pivot hole and milled down into the backside of the bolster.
 

Attachments

  • 09bofolder20.jpg
    09bofolder20.jpg
    52.6 KB · Views: 80
  • 09bofolder21.jpg
    09bofolder21.jpg
    55.2 KB · Views: 78
  • 09bofolder22.jpg
    09bofolder22.jpg
    41.2 KB · Views: 85
  • 09bofolder24.jpg
    09bofolder24.jpg
    52.4 KB · Views: 85
  • 09bofolder25.jpg
    09bofolder25.jpg
    36.4 KB · Views: 88
1. Not lookin' too shabby!

2. Time to jack around with the spring. I'm using "fish tape" that I got from Jody Muller.

Anyway -- I use the bandsaw to cut a notch into the back bar with the opening a little narrower than the spring material. The spring then gets notched so it won't come out. Then it gets some bending and touch of taper at the end. I still need to clean up the backbar and put some more screws in it.

3. At this point Jody stops by on his way to the Tulsa Gun Show (damn him!!) and drops off some much-need long 1-72 screws (I just had 3/8-long) so I can finish up securing the backbar. I talked him into taking a few pics while he was here. This is lining up where I will slot the bolster for the rocker. It has to get close to the pivot so that the notch in the blade won't show in the open position. That fancy-pants hidden pivot idea made this a bit tougher. :D

4. And milling it out! I'm also milling about .020 into the liner to make more room for the rocker spring.

5. At the end of the cut, I drill down as that is where the rocker "notch" will go into the blade.
 

Attachments

  • 09bofolder26.jpg
    09bofolder26.jpg
    50.1 KB · Views: 80
  • 09bofolder29.jpg
    09bofolder29.jpg
    33.2 KB · Views: 81
  • 09bofolder28.jpg
    09bofolder28.jpg
    49.2 KB · Views: 89
  • 09bofolder30.jpg
    09bofolder30.jpg
    50.7 KB · Views: 84
  • 09bofolder31.jpg
    09bofolder31.jpg
    53.4 KB · Views: 93
1. How the liner and bolster look after milling. Time to make the rocker! :)

2. I had to make 4 of these until I got to the one I wanted. It took a lot of surface-grinding and filing.

3. Marking the hole for the rocker pin to go through.

4. Using a 1/16th ball end to make a channel for the pin.

5. Awesome; except I put the slant on the wrong side of the rocker notch. :o:D
 

Attachments

  • 09bofolder32.jpg
    09bofolder32.jpg
    58.2 KB · Views: 67
  • 09bofolder33.jpg
    09bofolder33.jpg
    57 KB · Views: 67
  • 09bofolder35.jpg
    09bofolder35.jpg
    41.5 KB · Views: 64
  • 09bofolder37.jpg
    09bofolder37.jpg
    34.7 KB · Views: 66
  • 09bofolder38.jpg
    09bofolder38.jpg
    46.2 KB · Views: 71
Had to take a day off to work on orders and celebrate my dady's birthday. Anyway -- I about all I did to the auto that day was drill a few more holes to strengthen up the backbar.

1. 7:30 is a little early to kick up the surface grinder and dust collector equipment, so I put the rocker on hold and piddled with stuff like filing down a bit on the backbar where I had drawn on it. Since the spring will be up against it, it needs to be straight or concave, a hump in the bar might cause the spring to bow outward at that point.

2. Drawing out my lockbar --

3. Cutting the lock. I use a pretty cheap HSS slitting saw from MSC and run it slow as hell with lots of coolant (you like that coolant system? ). It works great and the saws last a long time.

4. I fabricated the vise handle myself -- it's pretty sweet.

5. Using a hacksaw blade to cut out the parts the wheels couldn't reach.
 

Attachments

  • 09bofolder41.jpg
    09bofolder41.jpg
    50 KB · Views: 63
  • 09bofolder42.jpg
    09bofolder42.jpg
    42.6 KB · Views: 70
  • 09bofolder43.jpg
    09bofolder43.jpg
    53.1 KB · Views: 63
  • 09bofolder45.jpg
    09bofolder45.jpg
    38.5 KB · Views: 68
I usually cut my lockbar relief perpendicular to the endmill with a ball endmill, but I figured it was time to try out the vertical cut again since I didn't have much to cut.

1. I really thought this would be a cool shot with chips flying, but I was wrong. The black thing is my shop vac --

2. Time to start on rocker number 4. Bandsawed out and ready to hit the surface grinder (I figured you all had enough surface grinder pics already).

3. Filing down the front of the bar to fit into that 3/16 hole drilled through the liner.

4. A nice fit!! The edges got rounded, to fit then I ground off the excess off the top once it was fitted in.
 

Attachments

  • 09bofolder46.jpg
    09bofolder46.jpg
    43.1 KB · Views: 57
  • 09bofolder47.jpg
    09bofolder47.jpg
    28.1 KB · Views: 55
  • 09bofolder48.jpg
    09bofolder48.jpg
    55.4 KB · Views: 55
  • 09bofolder49.jpg
    09bofolder49.jpg
    53.4 KB · Views: 61
1. Bought me some new 1/16 drill bits and drilled out the rocker.

2. Grinding down the backside of the rocker to allow it to "toggle."

3. Ground-down and marked for the spring placement.

4. Filing the back of the bolster and liner so the rocker can see-saw without binding.

5. The rocker cleaned up some more and rounded on the right side this time. This allows the rocker to move up when closing the blade.
 

Attachments

  • 09bofolder52.jpg
    09bofolder52.jpg
    41.7 KB · Views: 60
  • 09bofolder53.jpg
    09bofolder53.jpg
    39.2 KB · Views: 54
  • 09bofolder54.jpg
    09bofolder54.jpg
    39.5 KB · Views: 60
  • 09bofolder56.jpg
    09bofolder56.jpg
    36 KB · Views: 57
  • 09bofolder57.jpg
    09bofolder57.jpg
    35.2 KB · Views: 62
Alrighty some more:

1. This is the hole the rocker notch catches and holds in the closed position. One of the drawing problems I come up with is making sure this didn't show up in the open position.

2. a little layout fluid on the edge and scribed. I'm not sure why I did this as I wasn't ready to grind yet. :D

3. Time to start fitting the rocker release. It is obviously a little long in this picture. Fitting this entailed a lot of putting together, grinding a bit off, and repeating.

4. and 5. Finally I got to this point -- I don't have the "leaf spring" in the back or the rocker spring, but it sits flush in the closed postion and holds it tight
 

Attachments

  • 09bofolder58.jpg
    09bofolder58.jpg
    43.4 KB · Views: 43
  • 09bofolder59.jpg
    09bofolder59.jpg
    47.6 KB · Views: 45
  • 09bofolder60.jpg
    09bofolder60.jpg
    30.2 KB · Views: 49
  • 09bofolder61.jpg
    09bofolder61.jpg
    42 KB · Views: 51
  • 09bofolder62.jpg
    09bofolder62.jpg
    30.2 KB · Views: 49
1. Time for grinding! Put in 45s on the old grizzly then slapped on a fresh belt on the KMG and started in. I started with a W-2 blade, but screwed it up early in the build and changed to some homemade low-layer damascus.

2. Rough-ground blade and a little time stamp. I leave the blades with a 60-grit finish before heat-treat.

3. A little satanite on the blade -- Heat-treating folder blades is sort of a pain. I use satanite to coat the pivot hole and stop-pin contact areas. I also use a 3/16-thick mild-steel rod bent to go through the pivot hole to hold the piece. I can't use tongs as they would suck all the heat from the tang and the pivot hole and stop-pin areas need to harden up.

4. Heat-treating a bolster. I use a pyrometer in my forge to keep the temps where I want them.

5. eww. Post-quench in Park's 50.
 

Attachments

  • 09bofolder64.jpg
    09bofolder64.jpg
    55.5 KB · Views: 58
  • 09bofolder65.jpg
    09bofolder65.jpg
    25.1 KB · Views: 54
  • 09bofolder66.jpg
    09bofolder66.jpg
    15.9 KB · Views: 53
  • 09bofolder67.jpg
    09bofolder67.jpg
    39 KB · Views: 59
  • 09bofolder63.jpg
    09bofolder63.jpg
    32.6 KB · Views: 66
Burchtree---Unbelievable!!
How can you put a price on all that work?!
I'll be back.
Thanks for doing this.
 
Back
Top