WIP/Tutorial - The Making of the Gamblers Dagger

Stacy E. Apelt - Bladesmith

ilmarinen - MODERATOR
Moderator
Knifemaker / Craftsman / Service Provider
Joined
Aug 20, 2004
Messages
38,331
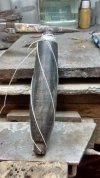
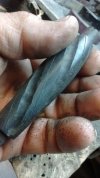
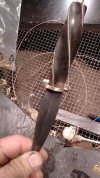
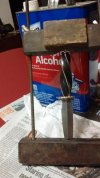
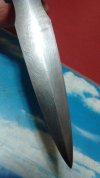
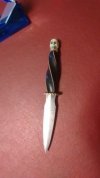
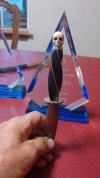
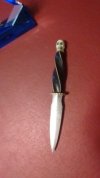
I didn't take photos of the blade being forged, but it was a simple small dagger blade. Ron Frazier started the billet before he passed away, and I think it is 1095 and O-1. It is about 300 layers.

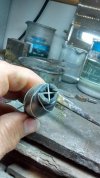
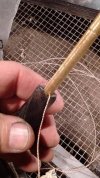
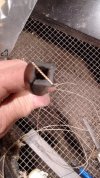
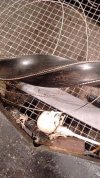
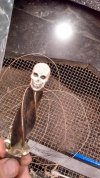
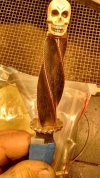
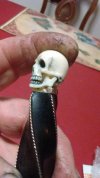
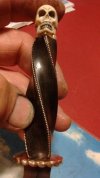
The skull came from a "picker" friend who was buying gold. The skull was in a box of ivory and gold stuff that were being scrapped. The skull and other carvings were free, because the owner didn't want any ivory because he thought he could go to jail for owning it. It was a bit less detailed, and I did a little reshaping and detail work.
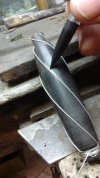
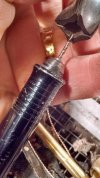
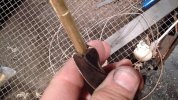
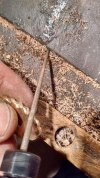
The handle is ebony and fluted buy hand. Twisted 14 karat yellow gold wire was inlaid down the flute ridges. I twist the two strands of 24 gauge wire with a cordless drill and put the loop end on a nail. Use just enough tension on the wire to keep it straight and prevent kinking. You have to move the drill forward as the twist shortens the wire. Twist it slow and run your fingers down the wire toward the nail so it twists evenly. Twist the wire with your fingers to walk the twist down the wire. With a helper on the drill end, I have done a length as long as 30 feet this way. The key factor is very slow twisting and working the twist down the wire for an even twist. The very ends of the twist, especially the drill end, will be a bit tighter or looser than the main part, so they will get clipped off. Plan for that on deciding the amount of wire to twist I usually twist about twice the needed wire length. This allows for replacements of wire damaged in installation or other problems, and the excess can be used for other decorative accents.

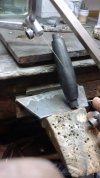
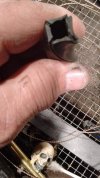
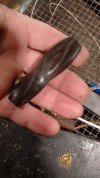
The fittings on each end of the handle are make in tri-color mokume. The guard is file worked with a fluted pattern. The pommel plate is shaped to fit the skull and fluted, too. The skull is mounted on a stud that acts as the cervical vertebrae.
 

Attachments

  • IMG_20170404_070619797.jpg
    IMG_20170404_070619797.jpg
    19.7 KB · Views: 201
  • IMG_20170404_070531506.jpg
    IMG_20170404_070531506.jpg
    23.5 KB · Views: 187
  • IMG_20170404_070618076.jpg
    IMG_20170404_070618076.jpg
    18.6 KB · Views: 186
  • IMG_20170404_070533441.jpg
    IMG_20170404_070533441.jpg
    20.3 KB · Views: 180
Last edited:
The handle block is drilled with a 7mm hole and turned on a pen lathe to the desired shape.You can do it by eye on the grinder, but the lathe maker the roundness and centering of the hole. more prefect. The flutes are started with a 0-90-180-270 cut across each end.

Note. I use 7mm because it fits the 7mm tubing I have and my pen lathe mandrel. You can use any system or hole size that works for your knife. I do suggest it be a round hole to keep everything even. I also suggest using a brass liner tube to lock down the wire ends and assure a perfect alignment with the blade.

Then a piece of string is run from 0 on the top to 90 on the bottom ( quarter twist), across to 180 on the bottom and back to 90 on the top, and repeat until the four strings mark the flute ridges.

I then use a soft pencil to make a mark on both sides of each string. This will be the ridge of each flute. Remove the string and with a 1/2" round rasp, make a starter groove down the middle of each flute ( between the ridge marks.

Slowly work the flutes down from both ends, turning the handle over regularly so you are working from both ends. When the center groove gets about 50% of the desired depth, start enlarging the flutes with a 1/2" half round bastard file. When the flutes are near the ridge lines, switch to sandpaper wrapped around a dowel. The trick to get smooth and even flutes is to twist the handle as you file/sand and not try to angle the file/dowel. Once you get the hang of it, it goes fast. When the flutes are meeting at a sharp ridge, sand to 800 grit ( or higher) and give a good buff with white rouge or matchless pink. Once all is shiny, carefully file the ridge lines to about 2mm wide. Run a jewelers #2 saw blade down each ridge to make a small groove. Using a knife edge needle file, file each groove to about 1mm deep and 1mm wide. The wire was twisted from two strands of 24 gauge wire which make a 1mm twisted strand.

Note: As you can see in the photos, I cut the groove first and then cut the flute, but I have done these handles a few times. It is safer to cut the ridge groove last until you are sure you won't have too many OOPSIES while filing and sanding. With experience, you can cut the flute ridge groove easier first while the handle is still round.

Take a piece of 7mm brass tubing ( from any pen supplier) that is 1/4" shorter than the handle, and make sure it slips through the hole smoothly. This size pen tube has a 1/4" inside diameter. Once the fit is assured, cut it in half and set it aside for the moment. These will be inserted from each end of the handle to lock in the twisted wire and make a perfect guide for the tang.

On the inside of each slot across the ends, make a 1mm deep groove down the inside of the handle. I like to go down about 1/2 to 3/4 of an inch. I start with a long needle burr and then use a ball burr to carry it down a bit further. Don't sweat the exactness of these slots, just try and get them more or less straight. The ends of the twisted wire will sit in these slots. I suggest checking to see that the tube will still slip in with a piece of the wire in each slot. No need to test with wire in all slots at the same time, checking them one at a time is fine.

About the blade:
The tang will need to be 1/4" wide if you are using a 7mm pen tube down the handle (If using a different method, just make sure the tang fits the handle before continuing). The part that goes through the guard can flare or step out, but the part in the handle will need to be 1/4". I just file/sand it to fit the tube snugly. I usually weld a piece of threaded rod to the end for the pommel to screw down on. In this case, I made a fitted stud for the pommel end that was a very tight fit in the tube. It went down the tube 1" for security. This stud was what the skull mounted on.


Photos out of order:
String to mark flutes.
Cutting the flute ridge.
Marking the string position.
Starter flute filing.
String seen from end.
 

Attachments

  • IMG_20170301_080217580_HDR.jpg
    IMG_20170301_080217580_HDR.jpg
    39.5 KB · Views: 94
  • IMG_20170301_080233514_HDR.jpg
    IMG_20170301_080233514_HDR.jpg
    34.9 KB · Views: 95
  • IMG_20170301_080249088.jpg
    IMG_20170301_080249088.jpg
    34.7 KB · Views: 88
  • IMG_20170301_082317081.jpg
    IMG_20170301_082317081.jpg
    33.2 KB · Views: 88
  • IMG_20170301_085741687.jpg
    IMG_20170301_085741687.jpg
    32.4 KB · Views: 92
Last edited:
Assembly photos are out of order the order is #4, #5, #1, #3, #2


The tubes are used to hold the wire in place while pulling tight into the ridge grooves. There is no glue holding the wire in place ... just tension.

Bend 1/2" of the wire end at 90 degrees and set in the handle. Push tube in enough to hold it there. Pul tight as you go down the flute ridge. When you get to the other end, pull it across the end to the other side. While holding the wire in place with your thumb, clip the wire off about 1/2" past the hole. Use a pair of needle nose pliers to grab the end and push it tightly down the hols and place in the groove. Push in the other half tube to hold in place. Check that the wire is tight and repeat. Each wire will be bent on an end. The tube removed to insert it, pulled down the groove, clipped to length, and stuffed down the hole. The tubes are removed and re-inserted as needed to put the wires in and then hold them tight. Once all wires are in place and suitably snug, push the tubes down the handle core until they are just shy of the top. Put a good size drop of CA glue on each wire on the inside where the wire is between the tube and handle. Repeat after a few minutes to assure that the wires and tube are well locked in place.

Note: When you have done this a few times, you can bend and insert all four wires on one end, press in the tube, and then pull them up and bend/stuff in the other end one at a time. With more practice, you can do all the top wires at one time and stuff the tube in to lock them tight.

At this point, check the fitt of the tang and pommel stud to assure things fit inside the tubes right.

Next, do any final fitting of the pommel needed to match the flutes. try and get it as close to perfect as possible, as anymajor amount of final fitting upon glue up will be problematic.

Finish the guard and solder it to the blade.

When everything is right, use epoxy to install the blade and guard first, and then put in the pommel and stud. Even if the stud fit is a tight press fit, use a drop of slow set epoxy spread inside the tube when inserting it. This makes sure things don't loosen up later on. Make sure the pommel plate is lined up with the flutes properly before the epoxy sets. If needed, you can do the final filing/sanding and shaping on the pommel plate after insertion, but you have to be careful of the wire. Cratex wheels are great for this step. When done, the pommel plate should be seamless with the flutes.

Note: I use the skull I had, but the actual pommel can be whatever you want. A ball, a gemstone, animal carving, dragon, etc. It will screw or glue onto the extension of the pommel stud that goes through the pommel plate and down the tube. The tube and stud assembly assures that pommel will be perfectly aligned with the handle, as was the blade.
 

Attachments

  • IMG_20170313_181350328_HDR.jpg
    IMG_20170313_181350328_HDR.jpg
    35.1 KB · Views: 69
  • IMG_20170313_181437385.jpg
    IMG_20170313_181437385.jpg
    37.5 KB · Views: 64
  • IMG_20170313_181601572.jpg
    IMG_20170313_181601572.jpg
    51.7 KB · Views: 68
  • IMG_20170313_181659363.jpg
    IMG_20170313_181659363.jpg
    56.5 KB · Views: 67
  • IMG_20170313_181710960.jpg
    IMG_20170313_181710960.jpg
    90.9 KB · Views: 64
Last edited:
Photo order 5-1-4-2-3

These photos go with the two previous posts for more clarity.

1) Test fitting the wire in the flute ridge groove.
2) Filing the guard.
3) Checking the fit of the pommel and plate.
4) Checking the fit of the tang and guard against the handle.
5) Handle with flutes and ridge groove finished.
 

Attachments

  • IMG_20170313_182151846.jpg
    IMG_20170313_182151846.jpg
    55.5 KB · Views: 65
  • IMG_20170313_181223306.jpg
    IMG_20170313_181223306.jpg
    37.8 KB · Views: 70
  • IMG_20170313_182304028.jpg
    IMG_20170313_182304028.jpg
    52.2 KB · Views: 71
  • IMG_20170313_182421095_HDR.jpg
    IMG_20170313_182421095_HDR.jpg
    56.6 KB · Views: 73
  • IMG_20170313_184729716_HDR.jpg
    IMG_20170313_184729716_HDR.jpg
    59.1 KB · Views: 67
Last edited:
Twisted wire installed. Round stock was soldered through the top pommel plate and sanded to a smooth press fit into the top handle tube. Skull glued onto stud extending through the top plate.
Blade.
Guard has been soldered to blade and handle being glued to blade tang. (photo out of order)
Finished all but the final clean up, buff, and sharpening.
 

Attachments

  • IMG_20170313_185004945_HDR.jpg
    IMG_20170313_185004945_HDR.jpg
    45.2 KB · Views: 67
  • IMG_20170314_221034003.jpg
    IMG_20170314_221034003.jpg
    33.4 KB · Views: 65
  • IMG_20170314_221812917.jpg
    IMG_20170314_221812917.jpg
    25.3 KB · Views: 70
  • IMG_20170314_221842777.jpg
    IMG_20170314_221842777.jpg
    21.5 KB · Views: 70
  • IMG_20170314_221942411.jpg
    IMG_20170314_221942411.jpg
    24.1 KB · Views: 67
Last edited:
Lovely stuff Stacy. I especially like that fluted handle with the wire highlight. That's not usually my thing, but on this piece it looks great!
 
Great stuff Stacy! And congrats on the great awards!

Daniel.


Sent from my iPhone using Tapatalk
 
Thanks.

I have edited some errors and clarified some things, so you may want to re-read the tutorial.
 
Thank you, that's very interesting
I've always wondered how comfortable those handles are? Though i suppose they are mostly decorative these days.
 
A fluted handle is a very old style on daggers, swords, and main gauche. It is surprisingly comfortable.

The ABS mastersmith dagger is required to have one.
 
Then a piece of string is run from 0 on the top to 90 on the bottom ( quarter twist), across to 180 on the bottom and back to 90 on the top, and repeat until the four strings mark the flute ridges.
I'm not entirely clear on this. so each flute (for this one) does a quarter turn (90°) around the handle? it looks more like a half turn (180°) in the photos.
how do you determine how tightly the flutes should twist?
 
Yes, I believe you are correct. On this build I did closer to half-twists on a four flute handle. It looks like it may be third-twists ( 0° to 120°). But it could have been half-twists, which would be from 0° to 180°. I use 0° to 90° twist on six flute handles.
Sometimes you make a lesser twist, sometimes you add more flutes (especially on swords).

It is mostly aesthetics, but that is the beauty of using string for the layout. You can make any degree of twist, or any number of flutes you like and find the combination that fits the look of the knife/sword before starting to cut wood. I have made handles from three twist to eight twist Four and six are the most common.
 
Back
Top