working with thong tubing

Joined
Jul 7, 2006
Messages
1,030
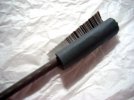
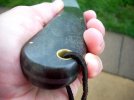
I have a few questions. When you use thong tubing to put a lanyard hole in a knife, what are the steps that are followed?

lets say your working with 1/4" tubing, you drill a hole 1/4" do you then epoxy the tube in place or is there someway of expanding the metal sot that it jams in place?

I would assume you cut it to a workable size, glue it in place, then just grind it/sand it down when your finishing the handle. Is this a correct assumption?

Also, should the metal be sealed somehow with a clear epoxy to protect it from the elements? I will be using stainless steel, but I know it will rust if given the chance. Thanks in advance...
 
It depends on what you want. Some people like to flair their thong tubing, I think this is the nicest looking and most practical system. There would be no sharp edges exposed.

IIRC you use a flaring press that spins as you press down.

You could just glue it in with epoxy.

Either way you don't need to coat it, a coating would wear off post haste in most cases.
 
ahhh a flaring press. That would be a good idea. Is there a cheap way of doing that? maybe with a hammer and a metal punch with a widening base?

I am thinking a homemade contraption could be use with a vise to do that?
 
Last edited:
exodus125,

I've also wondered how some makers achieve a great looking and functional thong tube on their knives. I played around a bit with flaring methods & fabricated a few tools and methods for doing such. Right now, though, I'm having pretty good success with a different method. First I get tubing with a thicker wall, say .065, then I drill a slightly larger hole in the handle material (ie....if tubing is 1/4" outside diameter, I drill 1/4" F size). I then rough up the outside of the tubing with 36 grit sandpaper and epoxy it in the knife....leaving just about 1/8" of tubing on either side of the handle. Let it cure as per your specific epoxy's recommendations. Grind or file it flush with your handle material (note....sometimes I have my handle finish sanded before thong tube installation....so I have to be really careful not to scratch it). Then I place the handle on my drill press and level it up with scrap wood chunks. I then chamfer the inside radius of the "thicker thong tubing" with my countersink bit. I have a variety of these with different angles to achieve the desired look. Now I,ll begin to sand the inside of the chamferd tubing. Take a small piece of 120 grit sanding paper, roll it around a 1/4" round file or dowel rod and start sanding away the rough marks. Move up through the grits to say 600 or 1000. It goes pretty darn fast and leaves a beautifully finished and radiused thong.
 
I don't have any W.I.P right now, but I'll try and round up a few pictures of my tools, tubing, & a finished thong. Hopefully, I'll get clear pictures. ha ha
 
few pictures of my tools, tubing, & a finished thong


Hope you can get a better idea from my amateurish photo's.
 

Attachments

  • DSCN0833.jpg
    DSCN0833.jpg
    26.1 KB · Views: 291
  • DSCN0836.jpg
    DSCN0836.jpg
    38.4 KB · Views: 65
  • DSCN0838.jpg
    DSCN0838.jpg
    43.5 KB · Views: 70
  • DSCN0826.jpg
    DSCN0826.jpg
    46.1 KB · Views: 96
  • DSCN0827.jpg
    DSCN0827.jpg
    46.8 KB · Views: 99
very nice! I see what you mean now.


In a stuck up photographer voice:

"I call this one, waiting on the windowsill:

attachment.php
 
Alright, I am going to be brave enough to put up a picture at my weak attempt at thong tubing. This was the first time working with it. Hopefully someone who is as knowledgeable as me will pick up a thing or two from this.

I had a piece I had already finished, and then I decided to put lanyard hole in it. I think that was my first mistake. I cut the pipe, glued it in place, then grinded it down. I wasn't going for anything fancy, just a tube for a lanyard hole flush with the piece.

I ran into some trouble cleaning the inside lip burrs and also the outer lip kinda mushroomed a bit. I am not sure if this is due to me adding the tubing after I had finished the piece. I think maybe had I glued the tubing in place before finishing it it would had come out a little nicer, but since the piece was finished I couldn't grind it as much. Well here are the pictures:

Stag with a 3" x 3/8" fire steel.

stagfiresteelb.jpg


stagfiresteelandstriker1.jpg


stagfiresteelandstrikernight.jpg


stagfiresteelglownight.jpg


Here is another piece I tried the thong tubing on. g-10 with a 3/8" x 6" fire steel:

g-10firerod6inch.jpg


g-10firerod6inch3.jpg


g-10firerod6inch4.jpg


g-10firerod6inchday2.jpg


g-10firerod6inchnight2.jpg


g-10firerod6inchnight.jpg


I also have some more questions. I was polishing up the piece with some white compound and the metal pipe caused the wheel to turn black, then the black sut was going all over the handle material and it was a big mess. How do you guys combat that and how do you clean up a wheel that turns black like that?

Also, I made the striker out of a an old jigsaw blade. I had to grind it a bit to get it to a usable size and then I had a hard time getting the scratches out. I ended up leaving a brushed aluminum look on it. What are the proper steps to polishing up a piece up metal that's scratched up to a mirror finish?
 
exodus125,

I've also wondered how some makers achieve a great looking and functional thong tube on their knives. I played around a bit with flaring methods & fabricated a few tools and methods for doing such. Right now, though, I'm having pretty good success with a different method. First I get tubing with a thicker wall, say .065, then I drill a slightly larger hole in the handle material (ie....if tubing is 1/4" outside diameter, I drill 1/4" F size). I then rough up the outside of the tubing with 36 grit sandpaper and epoxy it in the knife....leaving just about 1/8" of tubing on either side of the handle. Let it cure as per your specific epoxy's recommendations. Grind or file it flush with your handle material (note....sometimes I have my handle finish sanded before thong tube installation....so I have to be really careful not to scratch it). Then I place the handle on my drill press and level it up with scrap wood chunks. I then chamfer the inside radius of the "thicker thong tubing" with my countersink bit. I have a variety of these with different angles to achieve the desired look. Now I,ll begin to sand the inside of the chamferd tubing. Take a small piece of 120 grit sanding paper, roll it around a 1/4" round file or dowel rod and start sanding away the rough marks. Move up through the grits to say 600 or 1000. It goes pretty darn fast and leaves a beautifully finished and radiused thong.

Bob, any chance I can get you to send me a link of the countersink you use and or where you get your thicker tubing?
 
This is where I buy most of my thong tubing. The link should take you directly to the page with .065 wall thickness tubing. if it doesn't just let me know and I'll try and help you navigate MSC. Their site is a little difficult to learn, but after you figure out how to move through the different prompts it becomes easier.

http://www1.mscdirect.com/CGI/GSDRVSM?PACACHE=000000099623816

Usually, the machinists at work give me there used countersinks/chamfering toools when they want to buy new one's. So I rarely have to buy new one's. Here is a link to the one's that MSC carries....kind of expensive. You really don't have to but the "Best" one out there IMO.....because, after all, you will be sanding the tubing with progressively finer grits after you do your initial countersink.....plus, brass is soft.

http://www1.mscdirect.com/CGI/GSDRVSM?PACACHE=000000099625101

Hope this helps,

Bob
 
Back
Top