So, I'm about to get some wrought iron for guards and such, and I'm wondering how one etches the wrought, specifically for a guard, and then shapes the handle so that it all fits together without removing what you've etched? Is there any way to do this without basically making a takedown?
-
The BladeForums.com 2024 Traditional Knife is ready to order! See this thread for details: https://www.bladeforums.com/threads/bladeforums-2024-traditional-knife.2003187/
Price is$300$250 ea (shipped within CONUS). If you live outside the US, I will contact you after your order for extra shipping charges.
Order here: https://www.bladeforums.com/help/2024-traditional/ - Order as many as you like, we have plenty.
You are using an out of date browser. It may not display this or other websites correctly.
You should upgrade or use an alternative browser.
You should upgrade or use an alternative browser.
wrought iron guard etching
- Thread starter wordsmith
- Start date
- Joined
- Feb 28, 2006
- Messages
- 3,494
Hey you guys, you can't do this behind the scenes now that the cat's out of the bag! We want to hear about your R & D here.
Last edited:
The issue for me is the fact that the standard procedure for shaping guards seems to be to do it together with the handle so that the lines are continuous and the curves fair. I usually do this after everything is glued together, as in the recent tutorial that Bruce Bump posted. I don't think one can etch the wrought after this process though, not without messing up other stuff. I'd like to avoid doing a takedown where everthing has to be dry fitted first if possible, but don't see any way around it.
- Joined
- Nov 8, 2007
- Messages
- 460
The way I do it (that is a long way from meaning it is the right way) is to use hidden line-up pins that go from the guard to the handle material. I then use super glue sparingly to get it all fitted together. The guard and handle are then shaped and sanded to a fine grit. At this point it is very important to make sure it is completely finish sanded as the temptation to hit the guard or handle with sandpaper can be great if you notice some scratch when they are separated. Don't do it. A quick tap and the guard and handle will pop apart since I just used a small dab of super glue. I color the part of the guard that is against the handle with a sharpie for an etch resist so you don't end up with a little gap anywhere. Etch guard, attach guard however you choose, then epoxy handle. The line-up pins should make everything fit exactly as it did when you shaped it. Good luck.
-Mike
-Mike
- Joined
- Dec 2, 1999
- Messages
- 9,910
I heard my name in here and checked it out.
I like to assemble all the roughly shaped parts together and drip some superglue on just to hold everything together while I finish grinding, shaping and finish sanding them. If they pop off before I'm finished I just wick in super glue again. After the gaurd, spacers and handle are finished I pop them apart and clean up the parts and etch the damacus or in your case the wrought iron. Then simply reassemble all the parts with permanant epoxy. Works for me.
I like to make the parts fit the tang very well so they dont move around very much. Some people pin all the parts together but I've found if I spend extra time just hand filing inside the guard and spacers things fit closely and pins arent needed. If you practise this you'll discover making a take-down model is very easy.
")
- Joined
- Mar 12, 2006
- Messages
- 2,264
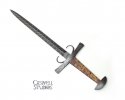
I don't know how deep you plan to etch, but to me this sort of surface topography would run around the corners of a guard--not end abruptly at a mating surface. Here's a piece I did about 12 years ago with wrought iron guard etched about as deep as anyone could want, IMO. (...Sorry, no close up, but I think you can see a little of how the surfaces meet up.)
On things like this, I'd just forge the guard, fit it up with the tang and grip and then etch it just before final assembly. No masking. This would work best for a take-down, IMO
On things like this, I'd just forge the guard, fit it up with the tang and grip and then etch it just before final assembly. No masking. This would work best for a take-down, IMO