1st Knife almost done with a couple questions

Joined
Oct 17, 2011
Messages
9,412
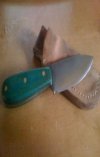
Here is the latest progress on my knife. It is 1/4 1084 aldo. I have learned a lot but am pretty happy with it. What can I do to make the scales a bit darker. I dont like the color. When I got the micarta slabs it was a much darker green.

I struggled with shaping the handle and its not as symmetrical as I would like, but it does feel good in my hand.

The finish I sanded to 1000 and then did a hot vinegar patina I think I will do that again to try and get it a bit more even.

I heat treated it myself, but on my next knife I am going to use thinner stock and O1 and send it out to be treated. I put too much work into this knife to be wondering how my heat treat turned out.

The sheath I made as well. Its about my 5th attempt Im getting better with each one and I hope the same will be true for my knives.

Any comments or advice would be welcome so I can learn. (I have thick skin)

Thanks

8514e6eb.jpg


ca72408a.jpg


ab3f8259.jpg


b937d57e.jpg
 
Hey psyop! Good to see it close to done. I assume the scales where polished on the outside when you got them. A lot of mircarta doesn't show its true color until its buffed or polished. Try that, it should darken to its original color.
 
Hey, good one, Psy. Thick little bugger, eh?
Yeah, like Todd said, you have to sand up the micarta.
That involves bring it to an even finish all around at 180, 280, 360. At about 260 you'll probably find what you're looking for, and can continue to 600 if you want. If you've got a lot of deep marks in the handle, start sanding at about 80.

Thinner stock is easier to through-harden at home. 1084 is straightforward if you have a couple bricks to hold the heat from your torch.
 
Looks good so far, but you are only about half way done. If the blade is as done as you are going to take it (I suggest some nice hand sanding to even it out) then wrap it in a paper towel and wrap it again in electrical tape, clamp it in your vise and then go to work on the handle and spine. Make the sanding scratches all go the same way on the spine, then scrub that micarta until you can't see any scratches from the previous grit. This also includes "light areas" that you get on micarta from when you grind it on a grinder. I usually take micarta up to 600 grit before buffing it and it buffs out nice and even. Pick up one of Paul Long's dvds on sheathmaking in order to improve your sheaths.
 
Yep, nothing else I can really add to the topic.

Sanding to 300-600 and buffing really helps to bring out Micarta's true coloration.
 
Thanks I will get to sanding. Do I need to wear a respirator when hand sanding the micarta?
 
Thanks I will get to sanding. Do I need to wear a respirator when hand sanding the micarta?

No dust is good for you to breathe.
The only way you get rid of it is a small amount of absorption of organic matter, or cough it up in phlegm.
Stonecutters in Italy used to get given a glass of milk at the beginning of the day to help trap the marble dust in mucus before it found its way into the lungs.
Milk is a mucus producer. The idea was that later in the day, you had something to cough up.
 
When drawing up a knife design, start with a slightly curved line. Re-draw the curve until it pleases your eye as the line of the handle and spine from butt to tip. This is your reference line. It should not change.
Next, draw the sweep down from the tip and back past where the blade will end. This is your blade line. Don't worry about where the blade will stop right now, just re-draw it until it pleases your eye as the shape you like for the blade. Once this is established, don't change it. Now, draw in the handle shape. The butt should not drop much below the blade, and the handle should normally not be fatter than the blade. Don't worry about where the handle will end at the blade yet. Once the handle shape is drawn, move your attention to the area where the handle meets the blade. Draw in the downward curve of the front of the handle. Draw in the choil so the blade rises up a bit and curves back to the front of the handle to establish the ricasso. Adjust the front of the handle if needed. The knife shape should now be done, with nothing but curved lines. Some may have a section that is almost straight, but it usually comes out of a curve and ends in a curve.

Take a look at the entire package, now. It should flow from one area to the next. There should be no big dips or sharp changes in angle. Curves should outnumber straight lines 9 to 1 .

Once all is right, then add feature elements, like finger grooves, jimping, file work, etc. Treat the basic drawing as if it was a curvy naked lady, and the extra features are tattoos ... a few well places accents are attractive, but put on too much skin art and she doesn't look so good anymore.

I agree with Stacy. I had straighter knives when I started and the handles and blades became more curved and flowing after handling them when I was finished with them and tested them out. I also draw everything out and measure everything as close as I can get it to help with all the making processes.
 
Spent some more time on it. Mostly the handles. I think they are much better now. Sanded to 1000 then a cotton wheel. Should I use some kind of compound on the cotton wheel?
 

Attachments

  • ImageUploadedByTapatalk1348852210.584868.jpg
    ImageUploadedByTapatalk1348852210.584868.jpg
    20.1 KB · Views: 26
BTW, it could just be the photo angle, but that sheath looks stitched without a glued up welt?
If so, it will cut thriough easily and may severly injure you.
 
Looking pretty good man! Keep with it, and as Darrin always tells me, shoot to make every blade better than the last. What did you use to make that?
 
Hey ole buddy. Lookin good. However, my sugestion is this. Believe me. We are our most critical critics. I can waste more time and beat myself to death over things that normal people wouldn't ever even know. Don't go down that road. Its your first knife. Its a learning tool. Keep it forever and take what you learned from it and apply it to your NEXT knife. You can spend forever working on it and never get it to your liking. Because your skills evolve. I promise. Your next will be better. Then the one after that will be better, and so on. Just keep it up. I love seeing poeple experiencing what knifemaking is all about. I'll do what I can to help you out!
 
Looking pretty good man! Keep with it, and as Darrin always tells me, shoot to make every blade better than the last. What did you use to make that?

I used 1084 Aldo 1/4 that 1066vik gave me. Used a Craftsman 2x42 and various hand tools. Heat treated it myself with a torch.

Hey ole buddy. Lookin good. However, my sugestion is this. Believe me. We are our most critical critics. I can waste more time and beat myself to death over things that normal people wouldn't ever even know. Don't go down that road. Its your first knife. Its a learning tool. Keep it forever and take what you learned from it and apply it to your NEXT knife. You can spend forever working on it and never get it to your liking. Because your skills evolve. I promise. Your next will be better. Then the one after that will be better, and so on. Just keep it up. I love seeing poeple experiencing what knifemaking is all about. I'll do what I can to help you out!


I hear you. My O1 is here Im ready to start on knife two. I have learned a lot and Im sure it will be better. Maybe wont even take me 4 months to finish it lol.
 
Back
Top