1st Knife Here, Any advice is appreciated. WIP

Joined
May 23, 2011
Messages
139
For the last couple of months I have been kicking around the idea of making my own knife. In fact, the idea is like a really bad itch that I have just not been able to get rid of. So I am going to start it.

I've been through the stickies and I've done a bunch of lurking here with the occasional question thrown out so I think that I am ready to start. I've also bought and read "50 Dollar Knife Shop," paying special attention to the stock removal sections. I also got another book, called something like "10 Knife-making projects" that went over everything from a first knife, "Paring Knife" all the way up to more advanced things like making a slipjoint folder.

As far as tools go, what I have is the following:

1. Craftsman 3-speed Drill Press
2. Hand Drill
3. 3-piece Craftsman File Set (Coarse)
4. C-Clamps, no table vise yet
5. Hacksaw
6. Sandpaper
7. Work Bench
8. Full Face Lexan Shield
9. DMT Diamond Hone Set (3-piece Coarse, Fine, Extra-Fine)
10. 2.5 Foot length of 1.5 in. wide O1 tool Steel 1/8 in. thick

I've been doing some drawings that last couple of days and here is what I have come up with.

2011-12-22_21-35-38_65.jpg


The one on top is the first one I drew that I really really liked. But when I did a cardboard cutout the handle was a little small for my liking. So I went back to the sketch pad and used that as a base with what I had learned to draw up another. I extended the handle and made the belly of the handle less pronounced. I also gave the blade a bit more belly since when I elongated the first one, the blade took on too much of a Wharnecliff shape. I like Wharnecliff blades, but here I wanted something that would be more useful as an overall utility/camp knife. I also got rid of the exposed area of the tang because I figured that it would make it much more difficult in shaping the handles during finishing. I'll probably revisit this design if I continue making blades.

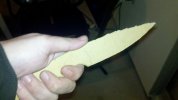
I'm going to do a cardboard cutout of the new design today to see how it feels in the hand. I'll post later to show it and give my thoughts.

So feel free to tell me what you guys think. And thanks in advance. I can't say it enough, but you guys are really great.
 

Attachments

  • 2011-12-22_21-35-38_65.jpg
    2011-12-22_21-35-38_65.jpg
    35.7 KB · Views: 21
Last edited:
Hi Talesin,

I prefer your original design because it's more unusual. The second design looks a lot like the Fallkniven WM1.
For proportion, I would lop about 1/4" off the blade length. Thicker scales would compensate for a slender handle and would allow more of a coke bottle shape when viewed from above. If you do stick with design 2, you may want to consider adding a lanyard hole for use with a pouch sheath.

EDIT: The exposed tang at the back means you'd have 2 ends to finish before glueing up. You need to get the shape almost there and then double sided tape the 2 scales together and finish the ends to a high polish, so that the only work needed at the handle/blade intersection is to clean off the excess glue. I wait until it's set fairly hard and then use a brass knife to trim the glue (doesn't scratch the steel). Trying to finish the ends after glueing will always end up with the bit closest to the liners not looking as good (or deep polishing/sanding marks on the blade)
 
Last edited:
Looks like your off to a good start.Simple design,good stock size,well planned.Have fun.
Stan
 
I like # 2 it resembles one of my favorite knife designs. Keep the first one simple. You have the basic tools to do it. Add a piece of bar clamped under the blade to hold it stiffer while you file and sand. Take your time. Get each stage finished smooth before the next. Enjoy.
 
Just stick with it till its done....When you shaping that blade with files its tedious (im still doing it this way myself) but when you hold that finished knife in your hand its all worth it..
 
Hi Talesin,

I prefer your original design because it's more unusual. The second design looks a lot like the Fallkniven WM1.
For proportion, I would lop about 1/4" off the blade length. Thicker scales would compensate for a slender handle and would allow more of a coke bottle shape when viewed from above. If you do stick with design 2, you may want to consider adding a lanyard hole for use with a pouch sheath.

EDIT: The exposed tang at the back means you'd have 2 ends to finish before glueing up. You need to get the shape almost there and then double sided tape the 2 scales together and finish the ends to a high polish, so that the only work needed at the handle/blade intersection is to clean off the excess glue. I wait until it's set fairly hard and then use a brass knife to trim the glue (doesn't scratch the steel). Trying to finish the ends after glueing will always end up with the bit closest to the liners not looking as good (or deep polishing/sanding marks on the blade)

Yea, I still really like the first design, but I figured that it would be a little advanced for a first knife. I haven't done anything like shaping handle scales before, so I thought I would remove some of the difficulty by making the scales the full length of the handle tang. The problem I had with the first one wasn't the thinness of the handle but the length. It needs to be about a half-inch longer in my opinion. I may look at the first on again and straighten the handle a little so I can add that extra half inch I want.

As far as the second knife looking like a Fallkniven WM1, that is coincidence. I've looked at the F1 and the S1 and like both but haven't really perused their other offerings. I just drew a drop point that, on paper at least, looked good to me. I also changed the blade shape to reflect a full flat grind since I wasn't sure if I could do a sabre grind with just files. Would it be feasible to do a sabre grind with just files?

As for a lanyard tube on the second one, I'll end up drawing that one in soon. I haven't even done the pin placement or the weight reduction holes yet.

The idea about the exposed tang was inspired by Brothers of Bushcraft. I figured that if I left one of the edges sharp, then I could use it for a fire striker without damaging the edge and I wouldn't have to leave part of the spine sharp instead. Also, the exposed tang looks a little short, so when I revisit the design I'll probably make it at least 3/16 in. so that I can drill a 1/4 in. lanyard hole.

Although now that I think about it, the first design might be even better to do in 3/16 in. thick O1 or 1084 steel. I think the blade shape and the tapering of the blade down to the modified wharnecliff point might lend itself better to some thicker blade stock. Or maybe that is a little thick for the size of the knife.
 
I like # 2 it resembles one of my favorite knife designs. Keep the first one simple. You have the basic tools to do it. Add a piece of bar clamped under the blade to hold it stiffer while you file and sand. Take your time. Get each stage finished smooth before the next. Enjoy.

I was thinking of making a simple work arm out of 2x4. This is something bladesmith talked about in weatherman's thread.

What kind of bar were you thinking about? Steel, wood, something else?
 
Gilbert AZ? You have a nice airgun store there :)

I like your bottom design. That looks like a good first build.

BTW since you are in AZ you should think about taking some classes from Tai Goo. He is not that far away from you
 
The only thing about your design that I would advise against is the very deep finger guard. while it looks cool, those things are a pain in the butt to sand clean. ask me how I know.
 
One problem with the first design... the rear 1/3rd of the edge will not be usable on a flat surface due to the finger guard bump.
 
The only thing about your design that I would advise against is the very deep finger guard. while it looks cool, those things are a pain in the butt to sand clean. ask me how I know.

So flatten the curvature on the guard on the second one then? That will make the cutting easier. What is the pain with sanding those by the way?

You're right about the finger bump trypper. I think that design will be done another time. That one really seems to be more of a SD than a camp knife.

I'll do another sketch of the second one and post it later. Posting this from my phone right now, so excuse any errors please.

Thanks guys.
 
if you don't have a grinder, you get to hand sand the top and bottom of the handle. sanding inside that groove is a long and painful process.
 
Sanding the inside of the finger notch is not tough if you use a 3/4" or 1" sanding drum that works with a power drill. I prefer the 1" size.

I like the second design. Keep us updated here as you make progress.

- Paul Meske
 
Alright, I've gotten the design that I like transferred to cardboard and I made some cardboard scales to go along with it. I really like how this feels in the hand at this point

2011-12-23_19-16-23_209.jpg


2011-12-23_19-15-41_976.jpg


2011-12-23_19-16-06_845.jpg


2011-12-23_19-16-31_888.jpg


According to my ruler the handle is about 1/8 in. narrower than my spyderco millie, and about a 1/2 in. shorter. This is what I consider a really comfortable grip by the way. I would still like to keep the index finger guard. I know it might be a pain to shape, but on the mock up it actually felt pretty good. Also, I just can't seem to modify the lines of the handle to work without it. Any thoughts on that part of the design specifically? I'm not to worried about difficulty, unless it would be impossible with my current hand tools or some extra ones that won't break my meager bank.

Now this is thinking ahead a little, but I would like to do either black paper micarta or black linen micarta for the handle slabs. Does 1/4 in slabs seem to be about right? Also, would it be advisable to get a sheet since I have never messed with micarta before? I am basically a newbie when it comes to shaping or cutting something like handle scales. I built a work bench this summer and even though I measured twice and cut once, it still needed quite a bit of adjustment for all the pieces to come together in the end.

You know, I've got this nagging feeling I'm forgetting something important. I don't have any idea what it is though.
 

Attachments

  • 2011-12-23_19-16-31_888.jpg
    2011-12-23_19-16-31_888.jpg
    33 KB · Views: 14
" Does 1/4 in slabs seem to be about right?"

It depends on how thick you like your handles. Increase the thickness of the handle on your mockup until it is @ .9". Sand it down until you have the 3D profile that feels good. Measure the thickness and width for a number of points along the handle. Sand some more until it doesn't feel as good. This will help you with your blade profile as well as determining the thickness of the scales. If the maximum thickness of the handle in your range of measurements is thicker than 5/8" you should go with thicker scales. If they are within 5/8" then 1/4" scales should be fine.
Make 'pretend' cuts with the mockup to determine how they feel to you.

Okay, I did what you suggested and made some more cardboard scales to go on the mockup. I took it out to 3/4 and sanded it down with a paint stick wrapped in emery paper. Cardboard makes a horrendous mess when you sand it by the way. Got it down to where it felt pretty good and measured it. The handle was just a shade under 5/8ths, so 1/4" scales will be the way to go. The 3D mock-up feels pretty good in sabre grip which is my preferred method of use for smaller knives like that. The finger choil creates a small gap when I hold it hammerfist, so I'm not sure if that is a problem or not.

I still need to buy a couple of things before I get started cutting metal at this point. I still need to get some brass rod for the pins, brass tubing for the lanyard hole and epoxy. I tried the local hardware store and struck out on all three counts. So off to the internet I go. Oh, and I need some 3/4" or 1" sanding drums for my drill along with sanding sleeves.

I'm thinking brass rods and black paper micarta for the handle. Afterwards, I'll make a pouch type sheath for it out of 9-10 oz leather. Another first for me.
 
The local ACE hardware here has brass rods. I also find them at hobby shops that specialize in model trains and cars.
 
"The finger choil creates a small gap when I hold it hammerfist, so I'm not sure if that is a problem or not."

If I understand what you're saying, rotate your knife in the grip so the edge of the blade is facing away from you and your little finger fits in the choil.
 
"The finger choil creates a small gap when I hold it hammerfist, so I'm not sure if that is a problem or not."

If I understand what you're saying, rotate your knife in the grip so the edge of the blade is facing away from you and your little finger fits in the choil.

Yep, that fixes that small gap. I wasn't too concerned since I do most of my cutting holding a knife in sabre grip. I'm at work right now but I can post pics of the mock-up when I get home.

Thanks for the advice Tryppyr. I remember seeing brass rods at the local Hobby Lobby the last time I was there and thinking they would be good for using for knife handles. I'm still debating between using some micarta for the handles or a slab of 1/4" thick red oak that I have handy. I'm leaning towards the micarta for right now since the varnish, sealant and lacquer up front cost will likely be greater than just buying a slab of micarta. Any opinions on 30 minute epoxy from Texas Knife Supply? I figure $14 for a 9 oz. package was a pretty good deal, and they had pretty good pricing on the black linen micarta I was thinking to use to.

I guess I should wait to start cutting and grinding until I have the last of my materials together. Last question for now, how essential is a set or a mill file in "fine"? I checked out Home Depot and they only had bastards, which I already had a set of.
 
The general rule on epoxy is that the longer it has to set up for, the better. a 24 hour epoxy is the way to go. the top 4 of those are western systems G flex, the t88 2 part, Acraglas from Brownells, and the K and G epoxy. all will probably be more than strong enough when used in conjunction with pins.

I don't think you need fine files. I personally do all my rough grinding with Nicholson magicuts ( which are amazing, I might add), and then draw file with a single cut nicholson that I got at HD, and then move to 120 grit. I HT, and then go back to the roughest grit that I have and work my way up to the desired finish.
 
Back
Top