1st knife in progress... comments please.

Joined
Feb 13, 2004
Messages
71
Howdy.


This is my first attempt at making a knife. I thought it would be fun to post pictures of the various stages of completion to get any feedback and/or comments from you all. Thanks to all who have given me advice so far, and to Roger for the steel.

I am using two files, a hand-drill and sandpaper, so this is probably going to take me a while. I read a good quote in Ed Fowler's book. He was talking about hand grinding a knife, and how much work it was... but he also added "Dreamers know no bad while living their dream" - Wise man.

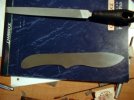
The first picture is a design I came up with that I like. I decided to modify it by removing the thumb ramp on the spine. First of all, it will mean less filing. Also I was told that having that 90 degree angle would be bad for the heat treat.

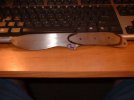
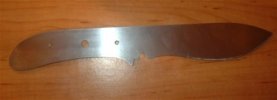
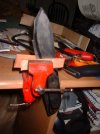
The second picture is the modified pattern, and the layout on the O1 blank.

Let me know what you think.


Thanks,

-Dave
 

Attachments

  • 1st.jpg
    1st.jpg
    21.6 KB · Views: 132
  • DSCF0002.JPG
    DSCF0002.JPG
    29.5 KB · Views: 313
I see you put a little recurve in the edge. You're going for the justo right off the bat. Good for you. Keep us updated.

RL
 
I'd have an index finger up on the spine of a knife way more'n my thumb...

As for tools, do you have a small 4" angle grinder?? what a cheap little time saver. Many guys here including myself, use them to remove forgeing scale before we go to a belt but I've made a whole knife with one before. Quite an interesting experiment.

regards and keep us posted...

mitch
 
I would think if you used the 4" angle grinder in combo with files and go in a grind...file...grind...file order you may be faster than you think. Way to jump right in.....
 
I do like the lines of your knife. The recurve is a bold choice for a first knife. I was looking at the dimensions in the sketch. I like the 4 1/4 inch handle because I have small hands, but most of my customers have expressed a desire for at least a 5" handle in a "standard size" skinning / camp knife.

I'm not sure what the concern was about the 90 degree angle in the heat treat. It's common - even normal to have 90 degree angles where the guard fits onto a through tang blade.

Keep us posted. It's great to see something so close to truely handmade.

Rob!
 
Thanks fellas.


I just received my copy of "$50 knife shop" so I am going to spend this evening reading that, and start filing tomorrow.

I imagine I will have to use the half-round file I bought for the recurve blade.... we'll see.

I am just going to take my time, and see how it all works out. I have already learned a lot, and am having a great time. It makes it much more fun to be at work when I have something to look forward to.


-Dave
 
You may want to not "recurve" the blade so much with the half round and let that happen by filing the bevel more where you want the recurve to be. You will eventually run out of edge and the edge will start to rise into the recurve and you will still have a flat blade. I would be afraid the halfround might create low spots that will be tought to even out....Remember to focus on the whole blade shape and try to keep everything uniform........

Be patient...those are 2 words I need to learn!
 
Wheeeew! :eek:


I just spent 4 and a half hours cutting the blank and am about half way to having the knife shaped out with my files. This is a lot of work. But, it is fun. I already have a much bigger appreciation for knifemakers, and the work that is involved with this craft.

I found a tiny little vice in a abunch of my old stuff... it has helped out a lot.

Here is the knife in "cutting the blank" stage.

Thanks for looking.


-Dave
 

Attachments

  • Cutting 2.JPG
    Cutting 2.JPG
    36 KB · Views: 148
Super.

You're almost faster than I using machines! Keep the spirit. Its going to be a good one.

RL
 
Here is the knife, ready to start filing the blade. There will be a choil and a little cutout near the choil as soon as I get a drill bit.

-Dave

P.S. I dunno about that, Roger... I do know my arm is tired. :)
 

Attachments

  • DSCF0002.JPG
    DSCF0002.JPG
    39.5 KB · Views: 113
  • cutter2.jpg
    cutter2.jpg
    25.3 KB · Views: 145
Great progress for such a short time all by hand. It's looking just like you drew it out to look. Going to be a real keeper. Keep up the spirit. The fun part is just ahead.

Don't forget to drill all holes before heat treat.

RL
 
nicely done. I'm impressed that you stayed at it for 4 hours.
What are you going to use for scales?
 
Thanks fellas.


Actually by the time I posted the new pics, it was more like six hours... but it was fun. I plan on using some sort of hardwood for the scales, not sure what I can find yet. I'd like to get some stabilized wood...

Roger, I think I would like to take you up on your offer of the heat-treat. That is very cool of you.I must say, I am surprised it turned out like I wanted so far, but like you said, I am taking my time... Also, should I do the filework on the spine before heat-treat?


Thanks guys.

-Dave
 
Absolutely. Do all but the final finish sanding before HT. You will not be able to file work it after heat treat. Do not finish the blade any finer than about 400 grit before heat treat (600 absolute finest). You will be sanding off oxydization after HT, so going too fine will cost you extra work.

Just let me know when you want to send it my way so I can be on the look out for it. I will be making trips out of town periodically for a couple/three days at a time until first of next month. I am leaving tomorrow and expect to return no later than Tuesday.

RL
 
I think that filing for hours at a time must have a similar effect to that of a woman having a baby when its over and you have your new knife in your hand you forget how much pain you went through filling it. Smart move picking a 4, 1/4 inch blade. Some Blokes go for the bowie 8 or more inches, not a smart move.

If you make your template out of thick card or thin sheet metal you can keep them for the next one save re drawing. I also cheat by printing a copy from the computer and stick it to the billet. It has some disadvantages ie the glue may let go.

Anyway good work keep it up.
 
Well, I think today I am going to start filing the bevels. I am a bit nervous, as I don't want to totally mess it up.

Any tips I can't live without before I put file to steel to create the blade? I heard about using a guide to file the part that butts up to the ricasso, anything else?


Thanks.

-Dave
 
probably a few you've already know.
use a drill bit to scribe your center line.
use a marker to see exactly where you are removing steel
never leave a knife in a vise unattended...even for "just a second".
make sure you switch sides often while filing when you get down near to where you want the bevels.
use a file brush often.
take your time it will show in the finished piece
and of course have FUN.
 
Well, the holes are drilled and the choil is formed...I'm avoiding filing the bevels I guess... but I'll do it soon.


-Dave
 

Attachments

  • Holes Drilled.JPG
    Holes Drilled.JPG
    9.2 KB · Views: 102
I tend to work about 2-3 hours at a time when I file. Once you get in that zone you just go and go and go! If you have things set up right you should feel about as goood after a 2-3 hour run at it as you did before. If you come away feeling like you got beat up you need to see your chiropractor then change the biomechanical way you're doing things and look at the ergonomics of your work area.
 
Back
Top