#23 Done, Please Help Critique!

Joined
Dec 8, 2014
Messages
814
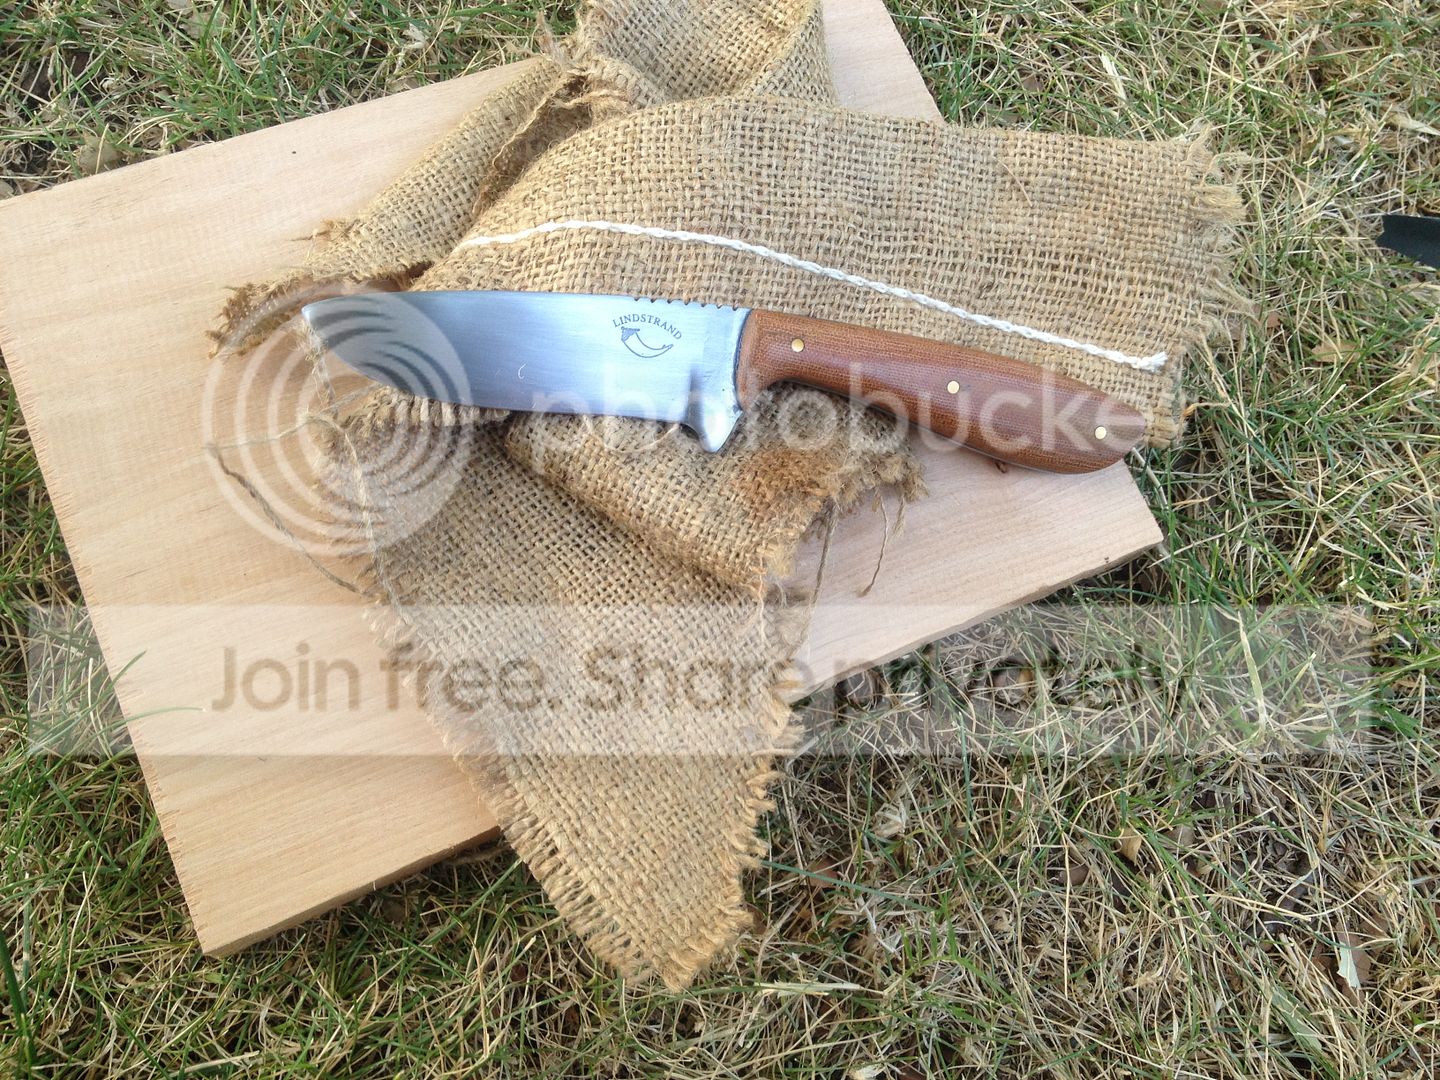
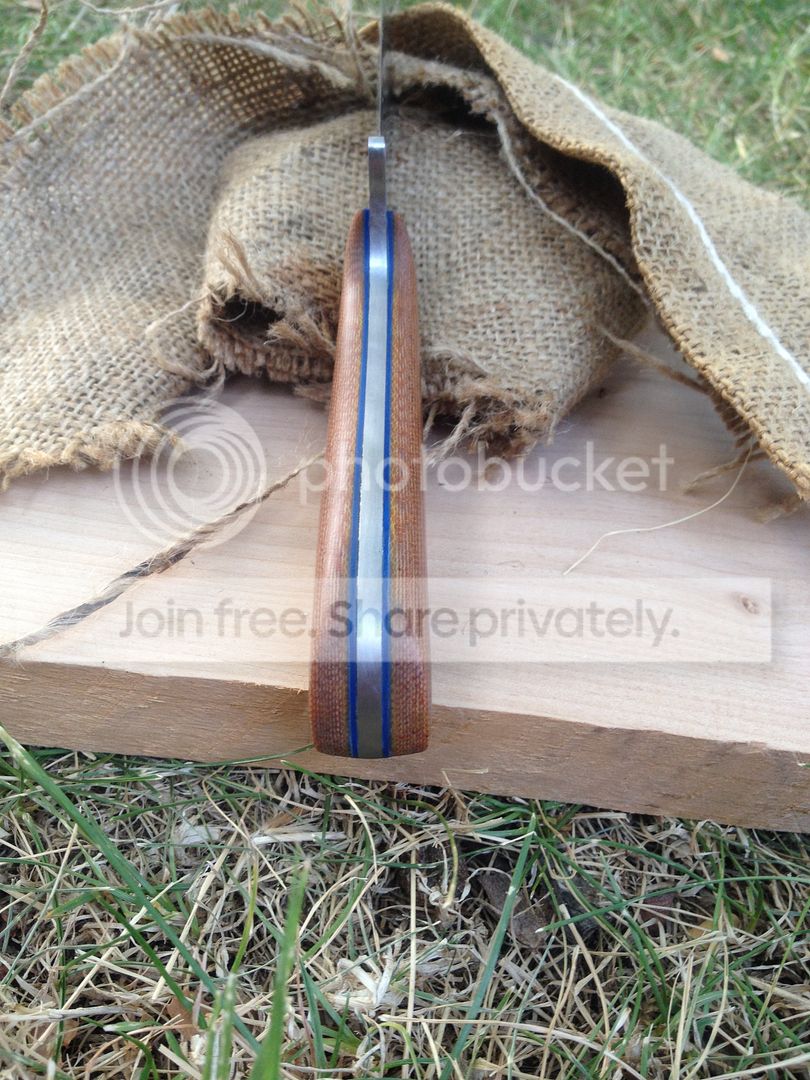
Hey all. Here is a knife I already had halfway done when I posted my last knives up. The blade was already made, so there wasnt much there I could do to improve on that this round, but i did take the dremel and grinder to the end and tried to put a bit more of a point on this one. I wish the plunge lines would have turned out better, Ive been having issues with my grinding set up and cant seem to get my lines as crisp as I would like. I didnt realize how dirty the blade was when i took these pictures, sorry for that. The handle is canvas micarta with blue G10 liners... I felt here was where I was able to improve the most. The front of this handle looks much better I think. This knife is very similar to the other two I made, but this one is a tad larger. Overall, it is very comfortable and sharp, and I'm especially happy with how the handle turned out. Please give me feedback or comments!

 
And i4Marc...if you have any major critiques, can you please do the arrow thing again? That was super helpful in pinpointing stuff to fix!
 
Not sure if it's just the angle, but in the second pic it looks like the center of the edge is to the right of center of the blade. If this is the case then the left side was ground further past center.

IMO tip needs to be a lot pointier.
 
Looks like you're improving. Couple of things I see right off the bat:
Plunge lines are pretty washed out.
2nd (probably ties in with the 1st) is your hand sanding. Seems a bit messy. Sanding lines are going different directions. Try long even strokes, and if you can, sand in only one direction.

Nick Wheeler has an excellent vid on hand sanding blades if I recall. Check it out.

At any rate, keep on keepin' on.
 
Overall, it looks like you did a good job.

The same problems exist that you have been told about on previous knives, IIRC.

1) Piece of metal sticking out at end of edge - this will prevent good cutting...and looks terrible. Leave it off any future knife.

2) Thin piece of wood dropping down from front of handle - This will snap off in use. On future knives, the front of the handle should round back into the bottom, or go back at an angle.....but never have a thin point.

3) Washed out plunge line - This looks amateurish. Try and make it crisper on future knives.
 
Not sure if it's just the angle, but in the second pic it looks like the center of the edge is to the right of center of the blade. If this is the case then the left side was ground further past center.

IMO tip needs to be a lot pointier.

Thanks, that's just the angle. I'm working on making my tips more pointy.
 
Looks like you're improving. Couple of things I see right off the bat:
Plunge lines are pretty washed out.
2nd (probably ties in with the 1st) is your hand sanding. Seems a bit messy. Sanding lines are going different directions. Try long even strokes, and if you can, sand in only one direction.

Nick Wheeler has an excellent vid on hand sanding blades if I recall. Check it out.

At any rate, keep on keepin' on.
Thanks you. I'm having plunge line issues, in thinking about just starting them with a file and then using my belt sander for the rest.
 
Overall, it looks like you did a good job.

The same problems exist that you have been told about on previous knives, IIRC.

1) Piece of metal sticking out at end of edge - this will prevent good cutting...and looks terrible. Leave it off any future knife.

2) Thin piece of wood dropping down from front of handle - This will snap off in use. On future knives, the front of the handle should round back into the bottom, or go back at an angle.....but never have a thin point.

3) Washed out plunge line - This looks amateurish. Try and make it crisper on future knives.

Thanks Stacy. I'm excited to start a fresh blade and start from scratch and really perfect the things that have been pointed out. I'm trying to get crisper plunge lines, do you have any tips for this? Maybe starting them with a file or something like that? Thank you!
 
2nd is your hand sanding. Seems a bit messy. Sanding lines are going different directions. Try long even strokes, and if you can, sand in only one direction.

Nick Wheeler has an excellent vid on hand sanding blades if I recall. Check it out.
That video is wonderful! If I ever get to the point that I would teach someone about blademaking, it would be mandatory viewing.
 
Many people file in the plunge with a small chain saw file first, and then file down the bevels and bring them back to the plunge with a flat file.

Sand with a hard and square block of wood ( or aluminum) as a backer for your paper.
 
Nic.,

I have no major critiques. You are doing fine. This one is similar to the last ones you posted and understandable for the reasons you mentioned. That is why I advised that you slow down. If you make 5 knives at the same time and make the same mistakes on all of them you just missed 4 opportunities to improve. Work on one knife at a time, for now. You are making some of the same mistakes but there is some good as well. The handle thickness and shape are very even on both sides. You have nice flow from front to back. The handle shape looks comfortable. A good way to make sure the fronts of your handle slabs are even is to work them together as one piece. Glue up your separate left and right side scale blanks with the liners. Sand the inner mating surfaces that will be against the tang nice and flat if necessary. Keep an eye on the liner thickness. You don't want to sand one scale too much and have uneven liner thicknesses. Now you can measure and drill your pin holes. With the scales test fit to the tang with test pins leave extra material in front. Here you will sketch the shape and location where the forward edge of your scales will be when everything is glued up. Then put them together and put some temporary alignment pins through both scales. The pins shouldn't stick out but if they do just remember to push the pins flush with whatever side you are laying down on a surface like a workrest at a grinder so the piece lays flat while working with it. Now shape the edge that will be the front of the scales and take the surface up to your final finish. Do your glue up and shaping as usual. These are the comments I have. Most of them were already mentioned by others. Since you requested arrows here they are:


Last edited:
The way to even the fronts of your scales is to pin them together without the knife and shape both them at the same time. A little shoeshine action to finish them up and they should be even. Do all your finishing of the fronts before attaching them. Take your time and make sure they are symmetrical.
 
Nic.,

I have no major critiques. You are doing fine. This one is similar to the last ones you posted and understandable for the reasons you mentioned. That is why I advised that you slow down. If you make 5 knives at the same time and make the same mistakes on all of them you just missed 4 opportunities to improve. Work on one knife at a time, for now. You are making some of the same mistakes but there is some good as well. The handle thickness and shape are very even on both sides. You have nice flow from front to back. The handle shape looks comfortable. A good way to make sure the fronts of your handle slabs are even is to work them together as one piece. Glue up your separate left and right side scale blanks with the liners. Sand the inner mating surfaces that will be against the tang nice and flat if necessary. Keep an eye on the liner thickness. You don't want to sand one scale too much and have uneven liner thicknesses. Now you can measure and drill your pin holes. With the scales test fit to the tang with test pins leave extra material in front. Here you will sketch the shape and location where the forward edge of your scales will be when everything is glued up. Then put them together and put some temporary alignment pins through both scales. The pins shouldn't stick out but if they do just remember to push the pins flush with whatever side you are laying down on a surface like a workrest at a grinder so the piece lays flat while working with it. Now shape the edge that will be the front of the scales and take the surface up to your final finish. Do your glue up and shaping as usual. These are the comments I have. Most of them were already mentioned by others. Since you requested arrows here they are:


Hi Nic,
I would like to add to some of the points made here-
A- the point, I may be incorrect but it appears you are using a contact wheel to establish your point. You will get a much crisper line if you use a flat platen.
B- plunge cut - I highly recommend you purchase a carbide file guide from Bruce Bump and use it to establish your plunge lines.
C- this can & should still be fixed, simply grind off on a flat platen flush with the edge of the blade and clean up edges by hand.
D- the way it is drawn in the photo will not only get rid of the weak point but will also make it more attractive.
 
Nic.,

It may have been mentioned in another post but, can you remind us what tools and machinery you have available to you to make your knives? It may help us recommend techniques suitable to your resources. Also, in what state do you live?
 
The way to even the fronts of your scales is to pin them together without the knife and shape both them at the same time. A little shoeshine action to finish them up and they should be even. Do all your finishing of the fronts before attaching them. Take your time and make sure they are symmetrical.

Thank you, I appreciate the tip. That's what I do, but I guess I need to do that more!
 
Hi Alan. Thank you for your comments! I'll look into that carbide file! I don't have a 2x72 of anything I can change from contact wheel to platen, that would be great though, I'd love one!

I4Marc: thank you for all the feedback, I really appreciate it!! The arrows are great! I have a 4x36 that I use for grinding my bevels, I have highly modified it so i can make it work for knife making but it's still not great. I cut blanks out with my angle grinder, then pretty everything up with the bench grinder, then the minute stuff with a dremel and files. I live in California, very northern ca
 
Nic.,

Take a look at this knife. It is not mine. It was posted in the Custom & Handmade section. Notice the proportions of blade length to handle length. Also, notice the height of the handle, particularly at the front where it meets the blade. Notice the absence of odd pieces sticking out. The shapes are simple. All that is needed and nothing more. I doubt the person that made it is working with the same kind of tools you are but you can get an idea how to distill your design down to its most elegant form.


Nice blade/handle proportion on that example. Really eye pleasing design.
Nic, see how the blade is shorter than the handle? For a standard knife that isn't going to be for heavy tasks, that ratio of blade to handle length makes a difference to the eye and balance. If it's too even, it's almost like it loses its soul, and looks too mechanical, if that makes sense. Now that doesn't mean the blade has to be shorter than the handle, just depends on the use.

When you draw out your next design, get a big eraser, and make tiny changes until that flow happens. You'll start to see how small changes can make a knife pop off the paper. For example, in your knife, the curve at the index finger doesn't look natural, there is something awkward about it. When you see knives you like, try to pick out the exact detail that grabs your eye. Sometimes it is one area, most of the time it's the overall flow. Some knives look like a falcon, and some like dodo birds.

i4Marc is giving some excellent advice here. :thumbup:
 
Another good example is the knife Antlerhog has posted at the top of this section. I know you saw it. His blade/handle ratio is about 50/50. However, the knife has a beautiful flow about it. It's very similar to the example I just showed you. Again, take a look at the height of the handle at the front. Look at the smooth transition from the ricasso into the handle. Look at the crisp plunge line. And notice how clean and tight the gaps are. These knives are examples of how simplicity of design and good fit and finish translate into very effective tools both visually and functionally. You'll get there.
 
Back
Top