One more pic also.
Ok now for the tips and tricks.
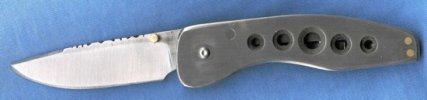
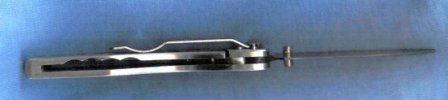
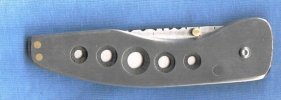
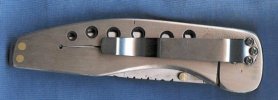
This knife was made without any milling equipment whatsoever.
Profiling:
First I profile the blade, I do not grind the bevels until everything has been completed except for finish work. This makes it much easier to drill holes square and lay things out. I do completely profile the blade, squaring up everything, especially the back of the tang where it will meet the stop pin. I do that part with a disc sander after carefully adjusting the table with a square. There are many ways it could be done though.
Then I drill the pivot hole in the blade, and in each peice that I will be using for handle slabs. These are just barstock cut slightly over length. I have not done any shaping on them.
Next I scribe the blade shape onto my peice for the handle, to ensure I have enough clearance all the way around and then cut it out with a hacksaw. Put a pin through the pivot holes in blade and slab to line them up. First I cut any straight lines I can. Next I cut lines from the edge, right up to the pattern line (perpendicular to the pattern line) 1/4" or less apart. Now you can cut rough curves with the hacksaw because the cut sections pop off and don't bind the blade. From there, I continue rough profiling with my 4X36 belt sander. You are basically just smoothing out the hacksaw cuts so this could be done fairly easily with a file also.
With everything roughly profiled, and the pivot holes already done, I have an easy way to line peices of and drill the rest of my holes.
Drilling
I generally start with the stop pin. Using a pin
to align them, put your blade on one handle slab and situate it so that its laying where you want it to in the open position. Scribe a line alongth the tang to mark where the front edge of the stop pin should be. Scribe another line to mark the distance from the edge of the handle for the stop pin, measure back from the tang line to where the center of the pin should be and center punch it. Now drill a pilot hole.
For the second slab, put a pin through both pivot holes and clamp them together, now use your already drilled hole to mark the second slab. This lines them up so that both slabs math. Now go back and drill/ream both holes to size.
Assuming your slabs are good and flat, you can drill them at the same time for everything else. Just put pines through the holes you already have to line them up and then clamp them together firmly.
You will probably need to cut a choil in the blade to give clearance around the stop pin so it can close all the way. This is simple, mark where the stop pin hits and file or grind a little bit. Mark again and continue until you get to where you want. I do the grinding with a sanding drum in a dremel.
The Lock
First off, you have to shape the tang of the blade. I like to make the lock face fairly wide, maybe 1/4" or more. It has to be done at a 7 degree angle. A cheater way to do this is if you have a grinder with an 8" wheel, grind the bevel with that first. You will have to pay attention to whether it is a left or right handed knife, so you can hold it against the wheel the right way.
After the grinder I simply put the blade in a vice and using a file, carefully flatten and square up the lock face. If you take your time, this is fairly easy to do while keeping the correct angle.
Now put pins in the pivot and stop pin hole and put the lade on the handle slab that will be cut for the lock. Firmly push the blade to the open position against the stop pin, and scribe a line along the locking face of the tang on your handle slab.
Drill a small hole at the top of this line, to mark the corner of the tab. Drill another small hole at the back of the slab where the cut for the locking tab will end. These should be just larger in diamter than the thickness of whatever you are cutting the tab with (I'll go over that in a minute) Scribe a line from hole to hole.
Now I clamp a 1ft long 1"X2" board in my vice so that it sticks out to the side, and then use a C clamp to clamp the hanlde slab down onto the board so that its laying flat. I use a dremel with a reinforced cut off wheel to cut the locking tab. I'm cutting from the inside of the slab out, so I cut almost all the way through with the reinforce wheel and then switch to a normal wheel to finish. This gives a much cleaner, thinner, cut from the outside.
DO NOT CUT THE FRONT OF THE TAB RIGHT ON YOUR LINE!!!!!!! That will inevitably make it too short. Cut just in front of the line so that its a little bit long and you will room to fit it.
If its a liner lock, you can go ahead and bend the spring and move on to fitting the lock. For a framelock you need to thin the tab out so it will bend easier.
I do that with a sanding drum in my dremel. Same clamping set up as cutting the lock. You can see that I went with a scalloped design on this one, I think this looks nice. It also makes a very stiff spring. You will have to play around with what type of cut you make, and how thin you make it. I would not make it any thinner than .040" thick, and would not take it that far until final finishing.
Once the spring is bent, you can assemble the knife temporarily and see if the lock works. You will need to do some more filing. you can either file on the tang of the blade, careful not to change the angle, or you can file on the end of the lock tab. The lock tab is the easier of the two and is what I would recommend doing on a liner lock. On a framelock you have to be careful as it will make a bigger gap in the handle.
Do not go hogging off a lot of material. This is a delicate process and you should stop when you have decent engagement of the lock. Do not take it as far as you want, because you will have scale to remove after heat treat and this will affect the lock up. Its a very touchy process but only requires patience.
Grinding the Blade
I grind my blades on an 8" bench grinder. You can do that however you want. Be sure to first have the folder temporarily put together, and opened so you can scribe a line on the blade to mark the front of the handle. Adjust you plunge accordingly.
Any holes you want in the blade should have been drilled already.
Once the blade is ground and all my other shaping and stuff is done on the handle peices I heat treat it all.
Thumbstud
A cheap and easy way to make an ambidextrious thumbstud is with a peice of pin stock and a peice of tubing that is a tight fit to slip over the pinstock. Cut the pinstock to twice the length you want one side to stick out, plus the thickness of the blade. Cut it a little bit long.
For your tubing, put a peice of pinstock in your vice so that it sticks out however far you want your thumbstud to stick out from the blade. Slip a peice of tubing over it and cut it roughly to length, then file it down flush with the pin stock, repeat this whole process.
Now slide the pin through the hole you have drilled in your blade (should be a tight fit) and slip your cut tubing over each end. Carefully peen the end with a light hammer until the whole assembly is a tight solid fit. If you do it right, it will be sturdy and will be there forever. No need for locktite, or pliars, or tapping holes. I use a copper tube over a bronze or brass rod to give it a two tone effect. You can use whatever materials you want. You should not put the thumbstud on until you have the blade polished. I know this is kind of a pain, but if you do it before it will be in the way.
Thats about all I can think of for now. I left out a lot of stuff, but it all pertains to finishing for the most part and thats something you have to figure out on your own depending on the the knife. I'm sure there are better ways to do things, but this should give you some ideas on how to start. If your careful you can get all the mechanics right without any fancy milling equipment. The main thing is that you just have to do it a few times, and get the experience. Its easier everytime


")
")


