Nice work. I see what you are saying. If you were to drop the back of the handle some and widen that dropped part I think it might flow a tad better. Eric could probably draw that in for you. I have no idea how he does that. Changing just that part of the handle would still leave the knuckle clearance and not change how the knife works. Just might be a tad more pleasing to the eye. Well yours and mine anhoo.
I dare not draw on dzlvs8's work... He doesn't like any critique besides that he asked for. I am trying to avoid the cluster the last critique thread ended in. HAH!
")
I just stick the photo in paint, and draw over top of it. It seems to be easier than trying to describe what I am trying to say. I hope nobody takes the red line like a teacher's red pen... that screaming reminder that you pooched up when you were in school....
Sorry it took a while to get back here....
I see that when you post a knife on here having people critique every aspect of the knife is unavoidable. lol
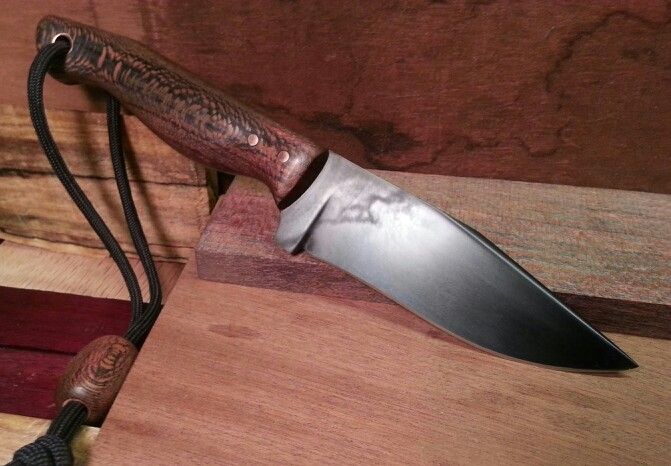
In regards to the handle material, my dad held onto the knife and said the same thing, "Is this synthetic?. Its actually just stabilized and dyed maple burl. It had a lot of blue and orange in it but the part of the chunk that I used didn't have much blue. I found it at a knife show and grabbed it because it had an ultra tight/fine grain structure. I have some left over and the next knife I make with it will have orange liners, which will help bring out the orange in it.
In regards to the jimping, it is indeed rounded and the entire spine of the blade is beveled from the tip to the end of the jimping /start of the handle. Athough the jimping doesn't go well with the knife, it is very useful with such slick handles and such a small form.
The handle is pretty boring and plain on this knife to me too. I wish it were bigger. I too like the size of the blade, it just doesn't seem to match up all that well with the handle to me. Too bad I can't make the handle bigger again! I guess I will leave it as is. In regards to the changes recommended for the handle; I don't know if you saw my first two knives (my tactical steak knives) but the rear of the handle was dropped and was fatter.
Rhino: When you say "oval shaped", do you mean, width wise, having a skinny front and rear of the handle? I usually like to have the rear of my handles dropped, but like I said, with this knife, it was plain jane. I uncharacteristically did not put much thought or creativity into the handle shape.
Stacy, I love curves on the knife you posted. No offense but, It captures a style similar to what I try to draw up a lot. I was going for that style on my tactical steak knives. May I ask how you had your bevel grind smoothly transition into the upper portion of the blade near the spine? Was it by accident when finish the knife? Also, if you don't mind giving away your methods, how did you go about getting the finish on your knife? Is it finely sanded and then bead blasted? Acid washed?
Also a basic question that has been bugging me....what is the black area from? Is that from heat treat or acid or?
I'm not Stacy, hence why it says '-Eric' at the bottom of my post.
Bldsmth is Stacy. Your friendly neighborhood forum moderator...
But, I will answer your questions about my knife as best I can.
First, nothing on my knives is by accident. Not being snobby, but if something happens by accident, it is probably a mistake, and will thus be fixed... I used to have pleasant
surprises with some knives, but I think I have passed the part of the learning curve where I will be
pleasantly surprised very often. If you look closely, you will see the bevel fades into a gentle curve. Here is a pic during polishing prior to final finish. Maybe it will be more clear. (This kind of stuff is why we were pushing you to learn the basics. It isn't an insult, it just allows you to use your toolset more effectively.)
This is done by feathering the blade slightly during the final few passes during the primary grind. I have a platen liner that has one side with a perfect 90 degree break and the other with an 1/8" curve edge. I break the belt over the side to finish the bevel. Combine that with feathering my passes, and the curved edge, and you get this profiles with a bevel. I make sure the semicircular bevel isn't such a radius that it would extend past the choil, as having a fat primary edge on the heel of the blade would be counterproductive.
My handles are fit to the end user's hand in two ways. I either generally fit the handle to a customers hands by making sure the high and low points land where they are supposed to, or I make the handle basically a copy of their hand squeezing a wad of clay, just smoothed out a bit. This one, I actually did a combination of the two. The butt is flared to create a mechanical lock on the handle when squeezed tightly, (hole in hand smaller than handle, etc...) and the section just behind the finger indentation is a ball shape. This makes the handle both comfortable during routine use, or when grasped delicately. The balance point is right on the index finger. It makes the knife light in the hand IMHO. This is what Rhino was talking about with holding an oval or an egg. It also resembles the shape of a fish, and since the dyed sycamore resembles the skin of a brook trout, and it will do some service as that type of knife, it all kinda naturally fell into place.
And for the record, I fought against the lanyard tooth and nail, but in the end it looks 'aight... I turned the matching bead which has a flared copper thong tube that narrows from front to back, locking it down against the paracord... In the future, I will do the paracord in two tails instead of tied together. Another member here pointed out that two tails allows the bead to be run up behind the handle, and not leave a loop dangling behind. See, it helps to take a little constructive criticism...
The finish is a simple etch. I polish to 2000-2500 grit completely, then etch briefly in a 3:1 FeCl/distilled water etchant. Then remove, polish with 0000 steel wool and repeat. I am watching for the resultant finish seen here. It is a semi-hamon in this instance. I say semi, as it is not as polished and refined of an appearance as a true hamon. Here it is simply an attempt (a successful one) to show the quench line and highlight the very fine structure of the martensite in the blade, and the grainier pearlite in the handle. Repeated etching reveals this as the pearlite etches a little quicker than the martensite, and the transition zone etches quickest of the three. Hardened carbon steel will darken with oxides when etched in FeCl. If removed from the final etch and placed in a boiling baking soda and water solution it will preserve this dark oxide. Then polish this out carefully with 0000 steel wool and either mineral oil if it is going to be used with food (this one was) or Remoil with teflon. My chosen lubes... It does resemble a media blasted finish when done.
I like the scales on your knife. It has a very interesting look for natural maple. That same kind of oddity is why I went for the sycamore on this knife. It is a dyed snakeskin sycamore that I luckily still have a small bit of which is going on another recurve EDC with black paper micarta bolsters and stainless spacer. I am always impressed with the appearance that can be achieved with modern dying and stabilization techniques when combined with interestingly figured wood.
Sorry guys, that was a wordy one.
-Eric


")