RyanW
Moderator
- Joined
- Jul 17, 2009
- Messages
- 3,327
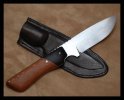
Alright I have been working hard on improving my knives, and decided they were too naked so I took a trip to the leather shop and made my first Sheath... I welcome any comments on the knife and Sheath.
Knife:
Steel: 01 1/8" Precision Ground
OAL: 8.5"
Blade: 4.75"
Handle: Ebony & Leopard Wood
Pins: SS
Thanks for looking, More thanks for Input!
Knife:
Steel: 01 1/8" Precision Ground
OAL: 8.5"
Blade: 4.75"
Handle: Ebony & Leopard Wood
Pins: SS
Thanks for looking, More thanks for Input!
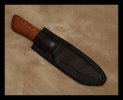
") The sheath looks like you wet molded it very strongly to the blade. I dont see a welt though. Wet molding has it place, but its a last touch to an other wise well proportioned sheath with a proper welt. These pouch type sheathes work very well, but need a real welt in the seam to keep the blade from cutting the stitches. Also adding three or so copper rivets just oustside the sewing will add a big margin of safety, plus look cool.:up right. Keep notes and take note of the difference in the leather. It takes some experience to lay out and cut a sheath to stitch up nicely. Use a gauge of some sort to lay out the stitiching so it is even, use a stitch=wheel (pouncing wheel) to mark the holes so they are even, etc. It is all about doing everything smoothly and regularly, everything else is icing.
The sheath looks like you wet molded it very strongly to the blade. I dont see a welt though. Wet molding has it place, but its a last touch to an other wise well proportioned sheath with a proper welt. These pouch type sheathes work very well, but need a real welt in the seam to keep the blade from cutting the stitches. Also adding three or so copper rivets just oustside the sewing will add a big margin of safety, plus look cool.:up right. Keep notes and take note of the difference in the leather. It takes some experience to lay out and cut a sheath to stitch up nicely. Use a gauge of some sort to lay out the stitiching so it is even, use a stitch=wheel (pouncing wheel) to mark the holes so they are even, etc. It is all about doing everything smoothly and regularly, everything else is icing. 
