A little help?

Joined
Jan 19, 2009
Messages
312
Here's a question for Paul, Omega Leather, Horsewright, and others that are solid leather makers - I have a bit of a stitching quandary guys. I'm sure the answer is simple and I'll feel stupid when I hear the answer but I would really like to improve this aspect of my leather work. I'll start by telling you how I do things:

Say I'm making a simple fixed blade sheath with three layers (front, back and welt). I cut my pieces of leather using my pattern and glue them together. When the glue is dry, I take them to the belt sander to round edges, get all the pieces edges flush with each other, etc. I come back with my track tool and cut the track where the stitching will go. I then take my stitch roller (usually a 5 or 7 stitches per inch since I'm doing small stuff) and mark where the stitches go.

Here is where I need advice: I do not have a sewing machine and do all my stitching by hand; two needles, saddle stitch. To actually punch the holes, I am using an awl needle in a drill press (without the drill press spinning) and punch a hole at a time where I marked my stitches with the roller. I go slow and push the needle straight down through the leather with no side to side or front to back pressure. The problem I have, as you will see in my photos, is the front or top side always looks great when I finish stitching. Turn it over and the stitches can be (more often than not) all over the place. Sometimes they look nearly as nice as the front, but most of the time not.

What I think is happening is my needle is bending as it's being pushed through the leather and doesn't make a hole straight through. Hence the backside stitching is not all nice, straight and even like the front. Should I start using an awl to punch my holes? A different thicker needle in the drill press? Other suggestions? I tried drilling holes with a small drill bit and that turned out even worse than what I've been doing. Thanks in advance!

- Chad

Front side:

18960363594_dde21828d2_b.jpg


Back Side:

19394972900_a0c6371e6a_b.jpg
 
For stitching sheaths like that as pictured I'd use a stiching pony or horse and use the awl in hand. With a little practice you can tell exactly where that awl blade is coming out and correct as necessary. You'll only stick it under a finger nail a couple of times, thats self corrective behaviour. Each craft has something that it looks at to judge another makers work. In knives a guy might look at the eveness of the plunge lines or the soldering job on a guard or bolster. In saddle making they look at the stitching on the rear of the cantle. It has to be done by hand and its kind of blind. How even are those stitches? That knife almost looks like one of my Vaquero Ultralights.

L7iMUSL.jpg
 
Hi Dave,

I appreciate your thoughts and reply! I will have to go ahead and give the stitching pony and awl a try. I'm not sure what you mean by how even the stitches are? I think I used my 7 SPI roller to mark this particular piece and try to punch my holes as evenly as possible. Sometimes I do better than others as I'm still pretty green to leather work. That keyring sheath is actually for a little cleaver style bottle opener made of superconductor. Pretty cool little item that I didn't want to get beat up on my keychain. I just used it since it showed the unevenness of the backside stitch pretty well. Here's a photo of it out of the case:

18963656403_353e5a882b_b.jpg


For stitching sheaths like that as pictured I'd use a stiching pony or horse and use the awl in hand. With a little practice you can tell exactly where that awl blade is coming out and correct as necessary. You'll only stick it under a finger nail a couple of times, thats self corrective behaviour. Each craft has something that it looks at to judge another makers work. In knives a guy might look at the eveness of the plunge lines or the soldering job on a guard or bolster. In saddle making they look at the stitching on the rear of the cantle. It has to be done by hand and its kind of blind. How even are those stitches? That knife almost looks like one of my Vaquero Ultralights.

L7iMUSL.jpg
 
Might be but I doubt it... Easiest way to align the awl that I have found is to align one side (and always the same) along the line your stitching groover makes, just like in your image.
However I have no clue how to push the awl through 3 glued layers of 7 oz leather in the first place.
Dave, that vaquero ultralight looks really nice, what steels do you make them in? (Maybe drop me a pm as not to derail this thread.)
 
Where to start??? If you'll trade that Chevy for a Dodge your stitching will straighten right out!;)

Seriously, using the drill press and needle, looks like you are getting a little flex in the needle. Also that method will work best with heavier leathers. That light weight key chain sheath would probably flex a little on its own.

The stitching pony and awl is a tried and true method. Be sure to lube your awl every couple of penetrations with some bees wax or paraffin wax. That will makes the job much easier through multi layers. Just stab the point of the awl into the wax and proceed.

Remember the lighter the leather, the harder to get a good straight stitch line by hand.

Paul
 
Last edited:
Also if you are using a groover you can groove both sides so that your stitches are uniform in relationshp to the edge. I had a very old and extremely sharp awl blade and I could do holsters and sheaths and in fact did many holsters by hand sewing. Where I use to get stuck was on rifle scabbards. I use to make em with a welt at the muzzle end (not sure why anymore) anyhoo getting through three or four layers of saddle leather wasn't happening.

PM sent vp.
 
Are you using a diamond shaped needle?

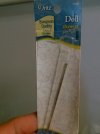
I use the largest and second largest needles from a pack of "Doll needles" I get at walmart. You'll need to cut them so that about an inch sticks out of the chuck. Maybe a bit more. This will keep them from flexing.

What kind of leather is that?

Wax is good.

A piece of wood on top of the steel work rest gives you stability because the needle can go right through into the wood. If you are using the hole in the steel plate it doesn't give you enough support.

I never use my press turned off. It certainly has the ability to push through the leather, but with a proper needle it'll push through much easier running, again adding stability.

uploadfromtaptalk1436560907045.jpg
 
A piece of wood on top of the steel work rest gives you stability because the needle can go right through into the wood. If you are using the hole in the steel plate it doesn't give you enough support.

I never use my press turned off. It certainly has the ability to push through the leather, but with a proper needle it'll push through much easier running, again adding stability.

View attachment 559813


Excellent advice here…..and the use of the bee's wax or paraffin applies here too, equally.

Paul
 
Nuther little tip. Burnish your thread when handsewing with apiece of paper bag. You'll be surprised athow much easier the thread will pull through.
 
When your drilling holes ( use a needle not a drill bit ) as Anthony said use a flat wooden backer .
Don't pick up and move the sheath after every hole leave it positioned exactly where it is on the wood , move the wood not the sheath when moving to the next hole .
Also don't go spinning the wood around , move it in a straight line following the line of stitching , spend time making sure that the needle is exactly positioned central to the mark . i don't use a wheel stitch marker , I use forks to set my stitching , I put a good amount of pressure on the fork so that I get a deep mark , so its sort of like center punching steel it gives a precise mark to line up the needle with , make sure its centered properly I do that with the drill turned off and when I'm happy i turn it on and make the hole . For me drilling the holes is not something I rush through , in fact I probably give it the most attention of the whole process .

Ken
 
I use a Groover both sides , then I make a hole all the way through as my start hole, I use a rotary over- stitch wheel on both side so the marks are lined up from the start hole.
I then use an awl to pierce a hole from each side , the holes line up perfectly so the stitches are neat on either side, it's a slow method but neater.
I've tried drilling with needles and drills bits etc , but they tend to steer as they penetrate through thick leather.

If I want to make neat holes and still hand stitch , I use my leather sewing machine with out thread to punch holes (space permitting), sounds crazy but I like the hand stitch look.

Allen
 
Well, just stitched a sheath and the wax really helps.

Allen, do you groove and so forth after you glued it together?
 
I've had a few projects turn out exactly like the OP. And as it has already been mentioned above, I came to the conclusion that it was just my own sloppiness at the drill press. Unfortunately, my eyes are to the point of really needing bi-focals, but don't have them. So I either take glasses off and press my face into bench drill press (not very comfortable), or leave glasses on, back off, and not see great. To compensate, I have moved my projects around at different angles so I can see each drill point in the stitching grove. Well, with a project that is not perfectly flat on the back side, I've ended up with different angles that the bit goes in. Perfect in the front, horrible in the back.

I do use a small wood block under the leather, but I think the key as mentioned is to keep the project in the same place on the block and move the entire thing around. It has been suggested to use a needle in the drill press instead of a bit. But I have always had good luck using a very tiny drill bit. I always have to use an awl to enlarge the hole prior to stitching, but don't have to work as hard at it as I would think if just pressing the stitching hole open. When making a sheath that is six or seven layers deep, I would think that a needle would just burn the leather to death before I got through it all, rather than a drill bit.

But I am still learning....that's why I'm here. Thanks to the OP for starting the thread, and a big thanks to the Pro's with years of experience that have taken the time to reply. This is such a great resource.
 
Well, just stitched a sheath and the wax really helps.

Allen, do you groove and so forth after you glued it together?

Yes, I also prefer dyeing last which is risky if you mess glue the dye will be patchy.

Sometimes I groove last and touch up the groove and holes with dye using a small art brush.
 
Just a little followup: I used a combination of the techniques mentioned here and lo and behold, I got the nicest backside stitching of my career :). Thanks guys! I wish I'd taken some pictures to show you. I also am considering a machine since I'm starting to get a lot of requests for sheaths, holsters and spare mag pouches from friends and family. Been doing a lot of research. First started looking at a Tippman Boss, decided against that. Now I'm thinking an Artisan Toro 3000 or Cobra Class 3 (pretty much the same machine with different labels). Does anyone here use these machines? Thoughts? I appreciate it as always! Great forum we have here... I always appreciate the helpful suggestions / replies!
 
For $200 more I'd get the Cobra 4. More versatility. Also they are LEGENDARY for their service, and its true.
 
Back
Top