A new way (maybe) to hold your handstamp in an arbor press

Joined
Sep 21, 2006
Messages
1,472
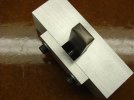
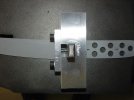
I dunno how you guys do it, but after a little thought I started looking through my toolbox for my biggest 1/2" drive 12 point socket. First, I checked to see if the handstamp would fit in the drive socket (it did), then looked around for the one that fits over the bottom of the ram. With the HF 1 ton it was 1 1/4". The handstamp fits the socket like a glove, but there is a little bit of play with the open end of the socket and the ram. Figures 1 1/8" is too small. No biggie, just made sure I had everything lined up as best I could. Check out the pics.
Handstampsocket2.jpg

Handstampsocket1.jpg


I have to come up with a way to get the socket to fit the ram more secure. Like taking the ram out of the press and standing it up in the socket, and filling the void with epoxy so there is less play. Of course I would wrap the ram with saran wrap so it comes out!:D Anybody have any other ideas?

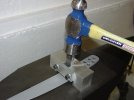
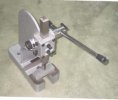
I still have to mount the press to something, I cannot get the leverage to crank on the handle to get a good stamp. I ended up keeping pressure on the handle with one hand, and smacking the top of the ram with a hammer a few times. Came out pretty nice, the stamp didnt jump. Actually I was pretty much thrilled.
 
I took the ram out of mine, and milled a slot for the stamp. I didnt like it. No matter how hard I tried, I could simply never get the stamping even and centered. I finally made a device to fix that.
 

Attachments

  • Ironwood_and_Bronze 002.jpg
    Ironwood_and_Bronze 002.jpg
    61.4 KB · Views: 171
  • Ironwood_and_Bronze 006.jpg
    Ironwood_and_Bronze 006.jpg
    85.4 KB · Views: 184
  • Ironwood_and_Bronze 007.jpg
    Ironwood_and_Bronze 007.jpg
    49 KB · Views: 214
you guys know you make me feel sooo dumb....been tryin to figure this one out for a while and here it is...great work and thanks for the post and pics!!
 
JH how do you keep the stamp from bouncing when you hit it since it is not secure? That is my biggest fear. The last thing I want to do is ruin a blade after hand rubbing the thing for 2 days.

On a side note, I am going to try wrapping masking tape around the ram till the socket is tight and do some experimenting. Hope that works out. You know, I did not even think that the stamps that others have were different shapes! Mine is just my initials. The socket thing might not work for some.
 
No problem JR. This setup is not bulletproof, so you have to do a little bit of lining up when you are ready to stamp the steel. But hey, its a start. I will post later and let you know how the test went with masking tape on the ram.
 
Uncle Al sells a modded arbor press just for that purpose. $95 I do believ and that is not s whole lot more than a good arbor press costs normally. Certainly less than Everstamp gets for their little device.
 
I took the ram out of mine, and milled a slot for the stamp. I didnt like it. No matter how hard I tried, I could simply never get the stamping even and centered. I finally made a device to fix that.

Cool device, my man. I would offer two suggestions to make it the perfect item that you could sell for maybe $100 at a minimum and make some knifemakers very happy.
a large bottom plate with long bolts on the corners coming up through the top and a slightly raised center the width of the slot so you could clamp the blade, and a long screw coming in from the side to hold the stamp so you could stamp along the length of the blade
 
Too bad I did not know about that modded press before I got this one. Anyhow, I tried a few wraps of masking tape on the bottom of the ram ( okay, more than a few), and tried it. Works pretty good. Like 95% of the slop is gone. For the first time in a while, the lowest tech solution worked pretty good.
 
I really like Higgy's stamp guide! I've never been able to use an arbor press because the handle's on the wrong side! Or I'm dyslexic. Anyway, I don't do any machining and everything I mock up around here is just bolted together. Here's the one I made out of scrap stuff laying around. The "anvil" part is beginning to get a divot in it and needs to be replaced soon. Nice thing about this is that the guide is adjustable for different sized stamps. Because I also stamp serial numbers in my blades and have two sizes of marks, that's very helpful. If I want to apply the mark at 90 degrees, I can just move the guide to fit the stamp sideways. I made a couple of spacers to move the guide farther "in and out." In all, it's a pretty versatile kludge. :)

ShopStampguide1.jpg


Here's the back, slots filed in to allow the upright to fit different stamps.

ShopStampguide2.jpg


So Higgy, whenever you start selling your well made stamp guides, if you include some way to adjust the width you can sign me up for one! That tapper is the cat's meow...
 
Back
Top