advice on my Forge WIP

Joined
Nov 7, 2013
Messages
262
I finally took the leap into building a forge. I'll be posting pictures here as I go along and I'd really appreciate any advice I could get along the way. I have on order: Inswool , satanite, ITC 100, and regidizer from high temp tools. I also have bubble alumina coming, because at some point I would like to make a vertical forge as well for forge welding.

I've started with this 11.5" diameter water tank, cut into 2 pieces


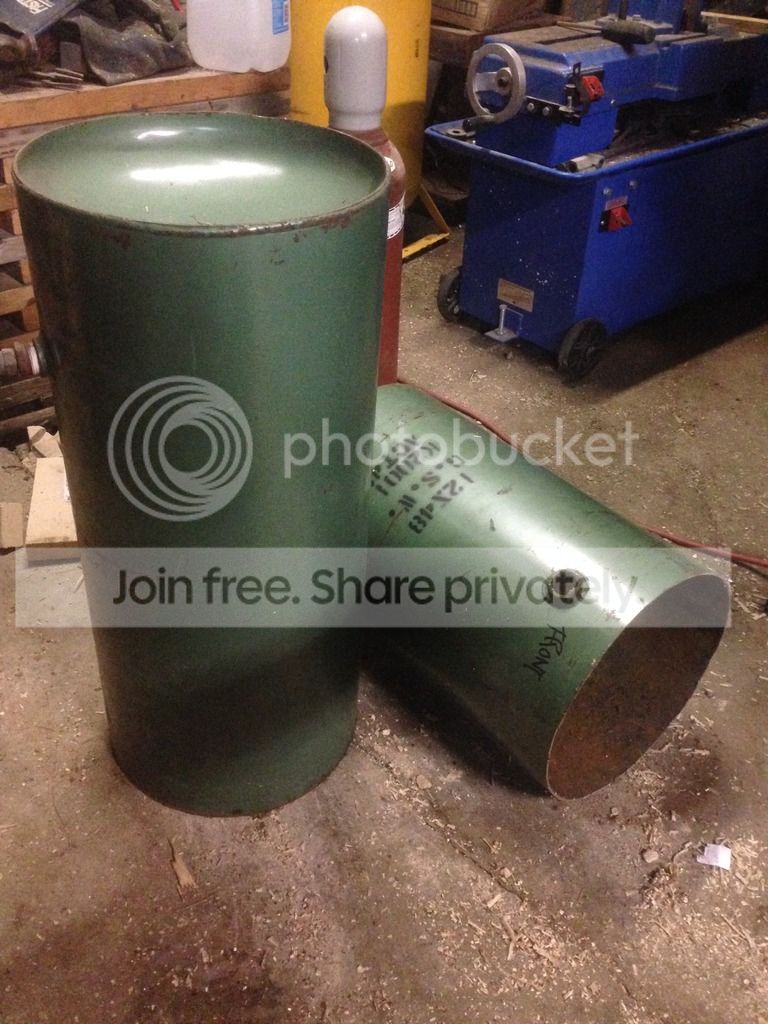
This will be the section Im using for the horizontal forge. It is cut to 18" right now, I was thinking about a double burner because I'd like to be able to heat a decent length blank.. but I'm all ears for any input on that. I can shorten it.


As I was cutting the front and backpieces my girl brought me a tea up to the shop because it's freezing out. She made that cup! I think I might be spoiled.


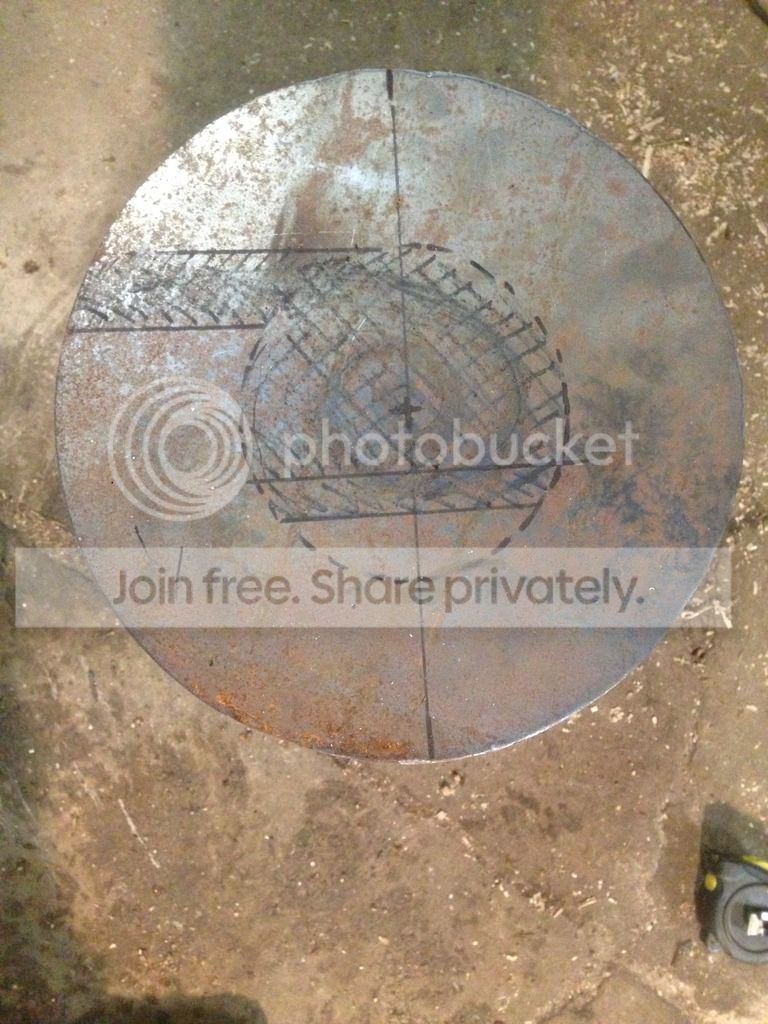
Drawing on the top to lay things out. Does this burner angle look right? 3" wool will give me 5.5" chamber. And can I shape fire brick for the floor?


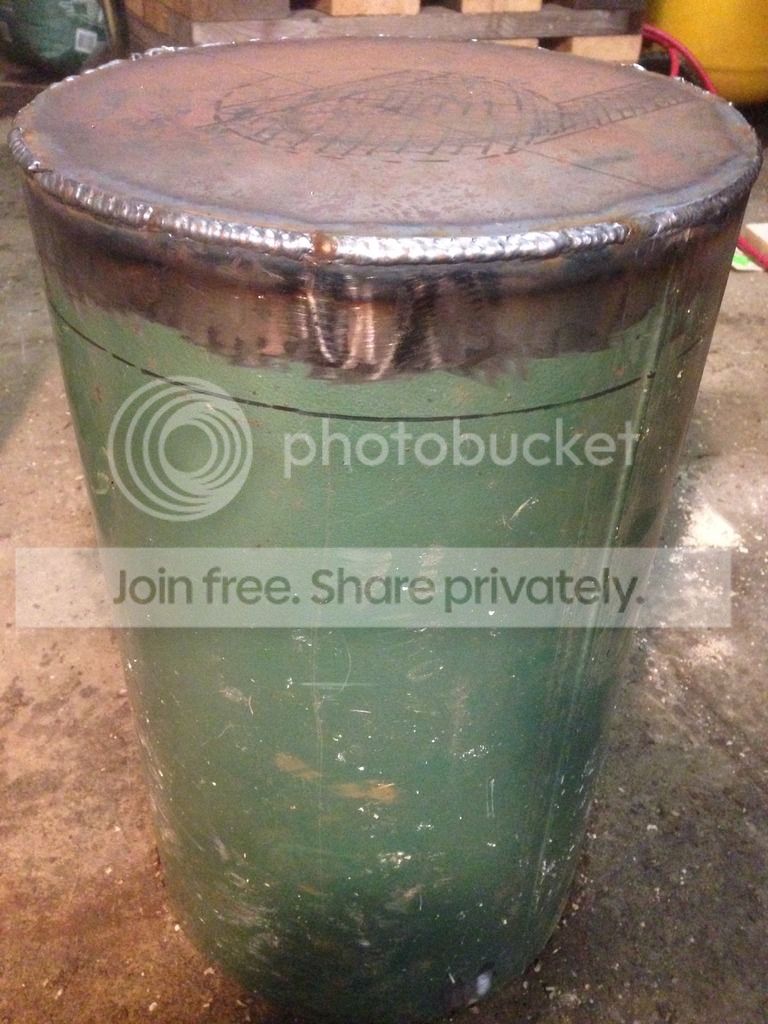
One end welded on (before running out of welder gas on a Saturday night) I'll be cutting this off at that 2" mark and adding a hinge...I think?


Again, I'd really appreciate some guidance on this build as I really dont know a heck of a lot about forges and the best way to go about it. Thanks!
 
I think with 3 layers of wool your pushing it. Me personally would do 2 and then line it and use a replaceable floor. But I'm getting into doing a lot more Damascus and the bubble alumina is great in my forge but is a lake of flux now. Which today got me wondering if you would make a pot that held a bunch of high temp melted borax to dip your billet into. Sorry tangent. Looks like you have the right stuff ordered I would just think over the size carefully. If doing a flat floor I would say go bigger on the inside. My small forge has a flat floor and is the shape of a D on the inside. The burner does swirl but not as good as if the inside was bigger.
 
Thanks JT, the reason for the 3 layers was I had posted before about pipe diameter and a few people mentioned keeping the inside diameter smaller. I don't plan on using too much flux in this one, I'm hoping I can get a vertical forge built after this is finished.
 
I went back and read the answers to the forge build questions I had asked before in a separate thread. Too much circus music going on in this head on mine. I'm going to use this to build the vertical forge, and I'll build the horizontal with a smaller pipe.

So I should be looking for approximately a 9' pipe, lining it with 2" wool to give me a 5" chamber?
 
ok.. Well I'm going to keep going with this and hopefully a few people can lend a couple pointers if I'm way off track here.

I found an 8" ID pipe


cut it to 12" and mounted it on a sturdy foot


and made front and back doors


So that's where I'm at so far today
 
Lookin good, when you do your lining I found it best to use 2 layers of the 1" stuff and over lap the joints so thy don't line up. I made my joint on the floor of the forge and cover with bubble. Worked great so far. I only have 1" of wool and with I had 2". Don't know how much of a difference it would make but I don't have to room for 2" per side. I love my verticle forge, it's a screaming beast. But next forge I'm going to build will be square with a ribbon burner to have even heat along the entire length.
 
Looking good to me. Here is a diagram showing nozzle location and origination for a good flame swirl. Atlas forge says you get better results aiming the nozzle from front to back, but with yours having a front and back door it won't matter. I would also cut in a 3/4" nozzle for a temp thermowell.

View attachment 616554
 
looking good mark! i'm hopefully getting started on one in the next month or so, just have to get the materials together
are you going to be using propane?
 
Much better size. I actually have a jig set up to cut 8" round firebricks with a 5" chamber. It seems about the ideal size for a medium forge.
 
Thanks guys.

Lookin good, when you do your lining I found it best to use 2 layers of the 1" stuff and over lap the joints so thy don't line up. I made my joint on the floor of the forge and cover with bubble. Worked great so far. I only have 1" of wool and with I had 2". Don't know how much of a difference it would make but I don't have to room for 2" per side. I love my verticle forge, it's a screaming beast. But next forge I'm going to build will be square with a ribbon burner to have even heat along the entire length.

I have 1" and 2" wool coming, so I'll keep the seams In mind when I get to that, thanks!

Looking good to me. Here is a diagram showing nozzle location and origination for a good flame swirl. Atlas forge says you get better results aiming the nozzle from front to back, but with yours having a front and back door it won't matter. I would also cut in a 3/4" nozzle for a temp thermowell.

View attachment 616554

Thanks Chuck, I cant get that link to work though, says its not found or error

looking good mark! i'm hopefully getting started on one in the next month or so, just have to get the materials together
are you going to be using propane?

Yea this will be propane, I have a small charcoal forge that is pretty useless so I finally decided to give this a shot.

Much better size. I actually have a jig set up to cut 8" round firebricks with a 5" chamber. It seems about the ideal size for a medium forge.

Thank you! I have about 3.75" there, I feel like maybe I should have built the doors after I got the inside lined to see the final dimensions. But I figured I'm loosing 4" to wool, then the coatings on top of that.. but if those openings end up being too small I can cut them out


Thanks again!
 
Thanks Chuck, I cant get that link to work though, says its not found or error

Let try a different way and see if it shows up.

nozplace.png
 
I highly recommend a rear port.

Make it so the bottom is even with the floor. It only needs to be large enough to pass a long blade or bar of stock out the bac. I find 3" wide and 2" tall works well. make a tapered fire brick plug for the port when it isn't needed.

I also feel that the chamber has a slightly more even temperature with a rear port open.

Another comment is to make the ports with a flat bottom. If you use a round pipe section ( as in your build) weld a 2-3" wide piece of plate across it so it created a flat shelf. Make the floor even with this shelf.

Another tip while you are welding stuff up:
Weld two pieces of 1/2" pipe on each side of the forge body. Make a movable work rest with two 24-30" pieces of round stock that will slide through the pipes and a piece of 2" wide plate welded across the ends of them. Weld the pipes and all up so the plate pushes in to be even with the shelf at the front port. When working a long bar or billet, pull the shelf out to support the longer stock. When doing regular work, push it in to meet the front shelf.
 
Stacey's advice is spot on and very simaler how my small forge is built. 1000% agree on a rear opening and could not live without mine. I also plug my rear forge hole with a tapered block of fiber board. Me personally think your 20deg angle looks a bit over kill. Mine is tangent to the forge chamber and pointing twords the front of the forge but I don't think it's that much and I'm just about perfect in front to back heating with both doors open. To much angle here and the flame will do a half swirl and right out the front door. My forge is 8" and I have 1" of wool around and then the normal forge wool coatings and then a bubble floor. And honestly my forge is to small and wish the opening was a tad larger around 4x3. The problem is when doing Damascus it's hard to fit the billets in the forge as I like to stack as many layers as I can on the first go around which means a billet at a max of like 2.5" right now. I'm not complaining as I love this forge but if I was to do it over it would be 10-12 OD with 2 layers of wool and slightly larger openings. The openings also can hinder me when grabbing the large billet with tongs. If I pushed the billet into the middle of the forge it's hard to get ahold of it with tongs if the door opening is to small. I solved that as I use a 2" wide X1/4" thick strip of steel as a shuttle for my billet. Billet goes on the end and I slid the bar in. The when ready I use tongs and slide the steel bare out with my left hand and grab the billet with as cheesy as this sounds Chanel locks. Slide the bar back in the forge and set tongs down and press the billet in the press. If I had a welder I would weld a stick onto the billet but I don't so the best option for me is Chanel locks as it provides a very strong grip for the ever changing billet size. Sorry I just relized I was ranting. Back to your forge, I'm in agreement that your going to want a flat bottom on your opening that's level with your forge floor. Here is a few pics of my small work horse forge. I don't have a rest on my forge as I can't weld sticks onto mystuff yet but once I do I will be adding one.

Photo%20Feb%2024%2C%2010%2037%2024%20AM.jpg


Photo%20Feb%2024%2C%2010%2038%2037%20AM.jpg


Photo%20Feb%2024%2C%2010%2039%2027%20AM.jpg


Photo%20Feb%2024%2C%2010%2047%2037%20AM.jpg
 
Last edited:
Front to back, with a small rear port, will give the best combustion of propane inside the chamber and the least dragon's breath. Back to front will work, but is less efficient and creates more dragon's breath.
 
If you have doors on both sides like me that you can turn the forge around and you have a front to back lol
 
Awesome, thanks a lot fellas! The rear door on this is identical to the front, so maybe I could make something to hold a brick in front of it when needed? For the floor do I just use regular fire brick and shape the bottom to fit the curve, or do I need something with higher heat resistance?

JT how did you get your forge to stick to the ceiling like that?? j/k :)

Thanks again, I appreciate the help. I'm hoping to get at this a bit more tomorrow night
 
Last edited:
I used bubble alumna and made the floor flat with that. You mix with water and spread in out.
 
Also my doors are 1" thick fiber board and held in place with the shelf that bolts in place so a door could be removed if needed to fit something larger.
 
Supplies came in today !

I've been looking at the doors on this,. the pipe I have welded in there sticks out about an inch, and 2" inside. Will this turn out to be a pain in the butt reaching in to grab stuff? I had planned on filling the door with 2" wool, but would a flat plate of steel with the hole cut out be a better option?
 
OK.. well I'm scraping the doors anyway. I got the wool fitted and the openings were too small compared to the camber size, which is good becuase to me it seemed really small., I kind of jumped the gun building them but oh well. I'll make new doors tonight.

Here is the wool in place, I ended up using 2" wool and put the seam on the bottom where it will be covered by the floor


Question about the floor, does this disrupt the circular shape of the chamber too much? Will the flame still move through the chamber properly?


And I also started on the burner port


How is this looking so far guys?
 
Last edited:
Back
Top