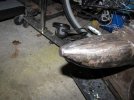
I'm not an anvil rebuilding expert like the welding guys on this forum, but the only way to repair the big chips are to build them up. You can just round them off and have a round edge anvil, if the cost of putting the anvil in the shop is too much. The bick is not all that useful in making knives, but comes in handy for some blacksmith chores. Many guys deliberately blunt theirs to prevent poking themselves.
I would suggest grinding/sanding the surface to be fairly clean, and not worrying about the small swayback. Round the edges where needed, and try to grind in one crisp area for offsetting and bends.
Make some hardie tools to do the jobs that need sharp corners, like crisp offsets at the shoulders, hot cuts, and scrolls. Making hardies is fun and cheap, so make one for any job that you do more than once or twice.A hardie holds the tool in place for you ,so you can do the job with both hands. Let your mind run wild. Anything you can attach a piece of square stock to (weld or bolt) can be made into a hardie tool. Hardie tools should be a fairly tough steel ( S series is great), but can be made out of most any type for occasional use.I use 3X1" mild steel bar from the scrap yard, and saw the hardie post into the piece for many hardie tools.They should not be hardened normally, with the exception of bending jigs.
Some hardie tools that often don't come to mind are:
A vise with a hardie post welded to the bottom to drop in the hole for twisting and blade straightening at quench.
A 3X3X3 block of fairly tough steel with a hardie post welded on. This is often called an anvil block. Make one for doing small precise forging and straightening jobs, and one in mild steel for cutting on. These will save a lot of damage to your anvil.
A "U" hardie , or bending fork,for bending and scrolling. Often made in different diameter round stocks to bend different radii. You can make one with a smaller holding arm and any size radiusing arm you like...say to bend 6" scrolls.
A fuller device. It can be as simple as a "hairpin fuller" or as fancy as a guillotine fuller.
A ball fuller. Weld ball bearings of various sizes to the ends of square stock ( to fit the hardie) and use to make spoons, and for highly controlled fullering.
Hardies about ,3" X 1", in various shapes from a 45 degree wedge for cutting to a round radius for making choils. These should stand about 3-4" clear from the anvil surface.
A "dog' clamp, or holdfast. This is nothing but a sort of squarish "J" shaped piece of stock ( round or square) that is smaller than the hardie hole by a good bit ( say 3/4" for a 1" hardie hole) The hook end is usually upset to make a flat spot. The long end is dropped in the hardie hole and the hooked end is set on the object being clamped. A sharp tap to the top of the "J" and the dog wedges at a slight angle and holds the object fairly firm. A side tap releases the clamp. This tool is good for simple hold down jobs.
Here is a link to of a similar things used in woodworking:
http://www.woodcraft.com/product.aspx?ProductID=146151&FamilyID=5379
The other way to make a good clamping tool is to attach a toggle clamp to a hardie post. Replace the rubber tipped part with a bolt if using it as a third hand in forging jobs.This tool is great for holding blades while stamping your mark. Here is a toggle clamp:
http://www.woodcraft.com/product.aspx?ProductID=143938&FamilyID=4419
Final tool:
This is sort of hard to describe in words, but is so simple and necessary that everyone should have one. It is a wooden anvil block. Take a piece of any good hardwood. Something from a 2X4 to a 4X4 works well. Larger is fine if you want.It should be about the length of your anvil face, but does not need to be more than 4" wide ( unless you want it to be). Drill a hole through it in the place where the hardie hole is. The hole should be just a little tight for a piece of square stock that fits the hardie hole. Drive in the hardie post, and fill the void with filler resin , like PC-7, or epoxy, to lock it firmly i n place. this is the hardie end of the wood face. The other end has a 1/4"x1" rabbit cut across the surface that sits on the anvil. This has a piece of 1X1/4 mild steel screwed into the rabbit so the ends stick out about 2" past the anvil sides. Bend the ends so they wrap down the sides. Now, the wooden face can be quickly set on the anvil or lifted off. It sits firm and flat. Use this tool for straightening hot blades when fresh out of the quench tank ( I use a lignum vitae mallet), and other bend/warp removal jobs. It is also good to hammer brass and such on when you don't want to ding the metal so much. Use a wooden or lead hammer for these jobs.
OK, that should keep you busy for a day or two.
Stacy
")
