thanks. that's the direction I'm leaningI like the bottom one. Looks to be more comfortable for the rocking motion while chopping.
-
The BladeForums.com 2024 Traditional Knife is available! Price is $250 ea (shipped within CONUS).
Order here: https://www.bladeforums.com/help/2024-traditional/
You are using an out of date browser. It may not display this or other websites correctly.
You should upgrade or use an alternative browser.
You should upgrade or use an alternative browser.
backyard knives
- Thread starter Backyard
- Start date
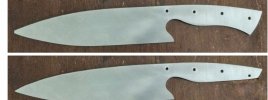
I would tweak the edge profile a bit as well smooth out the belly in the middle there to make a more gradual tradition to the flat, I'd also make the flat a bit shorter.so, as I've already showed in the other Magnacut threads I'm making a chef knife gift for a relative. he's by no means a professional but likes to cook. I'm trying to finish it in time for his birthday so I've kinda rushed the design and I think I angled the handle down too far so his hand or the rear most part of the handle might contact the cutting board when cutting. I'm thinking of modifying the handle to something slimmer at the back similar to other more "modern" kitchen knives. I'll also have to redrill the rearmost pin hole in the hardened steel but I think I can handle that.
the top photo is the current shape. the second photo is one I "Photoshopped" to be closer to the finish I'm thinking of doing with the steel it has left. Is this a good idea? should I keep the original shape, modify it?

Have a play with that on a chopping board, with a rocking motion you will notice quite an adrupt stop as you pass the belly onto the flat. You want it to glide smoothly into the flat which will reduce accordion cuts
thanks. I'll do that. right now it's just the rough profile I sent out for heat treatment. when I get it back I'll refine the shape and thin it out moreI would tweak the edge profile a bit as well smooth out the belly in the middle there to make a more gradual tradition to the flat, I'd also make the flat a bit shorter.
Have a play with that on a chopping board, with a rocking motion you will notice quite an adrupt stop as you pass the belly onto the flat. You want it to glide smoothly into the flat which will reduce accordion cuts
Hengelo_77
Basic Member
- Joined
- Mar 2, 2006
- Messages
- 6,323
Try a bit less finger choil on the next ones. You'll be amazed.While I was waiting for my previous two knives to come back from JT, I made two knives from an old rusty file. this steel I can heat treat at home so no wait.

I did, and I wasn't.Try a bit less finger choil on the next ones. You'll be amazed.
with less it felt like you could slip forward too easily onto the blade. by making them deeper it solves that and felt really comfortable. I was surprised because they don't have any handle other than the thickness of the file
Made some more. 5160 at about 5/16" thick. Distal taper on the knife.

Did most of the metal removal by draw filing. Actually went much faster than I expected. Probably due to annealing it in some coals to make it soft

Little touch up on the belt grinder and drill out and file the handles open

Heat treat in my little propane forge. Some sheaths and Paracord wrap handle


Did most of the metal removal by draw filing. Actually went much faster than I expected. Probably due to annealing it in some coals to make it soft
Little touch up on the belt grinder and drill out and file the handles open
Heat treat in my little propane forge. Some sheaths and Paracord wrap handle
Wanted to try my hand at actual forging. Got me a cheap Amazon two burner propane forge. Not a bad unit. But requires a lot of assembly.
Anyways. Decided to start with just the bevels. Leaving the more intricate handle forging for when I'm more skilled and aquire the tools needed.
Leaf spring steel. Possibly 5160 but can be a number of different alloys. Started out well. Put the bevels and curve in. Was making a large chopper as I feel it would be a little more forgiving with errant hammer blows. And who doesn't like big knives
Hammered out the basic shape

Ground in the bevels. Shaped the handle and hardened the blade

Then... During tempering. Well actually after removing it from it's 2nd cycle and cooling it off it split in two. It's weird because it didn't make any "tink" sound or any warnings. It just kinda fell off while I was cooling it down with the garden hose

The grain structure was not too bad. A little larger grain then I'd like, But should have been serviceable. There is a brown section near the spine that gives the tell-tale sign of the issue. This must have been there since the initial quench and remained unnoticed

Welp, time to get some more propane and start again. Luckily I have a lot more leaf springs to play with
Anyways. Decided to start with just the bevels. Leaving the more intricate handle forging for when I'm more skilled and aquire the tools needed.
Leaf spring steel. Possibly 5160 but can be a number of different alloys. Started out well. Put the bevels and curve in. Was making a large chopper as I feel it would be a little more forgiving with errant hammer blows. And who doesn't like big knives
Hammered out the basic shape
Ground in the bevels. Shaped the handle and hardened the blade
Then... During tempering. Well actually after removing it from it's 2nd cycle and cooling it off it split in two. It's weird because it didn't make any "tink" sound or any warnings. It just kinda fell off while I was cooling it down with the garden hose
The grain structure was not too bad. A little larger grain then I'd like, But should have been serviceable. There is a brown section near the spine that gives the tell-tale sign of the issue. This must have been there since the initial quench and remained unnoticed
Welp, time to get some more propane and start again. Luckily I have a lot more leaf springs to play with
Last edited:
jfk1110
Gold Member
- Joined
- Mar 9, 2013
- Messages
- 29,109
Wanted to try my hand at actual forging. Got me a cheap Amazon two burner propane forge. Not a bad unit. But requires a lot of assembly.
Anyways. Decided to start with just the bevels. Leaving the more intricate handle forging for when I'm more skilled and aquire the tools needed.
Leaf spring steel. Possibly 5160 but can be a number of different alloys. Started out well. Put the bevels and curve in. Was making a large chopper as I feel it would be a little more forgiving with errant hammer blows. And who doesn't like big knives
Hammered out the basic shape
Ground in the bevels. Shaped the handle and hardened the blade
Then... During tempering. Well actually after removing it from it's 2nd cycle and cooling it off it split in two. It's weird because it didn't make any "tink" sound or any warnings. It just kinda fell off while I was cooling it down with the garden hose
The grain structure was not too bad. A little larger grain then I'd like, But should have been serviceable. There is a brown section near the spine that gives the tell-tale sign of the issue. This must have been there since the initial quench and remained unnoticed
Welp, time to get some more propane and start again. Luckily I have a lot more leaf springs to play with
Probably had a stress fracture in its original form before you even messed with it..... Grab another and have at it......It was looking good until it tinked
 ...Keep on keeping on
I think if it was there from the beginning then it would be a lot darker. It would have to go through all the forging, normalizing and annealing heat cycles. To me it looks too fresh. But I guess it's possibleProbably had a stress fracture in its original form before you even messed with it..... Grab another and have at it......It was looking good until it tinked
Version 2.0 started and almost complete. On the tempering cycles. Still have at least one more cycle and then I have to do finish grinding, put a handle on it and sharpen it up
This one ended up with a bit more upsweep to it. Not sure if I like that but until I try it out I won't really know

Rough grinding before heat treatment

So far this one has lasted a little longer than the previous. But I left it a little thicker hopping it would have less warping and stress during the quench. Seems to have worked as the edge is straighter. But now I have a lot more grinding to do while it's hardened
This one ended up with a bit more upsweep to it. Not sure if I like that but until I try it out I won't really know
Rough grinding before heat treatment
So far this one has lasted a little longer than the previous. But I left it a little thicker hopping it would have less warping and stress during the quench. Seems to have worked as the edge is straighter. But now I have a lot more grinding to do while it's hardened
Finished it up and put a rubber handle on it. It chops pretty hard. Good weight and balance. A little less curve would probably be good but it works well as is. The best impact area seems to be right at the middle to about 2 or 3 inches from the tip. That's where you really feel it bite. Holding from the back section of the handle, it cuts best around the middle of the blade with no shock or vibrations. The rubber handle is very comfortable. I saved a large off cut from a weight room floor renovation. It's a little softer rubber then I'd normally use but it will probably harden up slightly with age. Bonded on with E6000 adhesive. I'll see how it holds up. I might pin it later if it looks like it needs it

Last edited:
jfk1110
Gold Member
- Joined
- Mar 9, 2013
- Messages
- 29,109
Finished it up and put a rubber handle on it. It chops pretty hard. Good weight and balance. A little less curve would probably be good but it works well as is. The best impact area seems to be right at the middle to about 2 or 3 inches from the tip. That's where you really feel it bite. Holding from the back section of the handle, it cuts best around the middle of the blade with no shock or vibrations. The rubber handle is very comfortable. I saved a large off cut from a weight room floor renovation. It's a little softer rubber then I'd normally use but it will probably harden up slightly with age. Bonded on with E6000 adhesive. I'll see how it holds up. I might pin it later if it looks like it needs it
Not bad.......Nice job!!