- Joined
- Jul 14, 2010
- Messages
- 15,417
Ok, I been trying to do this for a few days now, and so, now, I have done it. This is a basic firemaking bow drill, and I will try to cover the requirements of the bow drill, to make it functional. Once it works, embellish as much as you want to, and I recommend alot. Pretty wins points. Here we go
First, choose your tool. I have the choice of a BK6 Patrol Machete, a BK9 Combat Bowie, a BK2 Campanion, and a BK14 ESKabar. You can use as many Becker knives as you want to, but for this I will be using only one.

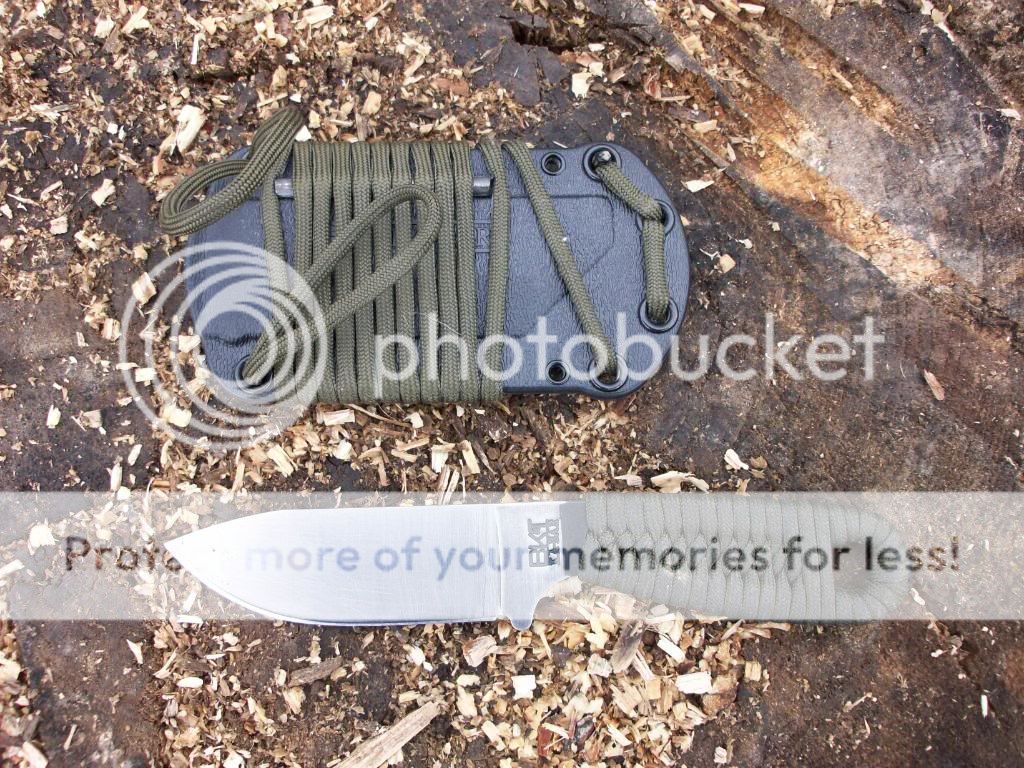
I choose my BK14. Its with me all day, everyday. Sun up to Sun down. I figure if I can make a bow drill with this little guy, then I can take care of my needs for fire with just my little knife

A little about my ESKabar and sheath. I stripped the blade (left he coating under the wrap ), and squared the spine. Sharpened it a couple of days ago. The sheat is the factory sheath. I haven't replaced it yet, mainly 'cause I been busy and there really is no need at the moment. That is one 7' long piece of paracord and a 2 1/2" x 1/4" GG firesteel. The loops are there to secure it to my belt, because I wear this IWB at 3 o'clock, unless I have a gun on, which is most of the time. Either way, you can see by the pics, it works and carries my most "basic" of needs with me daily.

The wood I chose is a Willow branch I found around. I like willow, it works, not as well as cedar IMHO, but it will work. Use the fingernail, lip test to make sure any wood you find is workable. If your fingernail will leave a dent (not gouge) its got the right hardness, and the lip test. LOL The way I do it is pucker up and just give it a little kiss, no tongue though, weirdos. Your lips will tell you if the wood is wet, or dry. YMMV


Ok, wood processing time. You will need 5 pieces of certain shape and size. Hearth, spindle, bearing block, bow, and coal catcher. I make all of my pieces from one piece of wood.
First make a hearth board. From the edge of my knife to the end is my length of my hearth board. I typically go from 6-8", you will need enough room for your foot, so don't skimp on the length, unless you have not choice.

I spine strike through the wood on all four sides, and just snap it from there

Now we have a round piece of wood, we need to make it a board. Finger width wide.

Baton of the edges where you finger ends. Be sure and move your finger first, please

When you finish, you should have a "board" about a finger width thick, and flat on top and bottom. Mine has a little curve to it, as that's the grain, but it will work just fine


Ok, board done, set it aside, time to make a spindle. I like my spindles to be about 8" long, YMMV, the short they are the easier to control, but you string way walk up to the bearing block, and monkeywrench the whole works. From the edge of the blade to my finger is the straightest piece, and about the right length.

Baton it off on both ends, and check it for cracks or breaks.

I like to shave mine down, one, I use the bark to make my nest for the coal, and two, it tears up your cord faster. Skin it.

Now, sharpen the ends, one like a pencil, the other like steep cone. You want a little tit DDon't we all) left, to help seat it in your hearth divot.


Hearth board, spindle. Done. Now we need a bearing block. I use a side piece left over from making the hearth for my bearing block, find a piece that comfy in your palm, and cut it down to fit right in the palm of your hand.

Now, I like to go right in the center of the grain, right where my knife tip is at. You are going to want a deeper divot here than in your hearth board, and it doesn't need to be as wide. This is where the pencil sharpened end of you spindle goes.


Ok, we now have our hearth board, spindle, and bearing block. The coal catcher is easy to get, find a sliver about an inch wide and thin, so you can put that under your hearth board. Next we need a bow. I used a stick I found in the yard. I think its maple, but I don't know. Doesn't matter. I like my bows to be about 3' and have a slight curve. You don't need a HUGE curve, but if that's what you want, go for it

You will need a notch at the top, to keep your cord, and I have a special way of doing the other end, pics should tell you better but I bore a hole about 2" back, and then split the wood to the hole. Then I string it.


Now, on to the good stuff. You will need to make a divot in the hearth board, about 3/4"-1" in. It needs to be shallow and wide, all the better to seat your spindle in.

Now, a big SECRET, well not really a SECRET, but it is the first *TIP* for a successful bow drill, made from 1 stick. Green vegatation. Grab some green, any kind will do. Roll it up into a ball and stick it in the divot in the BEARING BLOCK. This will provide an extremely smooth lubrication for your bearing block and allow you to really get some RPMs up.


Ok, the really hard part here and a very important part, I can't show you. I'm solo on this and I don't have anyone to take pics, so, I will try to explain. There are youtube vids that you can search up, that will show you the correct posture. Now, we gotta burn the board in.
Take your hearth board, place it on the ground. Take left foot (I'm right handed, so leftys, reverse it), put it on the hearth board, on the end away from the divot. Get comfy, make sure you have your balance. Place the bearing block right in front of your toes. Take your bow and spindle, place the spindle between the cord and the bow, and twist the spindle so the cord wraps around it. If this is your first time, it may take you a minute. Don't worry, you will get lots of practice.
Once you have your spindle in the cord, I hold the bow in my right hand and place my right thumb against the spidle, and it will stay there. Place the blunt end of the spindle, in the hearth divot, and set our bearing block in place, BEFORE you move your thumb. Once you have the bow, spindle, and bearing block in place, you can take your thumb off the spindle, and grab further back on the bow. Lock the area right behind your left thumb, against your shin bone and keep it there, no matter what.

Now, the secret is pressure and speed. When you start, start slow, with just enough pressure to keep the whole mess together. Once you find your rythym, increase speed and pressure. You should start to see smoke in about 10 secs. You will need to constantly monitor your pressure. Once you smoke the hearth for about 15-20secs, you should be burned in. Looks like this.


Mark 3 lines, once perpendicular to the edge of the wood, and 2 more at about 15 degrees off. You notch should be 30 degrees inclusive. It should also extend to CENTER of your burn in divot. Don't go past center, or you will have problems.

OK, the Becker part of the Bow Drill. Now the counts as *TIP* number 2 of importance. I was over at Ethan's place, checking out his bow drill kits, and he told me about the back cut. Now, before this little tidbit, I was about 50% on getting a good coal from a bow drill. After I started doing this, I'm at about 95%. Make a back cut on the underside of the hearthboard, to allow carbon to fall into a pile, and not just get caught in the notch, it may be hard to see, but here it is. Not sure if Ethan created it, but he's the one that showed it to me, so, there ya go. Ethan's back cut.

Now that all that is done, reassemble your kit, just like you did on the burn in but put your coal catcher under the notch. Start the same way, only increase your pressure faster, now, and smoke that baby until you see the carbon powder fill up the notch. Then, lighten just a little on pressure, AND GIVE IT ALL YOU GOT. ALL GO NO STOP. She should be smokin' like a housefire, and when you stop, take care to slowly disassmeble your kit. If the spindle flies wild, who cares, you priority now, it to take care of that coal. Take your knife and carefully poke the coal out of the notch onto the pile of carbon. Gently fan your hand over it and let it coalesce. From that point, you got fire, put it in a tindler bundle and blow it to life.


I know I need pics of the postion of the body and a vid of the actual work. Maybe after my daughters get back from a party they went to, I'll go out and make one, and get som more pics. Here is a pic from when I was at Joezilla's place a couple of weeks ago, it should allow you to see what I am talking about.

I hope this helps, and remember, there are several right ways to do this. This is just mine. Others will likely chime in with other ideas and observations, and that is welcomed. Practice, and experience will tell you what you are doing is right, or wrong.
Have fun. Be careful. And get those Beckers out there dirty.
Moose
First, choose your tool. I have the choice of a BK6 Patrol Machete, a BK9 Combat Bowie, a BK2 Campanion, and a BK14 ESKabar. You can use as many Becker knives as you want to, but for this I will be using only one.
I choose my BK14. Its with me all day, everyday. Sun up to Sun down. I figure if I can make a bow drill with this little guy, then I can take care of my needs for fire with just my little knife
A little about my ESKabar and sheath. I stripped the blade (left he coating under the wrap
), and squared the spine. Sharpened it a couple of days ago. The sheat is the factory sheath. I haven't replaced it yet, mainly 'cause I been busy and there really is no need at the moment. That is one 7' long piece of paracord and a 2 1/2" x 1/4" GG firesteel. The loops are there to secure it to my belt, because I wear this IWB at 3 o'clock, unless I have a gun on, which is most of the time. Either way, you can see by the pics, it works and carries my most "basic" of needs with me daily.
The wood I chose is a Willow branch I found around. I like willow, it works, not as well as cedar IMHO, but it will work. Use the fingernail, lip test to make sure any wood you find is workable. If your fingernail will leave a dent (not gouge) its got the right hardness, and the lip test. LOL The way I do it is pucker up and just give it a little kiss, no tongue though, weirdos. Your lips will tell you if the wood is wet, or dry. YMMV
Ok, wood processing time. You will need 5 pieces of certain shape and size. Hearth, spindle, bearing block, bow, and coal catcher. I make all of my pieces from one piece of wood.
First make a hearth board. From the edge of my knife to the end is my length of my hearth board. I typically go from 6-8", you will need enough room for your foot, so don't skimp on the length, unless you have not choice.
I spine strike through the wood on all four sides, and just snap it from there
Now we have a round piece of wood, we need to make it a board. Finger width wide.
Baton of the edges where you finger ends. Be sure and move your finger first, please
When you finish, you should have a "board" about a finger width thick, and flat on top and bottom. Mine has a little curve to it, as that's the grain, but it will work just fine
Ok, board done, set it aside, time to make a spindle. I like my spindles to be about 8" long, YMMV, the short they are the easier to control, but you string way walk up to the bearing block, and monkeywrench the whole works. From the edge of the blade to my finger is the straightest piece, and about the right length.
Baton it off on both ends, and check it for cracks or breaks.
I like to shave mine down, one, I use the bark to make my nest for the coal, and two, it tears up your cord faster. Skin it.
Now, sharpen the ends, one like a pencil, the other like steep cone. You want a little tit
DDon't we all) left, to help seat it in your hearth divot.
Hearth board, spindle. Done. Now we need a bearing block. I use a side piece left over from making the hearth for my bearing block, find a piece that comfy in your palm, and cut it down to fit right in the palm of your hand.
Now, I like to go right in the center of the grain, right where my knife tip is at. You are going to want a deeper divot here than in your hearth board, and it doesn't need to be as wide. This is where the pencil sharpened end of you spindle goes.
Ok, we now have our hearth board, spindle, and bearing block. The coal catcher is easy to get, find a sliver about an inch wide and thin, so you can put that under your hearth board. Next we need a bow. I used a stick I found in the yard. I think its maple, but I don't know. Doesn't matter. I like my bows to be about 3' and have a slight curve. You don't need a HUGE curve, but if that's what you want, go for it
You will need a notch at the top, to keep your cord, and I have a special way of doing the other end, pics should tell you better but I bore a hole about 2" back, and then split the wood to the hole. Then I string it.
Now, on to the good stuff. You will need to make a divot in the hearth board, about 3/4"-1" in. It needs to be shallow and wide, all the better to seat your spindle in.
Now, a big SECRET, well not really a SECRET, but it is the first *TIP* for a successful bow drill, made from 1 stick. Green vegatation. Grab some green, any kind will do. Roll it up into a ball and stick it in the divot in the BEARING BLOCK. This will provide an extremely smooth lubrication for your bearing block and allow you to really get some RPMs up.
Ok, the really hard part here and a very important part, I can't show you. I'm solo on this and I don't have anyone to take pics, so, I will try to explain. There are youtube vids that you can search up, that will show you the correct posture. Now, we gotta burn the board in.
Take your hearth board, place it on the ground. Take left foot (I'm right handed, so leftys, reverse it), put it on the hearth board, on the end away from the divot. Get comfy, make sure you have your balance. Place the bearing block right in front of your toes. Take your bow and spindle, place the spindle between the cord and the bow, and twist the spindle so the cord wraps around it. If this is your first time, it may take you a minute. Don't worry, you will get lots of practice.
Once you have your spindle in the cord, I hold the bow in my right hand and place my right thumb against the spidle, and it will stay there. Place the blunt end of the spindle, in the hearth divot, and set our bearing block in place, BEFORE you move your thumb. Once you have the bow, spindle, and bearing block in place, you can take your thumb off the spindle, and grab further back on the bow. Lock the area right behind your left thumb, against your shin bone and keep it there, no matter what.
Now, the secret is pressure and speed. When you start, start slow, with just enough pressure to keep the whole mess together. Once you find your rythym, increase speed and pressure. You should start to see smoke in about 10 secs. You will need to constantly monitor your pressure. Once you smoke the hearth for about 15-20secs, you should be burned in. Looks like this.
Mark 3 lines, once perpendicular to the edge of the wood, and 2 more at about 15 degrees off. You notch should be 30 degrees inclusive. It should also extend to CENTER of your burn in divot. Don't go past center, or you will have problems.
OK, the Becker part of the Bow Drill. Now the counts as *TIP* number 2 of importance. I was over at Ethan's place, checking out his bow drill kits, and he told me about the back cut. Now, before this little tidbit, I was about 50% on getting a good coal from a bow drill. After I started doing this, I'm at about 95%. Make a back cut on the underside of the hearthboard, to allow carbon to fall into a pile, and not just get caught in the notch, it may be hard to see, but here it is. Not sure if Ethan created it, but he's the one that showed it to me, so, there ya go. Ethan's back cut.
Now that all that is done, reassemble your kit, just like you did on the burn in but put your coal catcher under the notch. Start the same way, only increase your pressure faster, now, and smoke that baby until you see the carbon powder fill up the notch. Then, lighten just a little on pressure, AND GIVE IT ALL YOU GOT. ALL GO NO STOP. She should be smokin' like a housefire, and when you stop, take care to slowly disassmeble your kit. If the spindle flies wild, who cares, you priority now, it to take care of that coal. Take your knife and carefully poke the coal out of the notch onto the pile of carbon. Gently fan your hand over it and let it coalesce. From that point, you got fire, put it in a tindler bundle and blow it to life.
I know I need pics of the postion of the body and a vid of the actual work. Maybe after my daughters get back from a party they went to, I'll go out and make one, and get som more pics. Here is a pic from when I was at Joezilla's place a couple of weeks ago, it should allow you to see what I am talking about.
I hope this helps, and remember, there are several right ways to do this. This is just mine. Others will likely chime in with other ideas and observations, and that is welcomed. Practice, and experience will tell you what you are doing is right, or wrong.
Have fun. Be careful. And get those Beckers out there dirty.
Moose
