Blade forging (observations & questions)

Joined
Feb 28, 2006
Messages
3,494
Hi Friends,

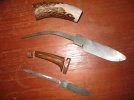
I have a few question regarding forging out blades. I've only hammered out a handful so am just at the beginning of the beginning.

The Steel
I'm using 3/4" round 5160 from Ray Kirk.

Heating the Steel
I'm using a coke forge so heating the steel is my first challenge. I'm getting a bit of a feel for temperature control, but it's somewhat like walking a saggy tightrope in an intermittently billowy and gusty wind. Steel temperature is dependent on where the steel is in the fire (between the center and top, NOT below the center), how the coke is stacked (a bit raked over the steel), how I crank the blower (slow and steady) and how long it is in the fire (approximately between 15 to 30 seconds).

Being more or less in control of all four aspects you'd think I could consistently heat the steel to the same temp each time, but noooooo. Almost half the time I pull it out with a good heat (orangey color and the scale wire-brushes off easily and cleanly), almost the other half of the time I pull it out prematurely (red in color sometimes even with shadows in it, scale doesn't brush off well) and occasionally I pull it out too hot (bright yellowy, almost sparkling). For the most part I believe my steel heating control will come with practice.

Forging the Steel
Here's my next challenge area. Most of my forging has been done with mild steel. High carbon steel is definitely different. It is harder to move and easier to crack if worked too cold. I really have to force myself to stop hammering as the steel cools. Frequently I hammer too long (loss of too much heat and color). Again, I assume control of this will come with practice. This should be easier to master than the heating.

My next challenge is hammer control. To watch me with the hammer you'd think I was a virgin teenage boy attempting his first lay (all over the place). I'm trying to keep my elbow tucked in and lift up straight and down straight as crackshafty piston like as I can. I'm trying to hold the handle loosely and whip my wrist at the end of the down stroke. It's all good until I need to work tight up against a transition, like tang/blade and ricasso/bevel. Again, this should get steadier and truer with more forge hours.

So, now for some questions. I know there are many ways of doing things. I'd really appreciate hearing yours.

  • Where do you start when starting with round stock? Do you forge it out flat first before starting in on your tang and blade? Or...???
  • Do you do your blade or tang first? And how do you go about it? I've tried using just hammer and radius anvil edge like swages to pinch out the tang, but my hammer control isn't good enough. So I'm using a guillotine-like contraption.
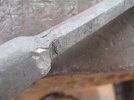
  • How to you set your ricasso and blade bevel transition?
  • How do you keep the ricasso thick and not thinned out into either the blade on one side or the tang on the other?
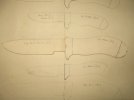
  • How close to finished blade shape and size do you go? Conversley, how much grinding/filing do you leave to do?
  • When do you set the shape and angle of the tang in relation to the blade so it will line up with your intended handle shape and angle?
You can see a piece I was hammering the tang out on (without hammering the rod all flat first) but I cracked it trying to change the angle. It was too cold, especially on the thicker rod side of the "joint". I'm trying to make the drop point "wave" knife in the middle of the sketches.

Thanks guys!

All the best, Phil
 

Attachments

  • Forge1.jpg
    Forge1.jpg
    79.5 KB · Views: 117
  • Forge2.jpg
    Forge2.jpg
    41.8 KB · Views: 113
  • Forge3.jpg
    Forge3.jpg
    68.3 KB · Views: 116
  • Forge4.jpg
    Forge4.jpg
    30.4 KB · Views: 86
Farmer:
I am also new at this as well I would think more wisdom will come.
3/4 is a bit big for starting out, something smaller might be easier.
Hammer in the same spot and move the steel around under it, if you get a bad hit stop, reheat and start fresh.
With a round I taper the end to a point first, then make the round flat, a little shorter tan final , it has a tendency to grow as you go along. Then I do the bevel useing the edge of the anvil. ricasso next, if you do not hit it to much it will not get to thin, you thin the blae and leave the ricasso thicker. Last I draw out the tang on the horn with a cross pien, still a mega lot of hammering a 3/4 down to size there mate.
Close to final shape as you want, everything you leave for later is more work well later.
That is about how it goes at my place, I would think the big brains can flesh out this outline for you.
Cheers Ron.
 
I don't forge well. I've gotten better. The biggest help has been drawing the blade, tang and all, cutting it out and markering it on the anvil. Bill Lyons (JS, Colorado) showed me that. Bill was helping me learn to forge and he could see I didn't have a picture of the knife in my head so he cut out my drawing and traced it on the anvil... and light came into my world... if I can see what needs to happen by holding the steel on the anvil-drawing, I know where the heat and hit needs to be.

Mike
 
If you want hammer practice... (I was in the construction business for 12+ years)

My dad started me out driving 20d nails into some scrap wood. (he learned from my grampa who WAS a real blacksmith back in the day)

Start a bunch of nails then using your normal forging hammer, you get one swing to seat the nail.

one swing per nail, don't stop until you attempted at least one swing for every nail you put in the board.

keep the nails far enough apart that a misstroke won't dink the nail next to it

*tip* you want to imagine you are striking 'below' the nail to have a proper 'drive' or 'follow through'

If you have martial arts training, you know what I mean. (aim behind the target)

hope that helps
 
Just noob thoughts, but if you're not doing an integral, it might be easier to create a bar first and then forge the shape you want. Maybe size the bar a little taller and wider than you want the the final ricasso to be.

I think you can have less worries with miss hits if you use your hardy tool for the tough spots like you did for your tang. If you bump the pin up a bit thicker than your ricasso, you should be able to strike a sharp plunge line and draw your edge down a bit like in your plan. Then the bevel and taper hammering can be away from the ricasso.

Just thoughts, Craig
 
As far as making the first hit for drawing out the choil/bevel, Kevin Cashen has a good method. I didn't pick up on this from his web posting, but I saw him do it at Troy. When he lays the bar on the edge of the anvil, he tips up the tip and drops the tang end so that the part where the plunge cut will be formed is the only part touching the anvil. He then gives it a couple of whacks on each side and then draw it out a bit flat on the anvil, set the ricasso and do your pre-bend. Now i cheat when it comes to the part where you go back and flatten out the bottom of the ricasso. I do that on the press.:D 
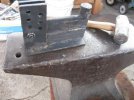
The good news is that it sets it very straight. The bad news is that it doesn't take out that initial bow in the blad quite as well and doing it by hand with the blade hanging of the edge of the anvil.
 
Just noob thoughts, but if you're not doing an integral, it might be easier to create a bar first and then forge the shape you want. Maybe size the bar a little taller and wider than you want the the final ricasso to be.

I think you can have less worries with miss hits if you use your hardy tool for the tough spots like you did for your tang. If you bump the pin up a bit thicker than your ricasso, you should be able to strike a sharp plunge line and draw your edge down a bit like in your plan. Then the bevel and taper hammering can be away from the ricasso.

Just thoughts, Craig

Spot on as far as creating a flat bar first. Some guys say that you shold square the round bar and then flatten it. What I use to do was flatten a 3/4 or 7/8 round as much as I could and then I would "bevel" the edges to t he thickness I wanted the final bar to be. I would then draw it out a bit, but I was only having to thin out the center of the bar, which was much easier on the old elbow. I still do it that way sometimes when I am squashing big round bars on the press. I hope that made sense.
 
I'm a fellow newbie (this is only my second forged blank), but hopefully this will help a little:

http://www.cashenblades.com/Info/Forging.htm

I just yesterday morning printed these instructions out, and came up with this. I started with a piece of Jeep coil spring, and I flattened it first into more or less bar shape before doing anything else. I also did as shown in the writeup, and forged the blade first followed by the tang.

IMG_1216.jpg


Finally, this is often easier said than done, but anything you don't want to change (such as the ricasso), leave it off the anvil at all times and don't hit it with the hammer!

Good luck!
 
That's a lot of questions.

Briefly,… in order to take a consistent heat you need to be able to “see” into the forge. With coke or coal, build an “igloo” configuration so you have an interior cavity to see into. If you have trouble forming an igloo with your coke, try mixing in some crushed green coal.

For hammer control, keep your elbow tucked, stand up close to the anvil, and don't snap your wrist. Try to keep your hammer stroke the same and move the steel and/or your whole body to focus the blow. You should not be lifting the hammer straight up and down. You should be striking on a natural radius from your arm. The center of the primary radius is from the elbow tucked into your side. This will help establish a more consistent stroke. As long as you keep your elbow tucked and avoid extending it, your hammer control will improve and you can also help prevent "blacksmith elbow" this way,... even though the elbow joint will be used the most.

I think it's best to try and work the blade as a whole rather than finishing one part at a time. In other words work the tang some, then the point a little, then the body of the blade a bit and try to keep the blade a more uniform thickness through all the sections as you work it down. If one section gets too thin right up next to a thick section, you'll get a lot of stress and flopping around at the transition area.
 
To go along with what Tai had to say you also need to lower your expectations. You need to learn how to crawl before you start walking. I would also suggest starting with some flat bar instead, say 1" X 1/4". I find 5160 to be about twice as tough to forge as your more simple spring steel. 1065 and 1084 move much easier with hand held hammers.
 
Last edited:
I got some of the 3/4 round 5160 from Ray a while back. I thought it forged out great!, (a bit stiff under the hammer like all 5160, nothing serious though). The scale pops off real easy and it forges out nice and clean,... not a lot of pitting.

I also performance tested some blades from it and was very leased with the results. I plan to use the round mostly for "non-hamon" working integrals. :) LOL
 
I was an avid bigwall climber for many years before I started forging. The accuracy developed from pounding in pitons with a 2 pound hammer has really helped.

You could always climb El Capitan a few times! :)
 
Phil, I agree with Tai and Ray on this one. Tai gave a great description of basic forging. Ray's suggestion of startin with bar stock is great too. If for some reason you do not want to get the bar stock then I would suggest forging your bar flat first. This will give you an idea of how the material is going to work under the hammer. You are very right that it is a tightrope using a coal or coke fire. I have burned many a blade and pulled out too soon also. But it is great to know the basics of using solid fuels. It all comes with experience. Practice Practice Practice. Oh also don't strike too cold.
 
Ray I don't know how my expectations could get much lower. At this point I'm just hoping not to get burned or hit myself in the forehead with a hammer.

Tai I don't have any coal and am not aware of any within 2500 miles or so. That cave thing is going to be real tough with the rock hard coke I have.

Chuck I have a little of Aldo Bruno's 1084 (previous batch) from Indian George. Part of the reason I've been whacking away at (not sure I like the sound of that) the 3/4" 5160 round is exactly because it's more forging work and I want the practice. But like Ray said, I better drop back to something a little easier for now.

Mike I like the drawing on the anvil idea. good one.

PJ234 looking good. Thanks for the link. I'll check it out.

Thanks for ALL the feedback guys!

Here are a couple of blades I'm hoping to get done for my dad and son for Christmas. They're from billets I made at Indian George's last summer. The top one is a few layers (57) of 1084 and 15n20. The bottom one is cable. The antler is from a deer my dad shot when I was two. I forged these out using a forced air propane forge and ground them on a Griz. As if I haven't bitten off enough, I'm trying to make the hardware for my dad's out of titanium as he just had his second hip replaced.

All the best, Phil
 

Attachments

  • Dad&Mikey'sKnives.jpg
    Dad&Mikey'sKnives.jpg
    70.1 KB · Views: 126
In that case, you might consider just peeking through the coals, or using an additive like whole corn feed which clumps together like coal, or building a refractory top with a space over the coals, or building a simple gas forge with a weed burner which is good for general forging, but not forge welding.
 
Phil,

Following after Tai's last...

Or a brick forge (one, two, three, or six...) and Bernzomatic JTH-7 burner(s), or Larry Zoeller's 3/4", venturi, side-arm burner (1/2" side-arm in a smaller volume like the bigger brick forges) in a 7-8" vertical (old oxygen type tank, old fire extinguisher, etc.) with one layer of ceramic wool and coating (if just forging).

"Two Brick Forge" (actually 1 1/2 brick... I made mine with three in the same configuration) in "Blades Guide to Making Knives" (ISBN 0-89689-240-9)... Wayne Goddard article...
Zoeller Forge: http://www.zoellerforge.com/

Mike
 
Back
Top