Blade shapes for slipjoints

Joined
Mar 6, 2022
Messages
317
I have been pouring through old catalogs and looking at all sorts of pictures, line art and so forth.
There are about 6 different things I am seeing called a "clip point". Can someone help me understand this particular shape?

Some times the spine and main portion of the blade are parallel. Other times it appears that it is at about 5° angle. The actual question would be how these should be relative to the walk-up or the back square. Ideas on this design aspect? And proper terminology?
 
Clip point refers to the point being below the spine and the upper part at a negative curve. It usually covers about 33% of the blade. However the length of the clip and the amount of curve can vary a lot.

The other two main shapes are drop point - usually shorter than clip point and straight or a small positive curve, and spear point - even shorter and more positive curve to the upper part . Drop and clip have the tip slightly above the centerline of the blade and spear is usually at the centerline.,

Drop Point
1660561126761.png
Clip Point
1660561187728.png
Spear Point
1660561215996.png
 
I did a google to come up with a picture, here is something just for illustration purposes from the Schrade Handbook of Knowledge.

What I am referring to, are 3 specific relationships:

The 1. Spine, 2. the long edge of the blade and 3. the back square of the tang.
Notice, specifically in your image of the Buck, presumably these three items would each be parallel. However, in the below image all the "clips" (large, clip, sabre, Turkish) either the long blade and back square are parallel with the spine being at 5° or it is possible (forgive my eyes) all three of them are 2.5° off one another. Presuming that the spring would have a straight line (parallel) with the spine of the blade, this would give an open knife the appearance that the blade has a forward belly. In some cases it is much more pronounced.

Intuition tells me that any terminal point should be above the rotational angle of the pivot, but other than that I can come up with no actual rules.

Having started with Culver's book, design seems to start with the back square and spine parallel. Moving on to Robinson's his clip point whittlers seem to have more of this splay angle. As I look at things like Tony Bose's toothpicks there is a distinct recurve with hardly a straight line to be found on the blade edge, and his swayback and dogleg jacks have quite pronounced bellies which kind of suggests to me that the back square and the spine are parallel, tipping the blade downward in the open position.
Other than making it look like you better not try to stab anything (or it will close on your hand) the only possible benefit I am seeing is having more spine available for a nail nick while still having the tip buried below the scales.
schrade_handbook_of_knowledge_terms_6.jpg
 
It seems to me that, in most slipjoints with clip point blades, the key relationships are that the back of the spine is aligned with the back of the handle, and the point is below the centerline of the handle. Regardless of where the point is, with a slipjoint you probably don't want to 'stab' anything - the point is to help start cuts, but hard stabbing is not for this category of knife. Having the point down a bit makes most cutting tasks easier - the cutting edge will be better aligned with your hand for cutting.

I just grabbed a small pile of clip point slipjoints (say that five times fast) from a variety of manufacturers, and you can easily see what I'm talking about in every one of them except the Cudeman 453-L (third from bottom). The point appears to be above the centerline here, but not if you draw the centerline from the butt to the pivot - then you'll see that even the Cudeman has the point below the centerline.
20220815_153648.jpg

Hope this helps.
 
Someone has been giving me a bunch of knife magazines (they own a knife shop, that I sharpen knives in front of at a flea market on the weekends for some extra money). Anyway, I've not really had a use for them, but I can look through them for some pictures of different clip point knives if you'd like. I should probably look in them anyway, its always good to see others work to get inspiration.
 
It seems to me that, in most slipjoints with clip point blades, the key relationships are that the back of the spine is aligned with the back of the handle, and the point is below the centerline of the handle. Regardless of where the point is, with a slipjoint you probably don't want to 'stab' anything - the point is to help start cuts, but hard stabbing is not for this category of knife. Having the point down a bit makes most cutting tasks easier - the cutting edge will be better aligned with your hand for cutting.

I just grabbed a small pile of clip point slipjoints (say that five times fast) from a variety of manufacturers, and you can easily see what I'm talking about in every one of them except the Cudeman 453-L (third from bottom). The point appears to be above the centerline here, but not if you draw the centerline from the butt to the pivot - then you'll see that even the Cudeman has the point below the centerline.
View attachment 1901127

Hope this helps.
Thanks, that is certainly helpful, and what a wonderful collection. Let's see how well my learning is going, from top down Coke Bottle, Barlow, Stockman in serpentine frame, Peanut, ???, Barlow, and Toothpick. I never really liked the toothpicks, but slowly they are becoming my favorite.
 
Thanks, that is certainly helpful, and what a wonderful collection. Let's see how well my learning is going, from top down Coke Bottle, Barlow, Stockman in serpentine frame, Peanut, ???, Barlow, and Toothpick. I never really liked the toothpicks, but slowly they are becoming my favorite.
If you haven't already, you should check out the Traditionals subforum, especially the "What "Traditional Knife" are ya totin' today?" thread. Don't try to catch up from the beginning - it's too much - just start with the most recent page, and you'll see a good variety of traditional knives that BF members are carrying regularly. You can learn a lot about these knives from reading and looking at all the pictures. If a particular type appeals to you, there are probably multiple threads about it that you can dive into. For example, for peanuts, there's the "Cult of the Peanut" thread, and I started a thread about a self-imposed challenge to carry and use a peanut for everything for one month.
 
Someone has been giving me a bunch of knife magazines (they own a knife shop, that I sharpen knives in front of at a flea market on the weekends for some extra money). Anyway, I've not really had a use for them, but I can look through them for some pictures of different clip point knives if you'd like. I should probably look in them anyway, its always good to see others work to get inspiration.
That sounds fun. I took a run at 5° angle and got a much more pleasing result. So I think I have some options
 
Definitely getting somewhere. I now have a parameterized blade that with a few changed numbers I can get from a flat blade to all sorts of bellied blades. And, so far I am getting the interior spring shape to follow. Unfortunately I such at screen captures, and this forum is really hard to upload pictures to anyway, I will have to wait until I get them posted somewhere else first to share them!
Thanks for all the help though!
 
Damn. I wonder who it was..I'll have to look for it again. I'm about to quench a knife then I'll see who's it was lol.
 
Okay, here is a first shot. Hopefully Google Photos Albums work as external sources...

Here is a quick Google Photos Album of 16 images. There are quite a few variations on the parameterized clip point, there is one near the end that looks pretty much like my opinel, definitely a cotton taster, and definitely a spey. The rest, I was just changing numbers around to see what I could get. There were literally 5 numbers I was changing, and most times I was only changing one or two at a time. By increasing the radius on the clip, I can get almost flat drop point stuff. but I think I will make one just to handle all those. Perhaps there will be a little overlap between the clips and the drops but I think I can live with that. I didn't allow for actual recurve though I could also do that, as I think I have the "how" figured out. If you can't see them on Google Photos, let me know. This is not done yet, but I will back up and call it a success!!
https://photos.app.goo.gl/NU7NocPw5J9uHpPn7
 
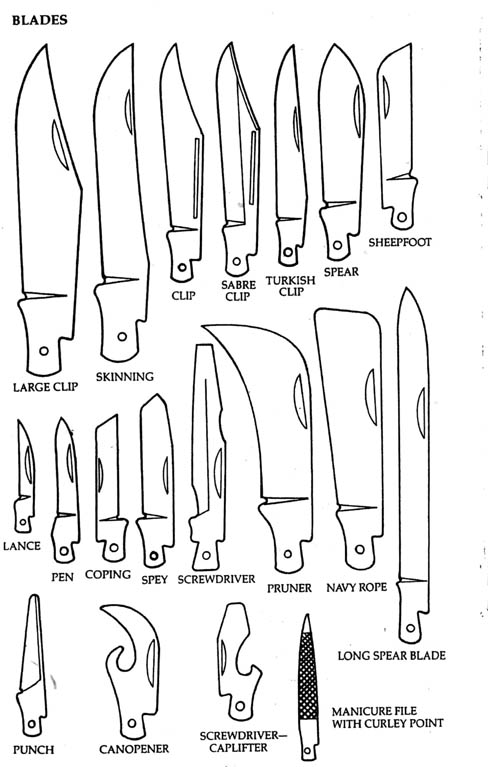
They look good to me. Which ones are you thinking of going with?
I love the look for the cotton taster (3rd one in) , though I have no idea why I would ever make one. The spey (15th one in) was just a lucky accident, but I will no doubt make a trapper or two, there is at least one or two blades in there that will make good skinners (like 2nd one in) to go with the spey for a trapper. The one clip with the deep belly is definitely a keeper (8th one in), maybe even for a single blade knife. There is one also that is a bit oddly shaped (5th one in) that would make a good coping blade for a whittler. There is one, I think the 7th one in, that with just a slight tweak would make a great toothpick (Texas or Arkansas take your pick. ). And for a fairly straight clip, the 11th one in will certainly see some time. I could almost get a stockman out of them but I do like a sheep's foot (will make a different blade that can have an outside curve where the inside curve is now to make the clip, and that should be able to do sheep/lamb feet, pen, spear, and all the "drop" points. I also think that I can take a lot more time to play these out. I only mildly scratched the surface with the changed. Of the 5 parameters, only any one or two were changed at a time. The ones (8th through 14th) are all the same except the belly angle changes from 12° to 0° by 2's. And between the cotton taster and the 12° clip, the only difference is the percentage of straight spine from like 80% to 55%. The first one is just a few percentage points away from my opinel, and I could play with it a little bit to get what's on my sodbuster.
I do need to do some more stuff "on purpose" with this. I think I could look at some specific cuts of blade and reproduce them with it.

After I get done with my other blade, I have to see if I can somehow do the frames. They are tougher, but so "related". I figure from a cigar, to a sleeve board, to equal end, english, coke bottle, coffin, swell, balloon, candle end, and all those jacks should be simple changes. Then serpentine, dogleg, swayback, peanut, and sowbelly... I have been playing with some arcs, and elipse parts that can be twisted a bit to come out with these shapes, some symetric and some asymetric. Then the "clasps" things like sodbuster, and even lanny's though that seems more like a saddlehorn. I figure if I can parameterize these, I can play around in between and come up with some novelty as well. Who knows, I might actually invent something new :) But like Walter Sorrels says, just because you can make something that looks cool in CAD doesn't mean you can make it, or that it will work if you do... :)

Anyway, fun times, fun tools.
 
Back
Top