- Joined
- Mar 15, 2005
- Messages
- 26,811
Do it yourself.Diy....?
Love this thread.Dig your knives.Envious of the lucky new owner.
That's all.
Doug
The BladeForums.com 2024 Traditional Knife is available! Price is $250 ea (shipped within CONUS).
Order here: https://www.bladeforums.com/help/2024-traditional/
Do it yourself.Diy....?
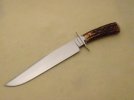
Wow! So the ferrule is a "true" ferrule that slips over the stag? Ok.....I'm not only going to have to pick your brain on that, but also on how you file the grooves in the ferrule...lol. Are you testing this year? I didn't see your name on the table holders list for Blade.Joe,
(LOL) DIY's the way to go...I was tempted by the broach
you mentioned, but I'd been using this one for a while...
it works, so I saw no need to buy one.
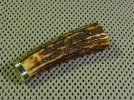
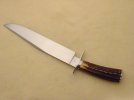
The Stag here has been cleaned, and sanded to make it
a bit more comfortable to hold. It's been inletted, and
the ferrule tamporarily installed for shaping and fitting the guard.
A Scotch Brite pad is used to round off the sharp edges left
by sanding the stag before fine sanding and polishing.
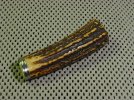
The ferrule is 1 X 1/4" 416 SS, Drilled, then filed out to
match the inlet in the stag. the edges of the ferrule and
the front edge of the stag are rounded. The stag is slightly
larger than the ferrule to allow for a little shrinkage. I learned
this from Bailey Bradshaw.
I'll go on record as saying that Mr. Gill is not worthy of this fine knife.