Bufer station

Joined
Feb 17, 2007
Messages
3,375
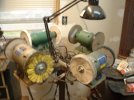
A couple guys have commented on how they like my buffer setup so I thought I would post a couple photos. It has 4 arms with a buffer on each. It pivots like a lazy susan and locks in place. A real wall saver in my small knife shop area. The base is very heavy and was filled with old steel bits and cement with a plywood below that. The 2" pipe column comes up and ends with the thread half of a 2" union salvaged from work. the 4 2x2" angle arms meet in the center and have a stub of 2" pipe and the nut 1/2 of the union. I welded a long bolt on it. When the nut is loose you can turn it to the buffer you want and then use the bolt handle to titen the nut on the union and it will stay put. want another station. Tap the bolt with your hand and it will loosen enough to pivot another into place and then you lock it. I have pivot arm light near the middle and a power strip. so I can position the light at which ever place I want and only one cord coming off the pivot. You can go a couple wraps of the cord in either direction. I just keep an eye on it and unwind or work myself lose on the cord. Jim
 

Attachments

  • DSCF0054.jpg
    DSCF0054.jpg
    61.2 KB · Views: 224
  • DSCF0055.jpg
    DSCF0055.jpg
    47.3 KB · Views: 125
Nice system! You have saved quite alot of counter space with it for sure. I wonder how you could wire it so you did not have to worry about the cords. There has to be an electrician who knows.

Is it set up so that you sit in one space while going from one wheel to the next?
 
I can set in one place and turn the machine I want to me. All the buffers, my sharpening unit and the light plug into a power strip zip tied to the arm cross. Only the cord from the power strip gets slowly wrapped up and if you watch a bit and turn it out once in a while it is no problem.
 
Be cautious when you are operating them without Shields. Some time you may want to setup some kind of vacuum/ventilation system to reduce the compound particles that you will be breathing.:yawn:
The compound is hazardous to your health. Or at least where a mask. Great looking setup and do enjoy it in the shop. :thumbup:
 
I have a ceiling type filter mounted above and to the right of the buffers. I also have a some half mask respirators and a dust collector. I have power tossed some stuff and hope I am smarter.

1. Tape any sharp edges heavily before I start except while sharpening of at the end buffing near the edge

2. hold on well and concentrate

3. Keep edges down and away from rotation. Never have even a dull edge or shoulder on top into the rotation. Stay below the center of the wheels.

4 Do my buffing well before sharpening.


Any other good Buffer rules?
 
I love that thing, very innovative. Do you have any plans on its construction?
 
Get a 2" pipe union. and about 3 ft of 2" pipe and some 2" angle. Take a 3' pieces of the angle and 2 17" pieces. weld one of the 17s to the center of the 3' piece at 90 degrees and weld the top flat and the down leg against the 3' pieces heel and down leg. Then weld the top flat on the other 17 straight across from the other 17. You can only do the top flat on this one and will have an open spot on the bottom where the 2nd 17s down leg hangs free. Now weld about a 3" stub of the 2" pipe to the union half with the nut and weld a 8" bar to the side of the nut. Now turn the xX you made upside down and weld the other end of the 2" stub to the center of the angle X. You should be able to weld the free hanging leg of the one 17" piece to the pipe and stiffen it up. Now take a piece of plate or some heavy base item and weld enough 2" pipe to it so your buffers will be the right height sitting on the 2" angle arms. You could pipe in a bucket of cement or something I guess, you just need a heavy stable base. Weld the threaded half or the union on top of that pipe. Put a bit of grease on the union threads, faces and shoulder the the nut rides on and then screw the union halves togeather. If the union is slightly lose the arms will turn. Tighten the nut with the bar you welded on and the cross will not turn. Then I just carriage bolted a piece of 3/4" plywood to the end of each arm big enough for the grinder bases. The grinders balance each other out, but, the union has a pretty good bearing surface anyway. I then mounted a plug in strip in the center and plugged i all the grinders and used zip ties to hold each coiled up cord to its arm so no cords hang down except the plug strips and that goes to the wall. I added the flex light from a second hand store by clamping the base one of the arms near the center and there it is. It works well. I have it sit so when the union is tight the bolt welded on the nut piece is pointed to my stool so I can reach under and use it to loosen the union turn the buffer I want to me and then use the bolt to tighten the union nut. and go to work. I have been using it for almost a year with no problems. I am hang a plastic bucke under each arm for that buffers compounds. Jim
 
Drill 1.25" holes behind each unit. drop the cords through the holes. plug them into the multistrip and bundle the excess neatly. No more cord jungle
Stacy
 
Stacy I have rolled the cords up tight and have the excess zip tied to the arms, amd only the power strips cord goes down and to the wall but, your way would do it to. I am sure I could redo the set up with 6 arms and have plenty of room between machines
 
Anything above the arm is a potential risk of being sliced into by a thrown piece of metal. Do you like the thought of cutting through a plugged in cord? Better they were bundled on the bottom of the arm.
Stacy
 
I run every electrical supply line, that goes in the shop, inside a metal conduit.
Not only does this protect the wires themselves, but it makes a good ground, back to the box. The first time you short something, you will be glad you did this.

Work safe, Fred
 
Jim that is an excellent idea! You can get buffers for way cheap, cheap enough to use more than one machine instead of changing wheels on one, and that makes for much more space!
 
On the electrical. every 110 line in my shop is GFI protected. Cheap insurance for shorts. Covers all the hand tools everything. You have a small electric drill and a bucket of cooling water? Hot stuff and sharp stuff and portable power tools? I am not going to drop mine in the water but, if I did, an instant popped circuit. I could easily get a rotating contact for the center but, see no real need. The wires in the picture are a little jumbled cause I had just traded spots with a couple of the machines and while doing so decided to post on the thing. they are usually directly behind the motors and not in line with the wheels. Having them under the arm would not help because the machine at 90 degrees to the arm would throw stuff down and back at the cord. I could get tack on box tubing to protect the cords from flying objects, but like I said GFI protection.

I have one 3/4 hp machine with a couple of the yellow wavy hard disks on one end and a 8" hard felt on the other. Thats my coarse grit metal station. Then a 3/4 horse with a couple of tight sewn cloth for my finer grits (just replaced the wheels. Then a 1/2 hp with tight sewn cloth and a loose cloth for wood. The 4th unit is a 1/2 hp sharpening station with the 8" hard composite wheels that one has the glued on grit and the other the slots and uses a buffing compound to remove the wire burr. I love that thing and can get them shaving sharp with it. I need to find some kind of a box that I can place over each when not in use to keep them from getting contaminated from other stuff.
 
Bro that is cool now if you could get that to drop down from the ceiling I would bow down to you:D


Seriously great idea, my problem is the buffers I have are the super long arm jet type, but this type of set up might just be adopted by me.

Thanks for sharing
Spencer
 
"I need to find some kind of a box that I can place over each when not in use to keep them from getting contaminated from other stuff."

I put a cheap shower cap over some of my buffer wheels when not using to keep them clean.
 
"I need to find some kind of a box that I can place over each when not in use to keep them from getting contaminated from other stuff."

it wouldn't have occured to me if I hadn't been working on a sewing project yesterday, but the top to a sewing machine travel case would be just about the right size for that kind of thing. maybe not with larger whees or longer arms, but the regular cheap grinders would work ok, I think

kindyr
 
Like the shower cap idea and the sewing box one is good too

Long armed buffers may take longer center arms to get clearances and a bit heavier base. I am not using cheap light or galvanized unions. Get a good 300# union from a supplier like Familian. They make them up into at least 4" pipe sizes. How tight will the get. LOL. I have hydro tested piping with unions to over 2000 psi. They will hold your buffers.

I could make it hang from the ceiling very simply if you have a solid enough ceiling. I would just use a smaller "base" plate to weld the long piece of 2" pipe to. The long drop piece of 2" pipe would get the nut half of the union. Then bolt that base plate to a big piece of 3/4" plywood and lag bolt that securely to as many ceiling joists as possible. Then I would weld the stub piece of 2" to the top of the angle cross instead of the bottom and when I put the union together I would have pivoting arms hanging from the ceiling. The union would then pivot on the nuts back shoulder. When you tightened it it would get very solid. I have built and seen many pivots and etc from unions. I even know how to make a safety arm so that a hanging swivel can not back off over 1/4, 1/, 3/4, or 1 turn. You simply make about a 8" round plate with a 2 1/2" hole in the center that goes over your thread half pipe before you weld the tread half to it or before you weld it to the angle arms. This plate is welded in with the weld on the thread half then You put a bolt in a hole drilled in the plate. The bolt is set using 2 nuts on each side of the plate to hit the arm you weld to the nut to loosen it and the nut must then turn with the thread half. Depending on where you spot the bolt you can loosen the nut up from just a bit to almost one turn. Bow now please
 
Back
Top