Burners for new Forges

Joined
Jan 28, 2006
Messages
55
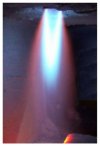
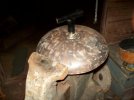
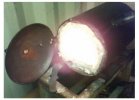
Am in the process of building a new forge. I will be using sidearm burners of the Larry Zoeller design and have them completed and they appear to be functioning properly with one minor (?) exception. One of them no matter how finely I tune it has what would appear to be a red Halo effect around its flame. The flame itself is the proper color and shape but just has that red halo around it. I haven't seen this before nor can I find reference to it. Has anyone else seen this or know what if anything this will do if I use it as is.
 

Attachments

  • flame 003.jpg
    flame 003.jpg
    18 KB · Views: 63
The only thing I can think of is that it's something that is being drawn into the burner and being ionized in the flame...can't remember what ionizes that color....I wouldn't be concerned about it myself...enjoy the new forge! Bill A.
 
Sent a note to Larry about this and am currently waiting a reply. However, I think Bill may have answered the question. I had the burner mounted on my old forge when the picture was taken and given the configuration of the forge (basically a box with burners straight through the top) and the way the burner was mounted, I think it was recycling gasses from the forge. I have since removed it from the old one and am continueing construction of the new.
l am trying to decide whether to leave the tank (a 40lb Propane tank) the full length and put a movable wall on the back side or cut it as marked in the picture. Full length would give me an interior about 9" x 23" and If I cut it about 9" x !7" (after applying the lining). I don't think I'll ever make a sword but the extra length might be nice to have should I ever need it. I'm thinking though if I leave it full length gonna need a third burner though. Planning on lining it with either KAST-O-LITE 97-L Plus or GREENCAST-94 Plus. Both are supposed to be good to 3000+f and I can get either locally.
Any suggestions or ideas welcome.
 

Attachments

  • forge 002.jpg
    forge 002.jpg
    101.7 KB · Views: 30
  • forge 008.jpg
    forge 008.jpg
    101.2 KB · Views: 27
Not exactly pertaining to your question.I made a small forge for one of our fellow members this past week and used one of larry's Z burners and it really impressed me.I used an old helium bottle and lined with Kaowool with a firebrick with duraboard for the floor,this little forge will go down to one psi and runs perfectly on up to 20 30 psi,he really figured out the dynamics on this burner,I think they are 65 bucks now but worth it:thumbup:---Regards Butch
 
Weeellll Larry is either too busy to answer or doesnt think its a problem. Meanwhile I've got it roughed out. Got the burner holders in place. Gonna use the ends that I cut out of the cylinder to make doors for it (still need to make cutouts in them for venting). Got a friend thats gonna give it a light sandblasting so I can paint it. Decided to go the short version with only two burners. If I decide I need a longer one later I have another cylinder that is longer that this one (about 12" X 36"). Gonna go pick up my refractory (Plicast 3100) tomorrow and after that will be just a matter of assembly and sufficient "cure" time for the refractory. Gotta give it plenty of time for that then heat it sloooooowly for the first time or two to make sure all the moisture is out... The only thing I havent found for it yet is a proper pyrometer for it. Dont know about my spelling there. Can run it without one but would be nice to have...
 

Attachments

  • forge 013.jpg
    forge 013.jpg
    55 KB · Views: 33
  • forge 015.jpg
    forge 015.jpg
    50.3 KB · Views: 32
I guess I got in a little too big a hurry saying the Larry hadnt answered me. He did replyto my question called the correct shot the first time. The orfice wasnt lining like I thought it was thus giving an incorrect burn. I changed to way the orfice was held and got it adjusted the first try. Got the doors put on it just need to cut vents still and finish insulating it. I mounted the burners and put a 2" layer of KAO wool in the main body of theforge and fired it off for the first time (Just for testing purposes). It started smoothlly and performed from 2psi to 28 psi, all with perfect stability.
 
Don't forget to protect yourself from IR/UV radiation...I can get sunburn from my little one burner freon tank forge!...this puppy is goin to put out a lot more I'll bet...I don't stand right in front of it nor hang around it until I'm ready to pull iron out and then I move off to the side where my anvil is so I'm not ketchin direct radiation from the forge opening!....but it's sure a lot of fun...enjoy this great new tool!
 
Although I still have a couple of minor things to do to it, like insulate doors and cut vents in them, I think I can safely say its gonna live. Took it up to full operating temp for first time tonight and I must say it surprised me. I'm so used to my old one taking a little while to get there, this one was ready in less time than it takes to tell about it. I think I'm really gonna enjoy this. Pictures were taken with burners at 8psi. If its that efficient here probably will never get much higher. Burners were tested to 30psi before installing so potential is there if I ever do need it.
 

Attachments

  • DSC00016.jpg
    DSC00016.jpg
    35.6 KB · Views: 26
Looks to me like your not goin to have any trouble gettin welding temps! I'm workin on a design with two burners right now too so that I can do longer blades easier!....
 
Back
Top