Busted shoulder question

Joined
Jan 8, 2011
Messages
70
Hey everyone! I've still been enjoying my knife making and started my 2nd knife. I did the same profile and grind as my first knife in order to get the hang of it. This time however, I am going to give some G10 scales a shot instead of paracord.

The knife is currently with Darrin Sanders being heat treated. He informed me that I did what is called "busted the shoulder".Bummer #1! He informed me that I can repair it with a grinding magnet and grind both sides of the blade to even it out (thanks Darrin!) As Darrin advised, next time ill stop my grind a 1/4" from the top. I was trying to get my grind as close to perfect pre-HT, which is a lesson learned.

I was wondering, could I turn the busted shoulder into a swedge? What are some other ways I could repair it? I know it would be much easier to tell with a photo, I'm sorry I don't have one yet.

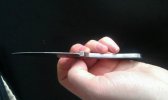
I'll attach a photo of the error as soon as it is back from Darrin. Here are a few that don't show the busted shoulder, however. The 2nd pic shows the grind before I went too far. Also, I made a mistake in my pin placement. I had them where I wanted them and then drilled the holes and then sanded and took away too much material! (I'm starting to see a trend that I need to stop!) Lesson learned: don't drill pin holes until I'm certain of the shape and design! Bummer #2!

I'm feeling like I have regressed rather than improved from my first knife and I don't think its supposed to happen that way :confused:

Thanks!
 

Attachments

  • uploadfromtaptalk1358618425008.jpg
    uploadfromtaptalk1358618425008.jpg
    22.9 KB · Views: 102
  • uploadfromtaptalk1358618479013.jpg
    uploadfromtaptalk1358618479013.jpg
    15.9 KB · Views: 110
I wish I know what a busted shoulder looks like. I have six knives (my first batch) with Darrin now and I think if they're not all sitting there with broken shoulders they might at least have sprains. Most of my bevels are all the way to the spine. I never heard of this as being a problem so what gives?

The only thing I can think of is if the bevel breaks into the spine and shows in the taper. So far I am okay but I never ground scale off before so I'm guessing that is where the problem comes in.
 
I really wish I had a pic to show it. Basically, I did a full flat grind and when I brought the grind to the top of the spine, I took too much off. So when you look at the knife from the spine down, you can see the indentation on one side. So ill have to take the tang and even it out. Darrin suggests I put the entire tang against the flat platen and even it out on both sides. It'll thin the knife a little, but its 3/16 and ill still have enough thickness. A magnet will help make this easier. I wish it was just a sprain! :p
 
Charlie,

Just part of learning process, flat grind the tang. Might as well taper that tang while your at it.

Greg
 
Charli, you blade is already packaged up and ready to mail or I would post a pic for you. "Busting the shoulder" as I call it is just taking a full flat grind above the spine. The result is the spine of the blade being thinner than the tang. Charli, I know of no way to add a clip or swedge and make it look right.
Jay your grinds are pretty close but with careful finish grinding you should be fine.

Don't worry guys, this is one aspect of knifemaking that comes with practice and experience. I promise you every knifemaker has done it. It is really just cosmetic and everything else being equal it will have little or no effect on how the blade cuts/performs. Like I said its just part of the learning curve. As long as you recognize the problem and correct it you are making progress. Always remember it is better to leave some extra steel on the blade before H/T than it is to remove too much. Just rough grind your bevels to 75-80% finished pre-h/t and refine them after h/t. Just keep at it and don't let mistakes stop you because making mistakes is the best way to learn. The main thing is have FUN.
 
Thanks Darrin! I'm really grateful for your knowledge and advice and glad you chimed in. I will post pics when the knife arrives and hopefully display some improvement :D
 
Don't want to hack your thead charlie but this is what Darrin is talking about
Top BUSTED
Bottom NOT
Flat or hollow does'nt matter, but hollow almost seems worse if busted.
The top is a very sad flat grind, The bottom hollow.
My first 10 grinds were a hell of a lot worse than yours.
Ken.
103_0288.jpg
 
Last edited:
What if you busted both shoulders equally and to a larger degree than you already have?
Sometimes it's easy to fix a mistake by accentuating it or incorporating it into the overall design.

I've actually thought about trying that on purpose just to see what it'd look like. My thought was to take 0.22-0.25" stock and full flat grind it until the spine was around 0.14-.015". It'd be kind of neat to do that with a neck knife then heavily skeletonize the handle.
 
Don't for one minute think that the older, more experienced makers don't "bust the shoulder".....they do it, too. They just fix the grind and no one knows.


What I do when that happens in grinding is just flat lap/sand the tang on the busted side until it isn't busted anymore. Done slowly and with careful attention to where you apply the pressure on the tang, you can walk the little triangle of flat forward to match the other side.

The simplest way to do this without a grinder is to tape a piece of sandpaper on a flat surface, and move the knife over it. While a granite surface plate is great, a good flat countertop, or a sheet of plate glass will work fine. Put a little soapy water on the paper and place the blade on it. Move the blade back and forth a few strokes and lift it to look at where you are sanding. Move your fingers to adjust where you remove the metal. What you want to accomplish is to flat sand the tang and ricasso until it walks out onto the upper spine the same amount as the opposite side. It doesn't hurt to give the other side a few laps to make sure they match. Work slowly, and change the paper as needed. When you are about 80% there, start changing to finer paper. This should allow you to sneak up on a perfectly matched spine at 400 grit.
From there, just finish the blade as you would have done if nothing had happened, going up the grits in hand sanding to the desired final grit.

For those who have one, this is where a disc sander excels. It takes about ten seconds to fix this problem on one.


A very old Argentinian goldsmith once gave me this koan on getting everything finished up right, "No one should ever have to know how many mistakes you fixed ..... but everyone will know how many you didn't fix!"
 
What stacy said-- Though its not too often anymore. The worst scenario is to have to
take equal amounts off each side with a surface grinder thereby making the blade thinner.
When "it happens" on a folder its worse cause now you have to grind the blade and spring
together at which point its pretty much like starting over.
Ken.
 
And just to reiterate - a sheet of sandpaper taped on a flat surface is the original surface grinder . A bit slower, but just as accurate.
 
Charlie, get the DVD Flat Grinding with Harvey Dean. Some great info on how to flat grind from a Master Smith and even more important, how to fix small mistakes like this "busted shoulder" one. Probably the same as what was explained here but "mo better" if you are visual like me. ;)

Keep up the good work.
 
A very old Argentinian goldsmith once gave me this koan on getting everything finished up right, "No one should ever have to know how many mistakes you fixed ..... but everyone will know how many you didn't fix!"

I LOVE this quote! Thanks Stacy!

Patrice Lemée;11755407 said:
Charlie, get the DVD Flat Grinding with Harvey Dean. Some great info on how to flat grind from a Master Smith and even more important, how to fix small mistakes like this "busted shoulder" one.

Patrice, I'm definitely a visual learner so I will certainly be getting this DVD. Thanks for the suggestion!
 
And just to reiterate - a sheet of sandpaper taped on a flat surface is the original surface grinder . A bit slower, but just as accurate.

I've had good luck using a piece of corian counter top as the flat surface; The one I'm am currently using was a tear-out that a contractor friend saved for me. The best thing about it is it was zero cost to me and I find myself using it for many different jobs when a flat surface is necessary; and yes I have used it to fix the above mentioned grind problem just like Stacy says. It just takes time and a little muscle.

I know its not as good as a granite plate but the one I lucked into is flat enough to do a pretty good job at most flattening tasks. I most often find that i use it with wet/dry paper and I just let the surface tension of the water hold the paper in place. It takes a little getting used to, but you can get your bevels nice and flat and clean up your plunges at the same time.
 
Back
Top