Carbidizer DIY

Saw the vids & pics. Sah-weeeet! The color is awesome. Is it the gold/yellow around the 50v margin? You can return it to the return address on the box I shipped to you. If you don't still have it, I can PM the address.
Yeah about 50V. I found it easier to just slowly ramp up until im happy. I didnt watch it too closely.
 
I am pretty certain that this unit will be able to etch logos as well. If anyone is interested in that functionality please let me know and I will make a piece for it and test it out prior to posting the tutorial. Then this will cover anodizing carbidizing and logo etching with one unit that is far cheaper than any one of those separately.
 
Received the knife today. Function is twice as good & the lock stick is very minimal only when flicked very, very hard. The color is awesome. Pictures can not do it justice. The light reflects in certain areas & the color iridescence is great. From a dark banana yellow, to a goldish hue. Great job! :thumbsup::thumbsup::thumbsup:

Now, it's time for me to do some stone washing!
 
I am pretty certain that this unit will be able to etch logos as well. If anyone is interested in that functionality please let me know and I will make a piece for it and test it out prior to posting the tutorial. Then this will cover anodizing carbidizing and logo etching with one unit that is far cheaper than any one of those separately.

Sounds pretty interesting. I look forward to whatever you end up posting. Thanks for sharing with us.

Jeremy
 
Received the knife today. Function is twice as good & the lock stick is very minimal only when flicked very, very hard. The color is awesome. Pictures can not do it justice. The light reflects in certain areas & the color iridescence is great. From a dark banana yellow, to a goldish hue. Great job! :thumbsup::thumbsup::thumbsup:

Now, it's time for me to do some stone washing!
Awesome. Im glad you are happy with it. Thanks for sending it in.
 
Sounds pretty interesting. I look forward to whatever you end up posting. Thanks for sharing with us.

Jeremy
Thanks. I will post my tutorial soon. Work has ramped up lately but i want to get it out asap for people to use. The etching portion will likely come later to avoid more delays. I also have a slipjoint tutorial on here i need to update. Lots of projects on the go. Hopefully i will get both up by early next week.
 
I realize its been a long time since this thread has been updated and i just wanted to state that it is still my intention to make the tutorial. I have been very busy as of late. If anyone has questions before I can complete this just message me and I will help however I can. I have only used the unit once so far. I plan to start making my own framelocks soon so I should get way more use out of it. I want to see how it holds up and if any improvements are needed before I put it out.
 
I use a Dremel engraver and my personalizer etching machine set to "mark" use the clamp you would normally clamp on the blade, on the carbide bit. The "pad" lead goes on the blade. I found an alligator clip fits perfectly on the banana clip used on the carbon block etch pad.
 
OK, enough screwing around. Its time to get this tutorial done.

Shopping list
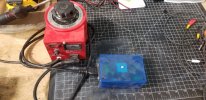
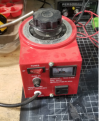
1) variac - This will likely cost about $50 or so on amazon. mine is 500VA which has been more than enough for both carbidizing and anodizing. If you don't know what this is its a device that plugs into a standard 120V plug and allows you to modify the AC voltage output via turning a dial. Its similar to an auto transformer, but that doesn't really matter. Its a simple device and is readily available. Here is a pic of mine.
upload_2019-11-9_21-26-38.png
If you plug a cord into the outlet on the machine whatever is on the other end will be exposed to whatever you set the output voltage to.

2) electronics - You will need to buy a bridge rectifier, a capacitor and 2 resistors. The resistors are 5w 15kohm resistors. They are wired in parallel to the output DC voltage from the bridge rectifier. They serve to slowly discharge the left over charge that is stored in the capacitor to prevent you from getting a nasty shock later on. The capacitor I used is rated at 200V 820 micro farads. Make sure it good for 200V. The DC output will be higher than 120V with the cap and if you exceed the rating it will explode. Trust me... The whole point of the capacitor is to smooth out the DC from the bridge rectifier. If you are like me, you will but a cheap rectifier and the DC voltage it outputs will be less than ideal. If this doesn't make sense don't worry, just trust me. The rectifier is what transforms the AC input voltage to DC which is required for carbidizing and anodizing. Expect to spend about $30 for all of this.

3) leads and terminals - you will need to buy some various leads, terminals plugs etc. That will become apparent later on in this tutorial. There are lots of options here so just use what's easily available

4) housing - You will want some sort of housing to encase the electronics. you can use whatever you want here. I used a cheap electronics box but if your on a shoestring budget you could use a Tupperware container.

5) Dremel engraver and tungsten carbide rotary burrs - the engraver is what allows for the transfer of carbide. The vibration continuously makes and breaks the electrical connection which allows for the transfer of carbide to the titanium. The carbide rotary burrs are a source of carbide. You can also use broken carbide bits and endmills but those never break so its likely you wont have any lying around...
 
Building the carbidizer

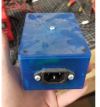
Here is a pic of the plug that brings the AC from the variac to the box. This is a standard plug and is easy to find. The cord for it is a standard 120V plug on the other end. Just cut a hole in your box and screw it in. You could hardwire this but I like this way better. It makes it easy to replace stuff down the road if need be.
upload_2019-11-9_21-46-48.png
Here is a pic of it plugged into the variac
20191109_205302.jpg
Mine is already built but yours will just be an empty box at this point
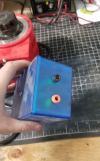
Here is a pic of the output terminals that will deliver DC voltage to your engraver. Again this could be hardwired but these accept banana plugs and are much nicer.
upload_2019-11-9_21-50-34.png
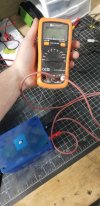
Now make a set of banana plug leads for your multimeter. this will allow you to monitor the output DC voltage. You cant trust the variac dial because the rectifier and capacitor modify the value. This isn't absolutely necessary but is nice. A cheap meter can be had for $40 or so online or at home depot.
20191109_205342.jpg
You will need to set your meter to DC voltage and plug the leads in accordingly. There is tons of info online if you are not following me here.
Now wire a set of banana leads in parallel with your meter. I use stackable plugs here so everything is disconnect able. If you must, use marettes. I then solder a set of alligator clips to each lead end. This is for connecting to your knife and to the Dremel.
upload_2019-11-9_21-57-6.png
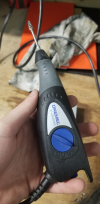
Here is the engraver you need. Its about $30. Leave it on the lowest setting at all times.
upload_2019-11-9_21-58-9.png
 
Wiring everything up

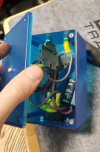
Here is a pic of my wiring. This likely wont help anyone but I will include a schematic to work off as well.
upload_2019-11-9_21-59-55.png
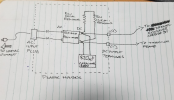
And here is a wiring schematic. You can make the electrical connections however you like. Crimps, solder, marettes etc. Note: capacitors are polarity sensitive, measure the output of your rectifier before wiring so you know what terminal is positive and what is negative. If you get this backwards your capacitor will explode. Again, trust me on this... Mark your output terminals as positive and negative so you know whats what down the road.
upload_2019-11-9_22-2-50.png
 
Using the carbidizer

When using the carbidizer connect the negative lead to your knife and the positive to the carbide in your engraver. Set the engraver to the lowest settings and adjust your DC output voltage to 40V. I like to mount the knife in a vise with micarta jaws. This is important as it electrically isolates the knife from the vise so you can rest your hands on the vise safely. Use a paint stick to separate the lockbar from the frame. It is often the case that you need to carbidize twice. Once after the initial break in. During the break in use sharpie on the lockface. As soon as the two faces mesh this will no longer be needed. open and close the knife 50 or so times to break in. Some can be stubborn but just keep carbidizing and breaking in. Here is a video of how I do it. Hopefully this helps.

https://www.instagram.com/p/B4qrCBOj_PS/

When I am better at anodizing I will add that here as well. This unit works great for anodizing so far. I imagine it will also electro etch logos but I have yet to test it.
 
Thanks man! How do you use it to anodize also?
Negative to a titanium plate in your electrolyte and positive to the scale, clip etc. Start at 0v on the variac and slowly ramp up until you see a color you like. Its important to use multietch first and run it hot. I double boil it at about 180f or so. Hotter is better at 140f it does nothing. The difference it makes is crazy.
 
Back
Top