Carved handle concept!

Joined
Oct 27, 2005
Messages
2,527
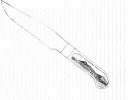
I'm going to be trying some handle carving. The carving will be full relief carving. I've begun to talk to some exceptional wood carvers in my area to learn the art of carving. I'm attaching my concept drawing for my mountain bowie. I'm probably going to use pink ivory for the handle on this one and some of the 5160 I purchased on the for sale page for the blade. I'm thinking that I'll clay harden it to try and get a nice hamon.

The mountain scene will be fully three dimensional, with the sky created by completely removing the pink ivory so that you can see through the handle.

The tang will be a frame around the handle, so that it appears to be a full tang knife. It essentially will be full tang, however, all of the material in the center will be removed, to allow me to carve the scene in the center.

I'm debating whether to have the frame of the tang split, to allow me to use a one piece handle that is slid up between the top and bottom of the tang, with the end piece added afterwards. I'm going to have small pins going around the outside of the handle shape to pin the wood to the tang.

What do you think of my idea?
 

Attachments

  • carved knife 4rev.jpg
    carved knife 4rev.jpg
    39.5 KB · Views: 436
Actually, you're my inspiration to finally try this. I've been thinking about trying carving for some time now, but needed a push. However, I'm way to chicken to try to do it in metal as you do. I also figured that if I had the thickness of the handle material to work with, I could get more depth to the carving. It will be interesting to see how it turns out, I would think.
 
I think from a practical standpoint both for making [especially as a beginner] and using , low relief would be a better choice than high relief.If you know the techniques ,low relief will give you plenty of depth .If you look at guns engraved with German type engraving of the low relief style or check a book like my old " Whittling and Woodcarving" by Tangerman there are lots of good examples of what can be done with low relief. Even if you want to cut all the way through remember that you only have a total thickness of about 3/4" in the handle ! I haven't carved anything like 'pink ivory' [plastic] I've used hard maple as my favorite.
 
Actually, you're my inspiration to finally try this. I've been thinking about trying carving for some time now, but needed a push. However, I'm way to chicken to try to do it in metal as you do. I also figured that if I had the thickness of the handle material to work with, I could get more depth to the carving. It will be interesting to see how it turns out, I would think.

Scott i have carved antler and wood that's why i wanted to try steel it does not split and crack;). What ever you decide on just take your time and do your best and if at first you do not succeed send it to me:D

Bob
 
Scott i have carved antler and wood that's why i wanted to try steel it does not split and crack;). What ever you decide on just take your time and do your best and if at first you do not succeed send it to me:D

Bob

If I can pull it off, I might just use this style for my 2008 Christmas gift knife. Now all you need is for my wife to pull your name, and I'll send it to you!
 
I think from a practical standpoint both for making [especially as a beginner] and using , low relief would be a better choice than high relief.If you know the techniques ,low relief will give you plenty of depth .If you look at guns engraved with German type engraving of the low relief style or check a book like my old " Whittling and Woodcarving" by Tangerman there are lots of good examples of what can be done with low relief. Even if you want to cut all the way through remember that you only have a total thickness of about 3/4" in the handle ! I haven't carved anything like 'pink ivory' [plastic] I've used hard maple as my favorite.

A lot of people are doing the low relief carving, and I want to be different. My wife says that I'm already different, but I'd rather be different in a positive way. Not too many are doing high relief carving, with Arpad Bojtos being one that I can think of that does, off the top of my head. I have no illusions of becoming a great carver, in the manner that Arpad is, but I do want to create a style that is all my own.

I do some drawing and oil painting, and have a good eye for landscapes which is why I've chosen that type of subject matter to begin with.

I will definitely check out the reading material that you've suggested and appreciate the assistance.
 
Scott, I think if I were doing this ,I would cut two pieces of wood with a raised area exactly fitting the cutout in the handle.With careful sanding they will meet exactly in the center.Make them extend beyond the tang edges, so you can sand them right up to the tang frame. Once glued together and sanded up to the tang it will look and work like one solid piece of wood. The tiny line on the mountain ridge (The only place where the joint will be visible) will be nearly invisible. To make the pins really look neat, drill 1/8" holes in the tang frame for the pins. Glue one scale to the frame ( remove any glue that gets in the center area). Drill 3/32 holes through the scale from the tang side. Glue the other scale on, gluing the centers together at this time. Drill the second scale from the holes in the first scale. Sand the edges flush with the tang. Put in 3/32 pins of whatever metal you wish. Sand the handle to the shape desired (leave a little to sand after the carving). Carve the scene. Sand and polish. With pink ivory you should be able to use bristle brushes and small muslin wheels to get a wonderful shine in the details.
Keep us posted as it progresses.
Stacy

Stacy,
I had thought about the option of putting the handle together in two pieces. What concerns me is my ability to make the center piece fit the hole precisely. Although, if I keep the carving away from the joint between the pink ivory and the tang frame, I guess it becomes a "non-issue".

My carving contacts are concerned that the knife will not be very user-friendly for someone taking it hunting or camping. I explained that very few people that would spend the money on this kind of detailed work would never take this knife into the field or use it anyhow. I will make the knife to the same exacting standards that I do for my "working" knives, as far as edge geometry, heat treat and functionality. It would probably put blisters on a users hands if they actually used it in the field, but I'm not trying to create a using knife. I'm trying to expand myself and create a work of art that could be used if the need ever did arise.

They were much more comfortable with the design after hearing this description of the knives uses, etc.

I think I'll follow your suggestion and do the handle in two pieces, instead of the tang. It will have a cleaner look, especially if I take the time to make the fit of the two halves as perfect as I can get it.

Thanks for all the help so far gentlemen!

Anyone else have any suggestions?
 
I went to a local carving club meeting and met some really nice people and got lots of advice. I bought a small set of carving knives and some basswood to practice on.

I STINK!!

I'm just too stubborn to give up. I'm heading off to the bookstores to find some instructional books on how to carve. I'm going to figure this out one way or the other!

I did learn something though. As with knifemaking, don't work with dangerous tools (in this instance, carving knives), when you're tired and frustrated. I pride myself on proper knife use and never cutting towards myself. However, I was tired and frustrated and determined. Long story short is that I did pull a cut towards myself and felt the tip of the razor sharp carving knife poke me in the chest. It was right at my heart. It didn't even draw blood, but did contact my skin with just the very tip. It was enough that I felt it and got a huge adrenaline rush.

My wife has a wireless doorbell in my shop with button up in her office, in case she needs me. She got tired of having to always come outside to get me when the phone rang for me, or she needed help with something. She only uses the doorbell once a week or so, but it saves her lots of steps. We now have two of those doorbells. I have my own that rings in her office, in case I do something stupid.
 
I'm sure you will figure it out in time! And with that handle concept the product should be nothing short of beautiful!
 
Scott,

Ever tried a Turbo Carver? It may help with the finer details. Like drawing with a pencil... i have one if you wanted to try it.

Chuck
 
Scott,
You should get a book on power carving. The type of work you are considering is best done that way. It is much easier than knife carving. About 95% of my carving work is done with rotary power equipment. The octopus that I did back in 1990 ( 4th place in an international competition) was completely carved with a Fordham flexshaft.

If you want to get some practice on the pierced scenery look, try carving the same design in a larger format first. Use a Moose palm (I have plenty if you want one) and do the mountain scene. Once you have done that one, do the knife. If both come out good,use the moose palm as a display stand for the knife.
Stacy
 
Thanks for the encouragement everyone. My wife said that my first one is better than I'm giving myself credit for. It's a mountain range scene in basswood. I do drawing and oil painting from time to time, and I've had a little trouble with going from two dimensional thinking to three dimensional thinking.

Stacy,
I went to three of the large bookstores and couldn't find a book on power carving. I've been using my dremel, and it seems to be working okay.

It's just me. It's just going to take some practice and stubborness, which I've been told I have plenty of the stubborness. I'll get it. Eventually.

Thanks for the words of encouragement.
 
Scott,

Ever tried a Turbo Carver? It may help with the finer details. Like drawing with a pencil... i have one if you wanted to try it.

Chuck

I don't want to try that yet. I know it will make it easier on me, but if I learn to do it the hard way first (like hand filing the bevels of a knife, instead of grinding them) I'll have a skill that I can use for many different knife ideas.

Thanks for the offer. Maybe down the road.
 
Scott, I probably have a dozen carving books. Do you want to borrow some? I'd be glad to send them to you on loan.
Stacy
 
Scott, I probably have a dozen carving books. Do you want to borrow some? I'd be glad to send them to you on loan.
Stacy

Stacy,
Now that is a very generous offer! I gladly accept. My shipping address is:

18111 NE 33rd Street
Vancouver, WA 98682

I'm a voratious (<<<spelling?) reader, so it won't take me long to read through them.

Thank you very much Sir.
 
You will have to be really careful with that thin section of wood near the spine. Wood moves alot with changes in moisture. A thin part like that is likely to warp all over with nothing to hold it in place. Not a big deal except that the steel underneath will remain in the same spot :grumpy: You might try inlaying a contrasting wood from the back of your scales and carving through to that instead of all the way through the handle.

Or you could stick a couple of really small pins through it to hold it still:D

I think you'll actually have an easier time carving the pink ivory than the basswood. It is a lot harder which forces you to go slower. Slow is good when it comes to not screwing up:D

Take your time and enjoy the ride. That will be a keeper for sure.
Don't forget to post pictures.


Actually, I've thought about something similar to this, but like your idea quite a lot too. I thought about putting some ebony in the middle and carving it first (before putting it in the middle, and then doing the majority of the carving on the two pink ivory pieces before attaching them...and then only doing the final finishing carving on the pink ivory after they are attached.

But, I like your idea. It would be a lot easier to carve a narrower piece, like the quarter inch one in the middle and then create windows in the pink ivory to accent the dark material underneath.

Thanks!!
 
Back
Top