-
The BladeForums.com 2024 Traditional Knife is available! Price is $250 ea (shipped within CONUS).
Order here: https://www.bladeforums.com/help/2024-traditional/ -
America has reached 250 years, and I am grateful to be here, in the best country in the world. Thank every one of you who helps make this country a better place, those who have gone before and risked it all, and those who've paid the ultimate price to make the United States what we are today.
Happy Birthday America! Let Freedom Ring for all time!
You are using an out of date browser. It may not display this or other websites correctly.
You should upgrade or use an alternative browser.
You should upgrade or use an alternative browser.
check out these power hammer plans
- Thread starter Will52100
- Start date
- Joined
- Dec 4, 2001
- Messages
- 3,824
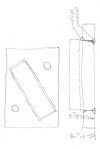
Here's a rough sketch of what I'm thinking of for dies. I figure on a 1/2" die plate, milled out for the die and beveled and welded top and bottom, with two 1/2" grade 8 bolts for atachment tapped directly to hammer head and anvil. Posibly needs a couple of locator pins. Bottom of die plate and mating surface of anvil and hammer will be surface ground for as flat as posible contact. I figure the dies should be about 2" wide by 4" long and about 1 1/2" sticking above die block. Sound good or do I need to change die size and holder set-up?
- Joined
- Jan 10, 2005
- Messages
- 655
Adjustment is basically just in the pitman arm for die clearance, and ram guides to adjust angle of impact, the brake is also adjustable, as is the clutch (slack belt) but the main power adjustment on the simple champion is the pittman arm.
I hope everything works out great for you!
I hope everything works out great for you!
- Joined
- Dec 4, 2001
- Messages
- 3,824
Thanks, I hope so too. It'll be awhile before I can even started gathering materials, so I'm trying to get everything figured out as much as posible. After talking with the Guru over on anvilfire the spring set-up is starting to look a lot better. Bassicly he's sugesting that the arms need to be shorter. I'm starting to think I'd be better off just taking out a loan and buying an air hammer! Nope, can't justify the cost, more's the pity.
I just wish there was a reasonable hammer out there for part timers like me. Even a well designed set of plans would be awsome.
I found a complete set of plans for a shop built 50#, but the toggle arms upper link pin only has 3/16 metal around it. That's asking for trouble to my way of looking at things, and that's without a bushing. I supose I could weld it up thicker, but...
Nope, can't justify the cost, more's the pity.I just wish there was a reasonable hammer out there for part timers like me. Even a well designed set of plans would be awsome.
I found a complete set of plans for a shop built 50#, but the toggle arms upper link pin only has 3/16 metal around it. That's asking for trouble to my way of looking at things, and that's without a bushing. I supose I could weld it up thicker, but...
And just to make it a bit more confusing Hans Peot has written a book on building an LG clone. He has written out very detailed plans according to the blurbs.
You can find it here http://www.piehtoolco.com/
You can find it here http://www.piehtoolco.com/
- Joined
- Jan 10, 2005
- Messages
- 655
I missed getting another champion 65# hammer on Ebay the other day while I was out of town, I was borrowing a friends lap-top at an internet cafe, and their connection went down, missed it by 2 minutes, it sold for $420! I wanted to cry. My hammer's been broken since about a week before my first heart attack last fall.
Jock over at Anvilfire knows his stuff about power hammers.
That does sound kind of thin at the link pin, That's the other thing about the toggle arm linkage, it's more likely to get out of whack, and more complicated to build!
Let me know if you want me to measure my springs, I've got the hammer apart right now to install a sow-block, since the casting broke.
Keep your eyes peeled, you never know when you'll run across a good deal!
Good luck,
Tony
- Joined
- Dec 4, 2001
- Messages
- 3,824
Thanks Tony, I'll stick with the toggle action for now. I may build a 100 pounder in the future if this works and may give the spring pack a try. But I've spent a lot of time learning the principles behind the toggle link and have finaly began to understand it. Also I've about settled on a design, a basic tire hammer, 50 pounder for the first one. Any future ones will depend on how this one works out. It's pretty much Ray Clontz design, and very simple, looks to be pretty easy to build and cheap on materials. Now if I can just find the mini centerlinks he's using for the toggle conectors that'd save me a lot of machining.
The Piet(spelling?) hammer uses 1" thick flat bar for the upper link arms and it's got a 5/8" hole through it. It's 1 1/4" wide at the link, but only 3/16" thick scares me. Also looks like a lot of unnesisary machining and grinding. Informative read though. He even shows how to build a maple block clutch for it.
The Piet(spelling?) hammer uses 1" thick flat bar for the upper link arms and it's got a 5/8" hole through it. It's 1 1/4" wide at the link, but only 3/16" thick scares me. Also looks like a lot of unnesisary machining and grinding. Informative read though. He even shows how to build a maple block clutch for it.
