converting a splitter

Joined
Dec 24, 2005
Messages
1,254
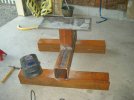
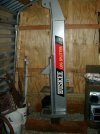
After using IG's big bertha again I decided that I needed a press badly but I don't have real power in my smithy (the buried extension cord doesn't count). I went out today and bought a 12hp 35 ton log splitter from TSC that I plan to convert into a press. My plan is to separate the splitter/press from the trailer that it is mounted on. I will use longer hydraulic hoses (7' long) to get the motor out of the shop so I don't have to put up with the noise and to make it take up less space. Then I will build a 2'6" high base to mount the splitter/press onto, This will put the working area at a good height for me. I will then weld on die holders made of 1/2"-3/4" plate..
I have a question about the new hoses though, The new hoses don't have any fluid in them. Should I have the ram extended before I switch the hoses so that when I retract the ram it will purge the air from the hose back into the tank? Are there any problems that I should know about before getting started on this conversion?
If anyone has some pic's of their conversion I would love to see them.. Thanks alot guy's.:thumbup:
 
Last edited:
Normally the fluid will circulate through the hoses. If air gets into them no big deal it will be pushed out when you energize the system, either direction. It will just take a couple of cycles to get all the air out.

You are going to love having a press. Have fun
 
Make the die holders from 1" steel, and the die plates from 3/4 to 1" steel. You want solid mass in the dies. For drawing dies, cut round stock in half and weld the matching pieces on the die plate. For ladder pattern dies weld a row of 1/4" round rods across the die plate. Don't make any die ( except a flattening die) surface wider than 2" wide. The die plates can be any size, but I like them about 6X4". Make a hot cut die, a couple sets of different diameter drawing dies,flattening dies,patterning dies,and one combo die that has a drawing and a flattening area ( 2" of the die face is rounded and 2" is flat).

Unless the frame and ram you have are massive, don't work any metal much out of the ram force center area.Side loads are a killer on rams. Things bend easily at 20+ tons of force. set the press up for the ram to be as far in the cylinder as possible when working the metal. About 6-8" total travel is all you will need for a forging press, unless you are going to work big stacks of damascus billets. Of course this travel is the total distance with the thickest die in place ( That mistake has been made...trust me). All welds should be very strong. If you aren't up to it, tack weld everything up and then remove the cylinder. Take the assembly to a welding shop and have them weld it all up for about $100-150. It will be worth it . Poor welds look like good welds until 20 tons of force get on them....thats where they separate ( bad pun) the good from the bad. This is one of those places where the welding machine settings, and rod selection really matter.

When setting up the die mounting plates,tack weld the base plate in place as square to the ram as you can make it. Then put the ram base plate in place and load the ram. When all is lined up under pressure, weld up the two mounting plates. COVER THE RAM WITH A SHIELD BLANKET TO AVOID WELD SPATTER FROM GALLING THE RAM !!!.

You will most likely have to add stiffener bars to the frame of the chassis, unless you plan on building a complete new mount for the ram. Go HEAVY, like I said....things like to bend at high force. Replacing the hoses with longer hoses, and building a motor/pump shed outside works well. Replace the hoses with metal clad hoses, and run them so they are shielded from hot slag and dropped or carelessly moved billets of 2500 degree steel. Trust me, you don't want a high pressure line to burn through in a mishaps with a billet. Metal shields are a smart part of the design of your press.
Stacy
 
Last edited:
Really looking to see how this comes out. Every time i see a splitter on craigslist I think of getting it to make a press.
 
The build begins today.. Stacy, thanks for the advice !! I will take pic's of the progress.
 
Here is an update on the conversion. The base is done, 6"x6" tube steel with a 1/2" mounting plate on top. The die holders are 3/4" plate. Still a lot of welding and braces to attach to the die holders but you get the idea. The beam is not in it's final location yet( I can't pick it up high enough :(
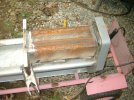
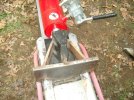
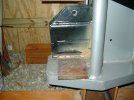
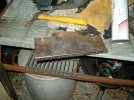
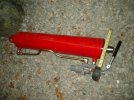
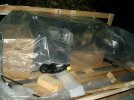
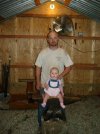
) I still have to mount the ram anyway..As you can see the ram is 5 1/2" and quite beefy.. The 12.5 hp motor and hydraulic unit are still in the crate.. I picked up some longer hoses so that the motor will be on the other side of the plywood wall, I hope that will keep the noise tolerable. Kaitlyn came out to help for a while :D. I will post more pic's as the press comes together..
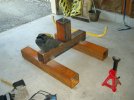
 

Attachments

  • press 001.jpg
    press 001.jpg
    54.4 KB · Views: 101
  • press 002.jpg
    press 002.jpg
    49.4 KB · Views: 80
  • press 007.jpg
    press 007.jpg
    40.8 KB · Views: 112
  • press 008.jpg
    press 008.jpg
    49.9 KB · Views: 110
  • press 009.jpg
    press 009.jpg
    64 KB · Views: 100
more pic's.
 

Attachments

  • press 011.jpg
    press 011.jpg
    73.8 KB · Views: 75
  • press 012.jpg
    press 012.jpg
    57 KB · Views: 78
  • press 003.jpg
    press 003.jpg
    43 KB · Views: 236
You are my hero Louis :D I am in the same situation with the power to the shop.My answer lies in my old riding lawnmower and some "spare"beams.Frankenpress!!!
Good luck with the build.
 
Man, now that's talent forging out a small child like that!
attachment.php
 
Eric, it can only be done on a 300lb Trenton anvil while wearing a tin foil hat (which must cover your ears by the way). No work on the press tonight :( I had to get a massage :o.
 
Will,
Ever one knows.....After you've pounded away for about an hour ,you let it soak in the oven for nine months. If done right you end up with a really sharp baby.
Stacy
 
Will,
Ever one knows.....After you've pounded away for about an hour ,you let it soak in the oven for nine months. If done right you end up with a really sharp baby.
Stacy

Good one Stacy! Got me chuckling, and at 5AM (HST) that's not easy. Got to remember though, there's a very complex series of heat treat practices that take between 18 to 21 years to complete.
 
Will,
Ever one knows.....After you've pounded away for about an hour ,you let it soak in the oven for nine months. If done right you end up with a really sharp baby.
Stacy

Stacy, in your case you just pound it for about 30 seconds.:jerkit::eek:HEHEHEHEHEHE!!!
 
Dang, you've been talkin' to my wife again!:eek:

But I'm just hammering for fun now, so I don't have to put as much time into it, :), since it won't need any further treatment.
Stacy
 
Well I have the press up and running!! I already made a few sets of dies for it and I still have a few sets to make. I still have to work some bugs out with the alignment of the dies. I tested it out on a RR spike and it worked great !!!!! Here are some pic's...
 

Attachments

  • press 013.jpg
    press 013.jpg
    76.5 KB · Views: 56
  • press 014.jpg
    press 014.jpg
    90.7 KB · Views: 66
Back
Top